Skins (156)
Visuals (115)
Input Plugins (34)
Output Plugins (6)
General Plugins (14)
Archive Readers (15)
Input Plugins (41)
DSP Plugins (10)
External Add-ons (16)
XMPlay Archive (71)
Skins (156)
Visuals (115)
Input Plugins (34)
Output Plugins (6)
General Plugins (14)
Archive Readers (15)
Input Plugins (41)
DSP Plugins (10)
External Add-ons (16)
XMPlay Archive (71)
Welcome to the XMPlay Illustrated Manual! This is an attempt to document the many features XMPlay has. If you have a question, please do a search first. If you can't find the answer, join the forum to ask other users.
Note that there's also a Quick start.
The Illustrated Manual is also available as a PDF file (by Jimmy Neutron) and as a standalone executable (by nothingness).
XMPlay is a high-quality, free audio player for Windows. The very first version was written by Ian Luck of Un4seen Developments in 1998 in his free time. His aim was to create a tiny program that played XM-files just like FastTracker2, but without the whole module editor in it. Since then, he added more and more function to the player, and he is still actively developing it. The playback of XM-files is still most accurate to FastTracker2, including all features and quirks. IT playback also supports all effects/NNA/DCA/filters/DMO effects and stereo samples. Despite all the new features, XMPlay is still small, fast and beautiful.
XMPlay's audio engine is very similar to BASS, the audio library of Un4seen Developments. XMPlay is closed source, and will probably not go open-source in the near future. A plugin API is available, so developers can create their own input plugins or DSP plugins.
If you have a problem with XMPlay, be it a bug or a question how to perform a specific action, head to the forum to communicate to other XMPlay users. Ian regularly checks all bug reports and tries to resolve them, especially when it comes to XM and IT playback. He also adds minor features to the latest beta version on user request (if it's a useful feature, obviously).
Get it here. Save the ZIP-file somewhere on your computer and unpack the contents to a folder of your preference. In the download you will find:
XMPlay can load the plugins, visualizations and skins from the same folder or from a subfolder, so it can look like this:
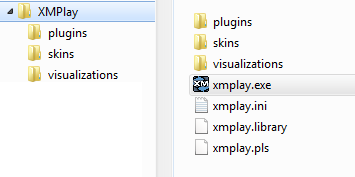
xmplay.ini (the settings file), xmplay.library (the library file) and xmplay.pls (the current playlist file) are created when you start XMPlay. XMPlay is commonly put in C:\Program Files\XMPlay (or C:\Program Files (x86)\XMPlay on 64-bit systems), but that's not mandatory. If you'd like to run XMPlay from your portable drive, read more in XMPlay on a portable device.
Most plugins can be found on the XMPlay page of Un4seen Developments and on this Support Site. Download the ZIP-files and add the DLL-files to the plugins directory. Note that XMPlay needs to be restarted to find new plugins.
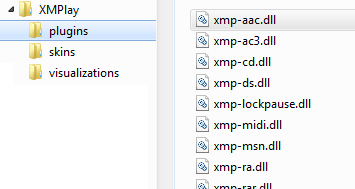
Configuration of the plugins is handled on the Plugins page of Options and stuff. Note that xmp-wma uses the Windows Media Format modules which are installed with Windows Media Player (you can get them separately from the XMPlay page at Un4seen Developments). XMPlay also supports most Winamp input plugins. Some installers for Winamp plugins look for the Winamp executable specifically. A workaround is to create an empty text file in a folder, rename the file to winamp.exe and point the installer to the folder.
Most skins can be found on XMPlay page of Un4seen Developments and all of them on this Support Site. Add the XMPSKIN-files to the skins directory. Note that XMPlay needs to be restarted to find the new skins.
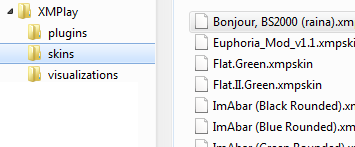
If you'd like to modify a skin, you can get most of the sources from this Support Site. For more information about skinning, refer to the Skinning tutorial.
XMPlay uses Sonique visuals. You can find a nice collection at this Support Site. Add the SVP-files to the visualizations directory and restart XMPlay.
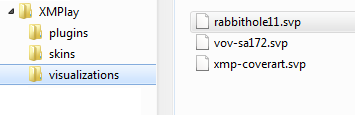
Since Sonique development ceased to exist years ago, new visuals are created only sporadically. For those interested, the visuals API is available on the forum. Via xmp-wavis, XMPlay is also able to use Winamp visualizations in a separate window.
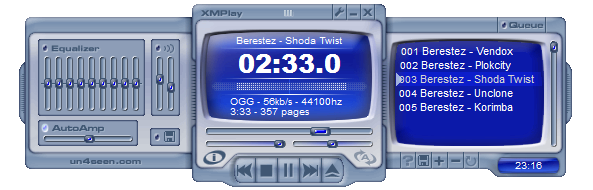
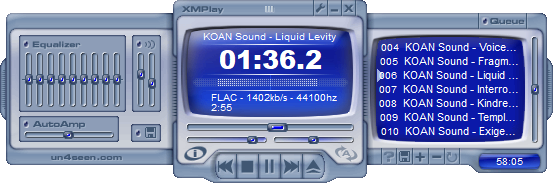
The title area shows the title of the current track, the elapsed time, a volume bar and information about the format of the track. Clicking on the time display will make it switch to the remaining track time. If you're playing modules, clicking the time display again will make it go to order postion (with the active channel count on the left and the beats per minute (BPM) and speed on the right). The Playlist panel and the DSP panel can slide out by dragging their handles, or by double-clicking on the handles.
Playback buttons and sliders
At the center bottom of the Main Window, you can find the regular buttons. From left to right: previous, stop, play/pause, next and open file. Above these buttons are three sliders; lower left is the volume slider, lower right the balance slider and the big one above them is the position slider. If you're playing a file over the network, the shading of the position slider will indicate how much XMPlay has downloaded of the file. The volume can be changed with the slider, but also by using the mouse scrollwheel over an unused area.
Left-clicking the buttons and sliders makes them do what you'd expect, like going to the next or previous track, pausing or stopping playback or changing the volume. Clicking the Stop button twice will unload the track. Right-clicking them brings up a context menu or does something special. Right-clicking the next or previous buttons makes XMPlay jump to the next subsong of the current track (for example, in modules or in tracks with a CUE-sheet). The stop button brings up a context menu where you can stop the playback after the current track. The play/pause button has XMPlay play a different, randomly chosen track from the playlist. Right-clicking the open file button brings up the Open folder dialog, which lets you add all the files in a folder (and optionally its subfolders) to the playlist. The right-clicking applies to the sliders as well: you can mute the volume, reset the balance slider and Set or Resume a bookmark position by right-clicking the three sliders. The bookmark is to temporarily save a single position in the current file, for example if you quickly want to preview a different file; if you Resume the bookmark, XMPlay will continue playing exactly there again. The bookmark position is lost when you close XMPlay.
Other buttons
On the top right of the Main Window are three buttons. The first one, depicting a wrench, opens up Options and stuff. The second one minimizes XMPlay to the taskbar, or to the system tray if you right-click it. The third one is the Close button, which shuts down XMPlay. Right-clicking the Close button gives you more options, so you can close XMPlay automatically at the end of the current track or at the end of the playlist. Or, a really nice one, Close with position saved, so XMPlay continues playback from the current position when you start it again.
Near the playback buttons are two additional buttons. The left one (i) opens the Info Window, right-clicking it allows you to jump to a certain page of the Info Window, like the Extended Playlist or the Library. The right one (A) controls track looping by cycling through the different loop modes (see the Miscellaneous page of Options and stuff).
By double-clicking on an unused section of the Main Window, for example on the big bar at the top, the Main Window switches to Mini mode. Double-clicking it again will make it go back to normal.

By default, the Mini mode is display on top of other windows, a setting which can be changed in Options and stuff. The Mini mode contains the most essential buttons and displays, so you can keep XMPlay visible all the time without sacrificing too much of your screen real estate. At the top right are again the buttons for Options and stuff, minimizing and closing XMPlay. The display in the middle shows the title and a volume bar. Right below it are the position slider (left) and volume slider (right). The bottom row, from left to right, has a button to open the Info Window, previous, stop, play/pause and next playback control, an Open files button, a time display and a loop button. All buttons behave the same as in the normal Main Window, including the context menus and right-click actions.
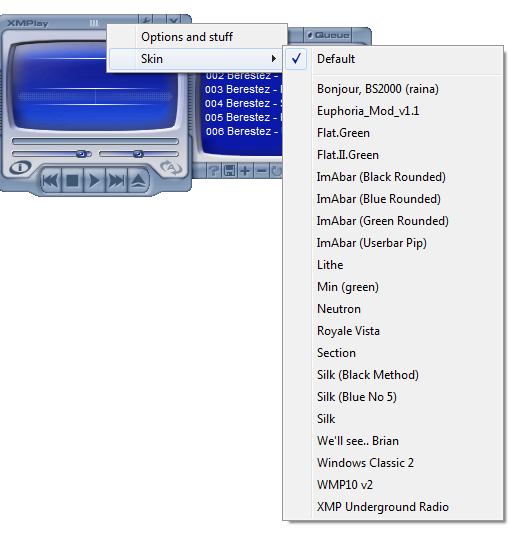
You can get various skins from the Skin section of the Support site). Switching between skins can be done via the Appearance page of Options and stuff, or by right-clicking an unused section of the Main Window and selecting the Skin submenu.
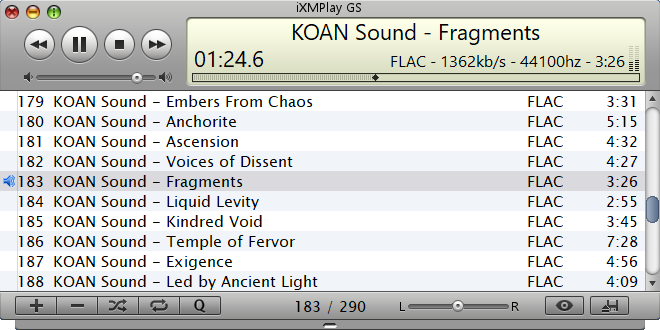
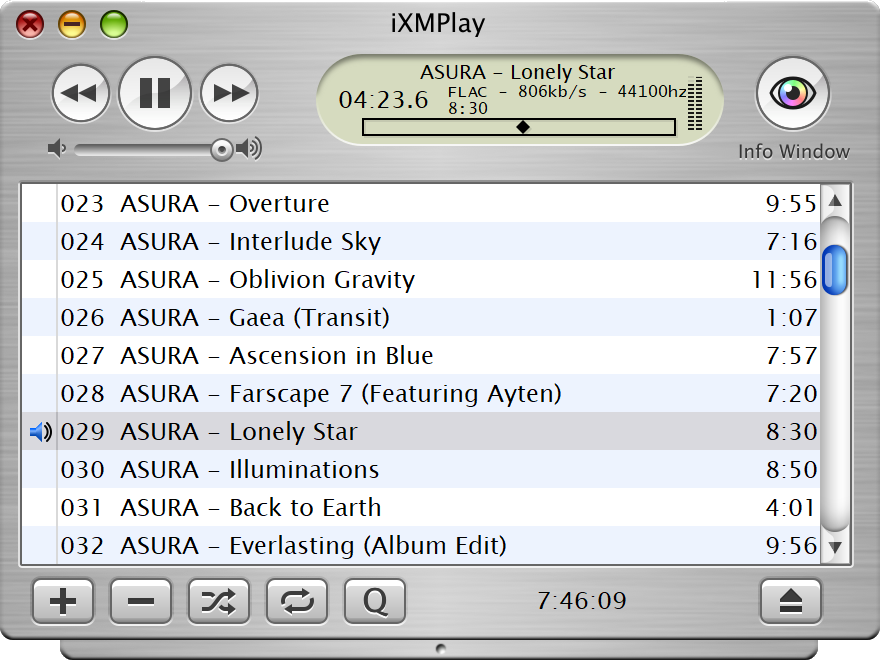
A different skin brings different button styles and placements. This manual won't point out where all the buttons are in each skin, but most of the time the buttons are quite obvious. Note that not every skin includes all buttons and fields, since none of the buttons are mandatory. If you're unsure about what the button represents, just hover over it and wait for the tooltip to appear.

Some examples of what the Main Window looks like with other skins:

 [L1].png)
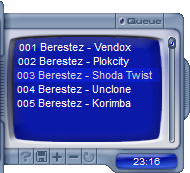
The Playlist panel contains a small view of the playlist. Note that you can create a different title formatting if you like (see the Titles page of Options and stuff). Left-clicking on an entry will select it (select multiple entries using Shift or Ctrl, like in Explorer), double-clicking will play it and middle-clicking will queue the entry. Hovering over an entry will bring up a popup bubble with the title and the location of the track. If a file isn't playable, it'll have a single red line through it. A double red line means XMPlay couldn't find the file. The playlist supports drag-and-dropping, both for files and folders coming in (just drop them on the playlist) and for files going out (hold down both mouse buttons, first left, then right). If you drop files on XMPlay outside the playlist (for example on the Main Window, or on the tray icon), the playlist will be cleared and the dropped files will be added. You can invert this behaviour by holding down the Shift key when dropping files.
Buttons
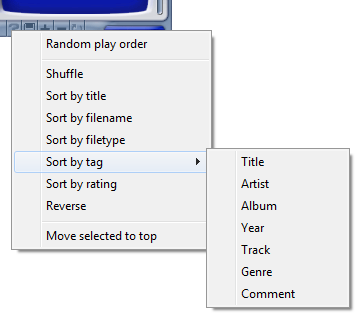
On the top is a large button to show the Queue. On the right is a scroller to scroll through the playlist. Right-clicking the scroller will jump the playlist view to the current track. On the bottom right is a timefield, which displays the total time of the entries in the playlist or the total time of the entries you've selected. Click it to have it show the number of tracks in the playlist. The buttons on the bottom all have their own functions. The first button on the left (?) switches random mode on or off, so XMPlay chooses the next track randomly. Right-clicking it brings up sorting options, like sort by filetype, rating or artist tag. The sorting applies to the tracks you've selected, or to the complete playlist.
The next button allows you to save the playlist to a file (PLS or M3U), so you can easily load all the tracks again. The next two buttons, + and -, add or remove entries from the playlist. Adding tracks brings up a similar dialog as when opening tracks. Right-clicking the add button brings up the Add folder dialog, right-clicking the remove button allows you to choose which entries to remove, for example all dead tracks, or to clear the queue. The last button toggles list looping (note that this is not the same as track looping, described earlier), its context menu gives you some more options regarding list advancing.
The DSP panel contains the most common sound-processing functions.
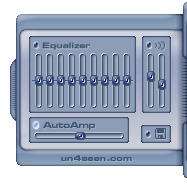
On the top left is the Equalizer, click the title to switch it on. You can adjust the different bands, or reset them by right-clicking them. Right-clicking the title allows you to load various presets. On the top right is Reverb, which simulates a large chamber in which your music is played. You can adjust the reverb time and reverb level to tune it to your liking. On the bottom left is the Auto-amp slider, which control the level of decoding audio (read more about it on the DSP page of Options and stuff). On the bottom right is a switch to Automatically load saved settings, which concerns the Saved Settings in Options and stuff. Right-clicking the button allows you to directly load a setting saved as a preset.

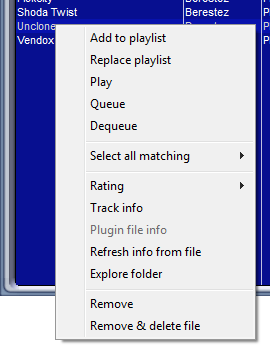
Play obviously plays the file. Write to disk applies to network streams only, and writes the original stream data to disk (very nice if you'd like to record an online radio show). If the stream contains title updates, you can choose to write an additional CUE file containing the titles, or to split the audio file into separate tracks with the titles as filenames. (Note that the title updates are not perfectly positioned in respect to the music, that's inherent to streaming. This means the track split may occur some seconds too early or too late.) Queue and Dequeue add or remove a file to or from the queue. Queueing a file will make sure it is the next file to be played, even if XMPlay is in random mode. Skip tells XMPlay not to play this track unless you double-click on it, and the entry will be grayed out in the playlist. Add to library simply adds the selected file(s) to the library. Locate in library selects all files in the library with for example the same artist or from the same album. (Read more about the library on the Library page). Rating gives you the ability to set a rating to a file, which makes finding your favourite tracks easier. Track Info opens a window with the tag information XMPlay has about a track.
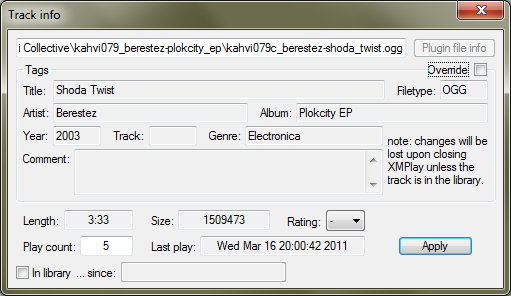
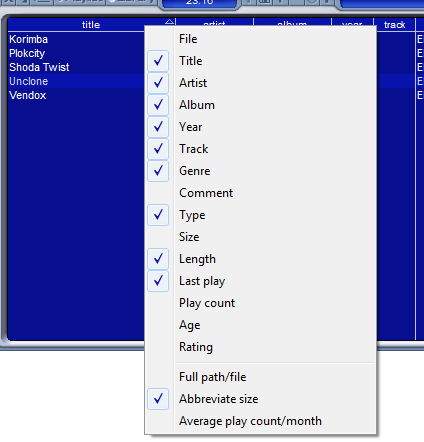
You can override the tags without changing the file by ticking Override. If the file is not in the library, XMPlay will forget the changes you made when it is closed. Going back to the context menu, Plugin file info opens the file info window of the input plugin used for this file, or of the tag writing plugin if applicable. Refresh info from file re-reads the tags of the file and rebuilds the formatted title. Explore folder opens the directory the file is in in Explorer. Remove removes the file from the playlist, Remove & delete file also deletes the file from the harddisk (to the Recycle Bin). Finally, Display columns actually applies to the playlist, not to the selected track, and allows you to select which colums should be shown (entry number, filetype, length and rating are available). The title of the track is always visible.
Next page: Opening files and folders
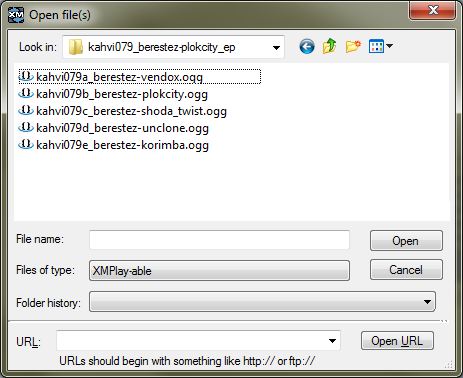
This dialog is very similar to the regular Open file dialog you see in Windows. At the top, you can use the dropdown list to select a directory. In the file view, you can select one or more files (using Shift or Ctrl) you want XMPlay to open. If you only want to see a particular filetype, use the Filetype dropdown box. The Folder history dropdown box allows you to quickly navigate to a recently used folder. The lowest part of the dialog allows you to open URLs to online streams or to their playlists. Links to podcasts can be used here as well. The history of the boxes can be cleaned via the Miscellaneous page of Options and stuff.
The audio tracks of a Mixed Mode CD can be played by loading the whole drive in the Open directory dialog.
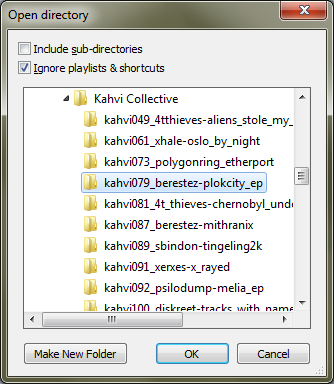
If you right-click the Open file or Add file buttons, you can add a whole folder at once. This dialog box allows you to select which folder you'd like to add. At the top are two checkboxes. Checking Include sub-directories will have XMPlay scan all directories within the directory you selected as well, and add all audio files it encounters. The Ignore playlists & shortcuts box prevents XMPlay from following shortcuts to other folders or files, and it keeps XMPlay from adding playlist files, which usually contain the same audio files that it already found in the folder.
Both these dialogs can appear in two variants: Open and Add. When using the Open one (either for files or for a folder), XMPlay will replace the current playlist with the files you've selected. The Add variant will keep the current playlist, and add the new files to the bottom.
XMPlay can have a system tray icon in two cases: when you minimize it to the system tray by right-clicking the minimize button, or when you set XMPlay to always be in the system tray on the Miscellaneous page of Options and stuff. When XMPlay is in the system tray, you can control some of the basic functions via the system tray menu. Right-click the XMPlay icon to open the menu.
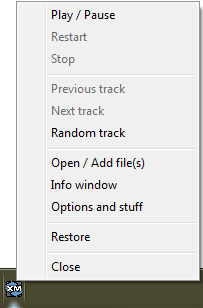
Play/Pause pauses or continues playback like the Play/Pause button does. Restart rewinds the current track and plays it again. Stop, well, stops the current track, clicking it again will unload the current track. With Previous track and Next track you can change tracks, and by clicking Random track you can have XMPlay select a random track. With Open/Add file(s) you can add files to the playlist (note that you get the Open file(s) or Add file(s) dialog based on your default setting when adding files set on the Integration page of Options and stuff). If you Shift-click this entry, you'll get the Open directory or Add directory dialog box. Info window opens the Info Window, and Options and stuff opens, you guessed it, Options and stuff. Restore brings back XMPlay's Main Window to its previous state. Finally, Close closes XMPlay as if you clicked the Close button on the Main Window.
Hit Ctrl+f to open the Find Window, or click the Find button (the !) on the Extended Playlist. Here you can find tracks in the playlist or in the library.
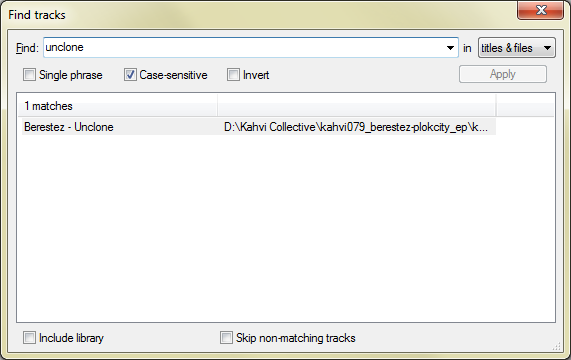
On top is the Find box, where you can type your search terms. Results will appear after a small delay. When you hit enter or click Apply, the search filter will be applied and matching tracks will be highlighted in the playlist.
With the dropdown box on the top right of the Find Window, you can choose where XMPlay should search for these terms: in titles and tags, in filenames, or in titles, tags and filenames. If you tick Single phrase, XMPlay will look for the exact phrase you put in the Find field. If it's unticked, XMPlay will look for tracks which contain all (space separated) Find terms. You can exclude certain terms by prefixing them with -, or look for either of terms using /. For example, a -b c/d would look for tracks containing a, but not b, and at least one of c and d. Ticking Case-sensitive will look for the exact (upper or lower) case you type it in. Invert turns the results around, so the result field will contain all tracks not matching your criteria. By default, all results will be selected, so you can perfom the same operation on all of them (like adding them to the playlist). On the bottom you can also choose to Include the library in the search, rather than only the files in the playlist. If you tick Skip non-matching tracks, XMPlay will set all other tracks to Skip and play only tracks matching your search criteria. Note that there is also a Find quick (a.k.a. Find as you type) shortcut (Alt+F by default), which uses all the settings from this Find dialog (except Invert), but allows you to search for tracks without opening the Find window.
The Info Window contains various other panels with track information, an extended playlist and an audio file library. Usually, the header of the window looks like this:
![]()
On the left is a Close button. The second button is Auto-resize, which will make the Info Window adapt its size to the contents it's displaying (on the Appearance page of Options and stuff as well). The third button, Track info, switches between the two modes of the Info Windw: track info and playlist/library. Left-click this button to go to the Extended Playlist, right-click it to go directly to the Library. The rest of the tabs are explained below.
General
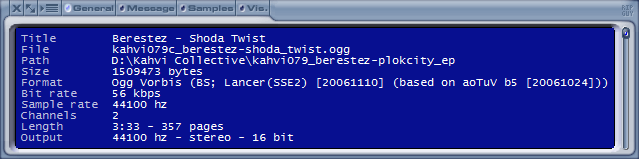
The first tab of the track info, the General tab, contains information about the file and the format. It'll display the formatted title, properties of the audio file and the Output format used. If a module file is trimmed, this will be noted in the the Length field. If the current file is resampled or downmixed to match the settings of the output device, the Output field will show the file's original sample rate and channel count between brackets. Right-click anywhere on the text to open the context menu, where you can Copy the text to the clipboard or open the Plugin file info window, if the current track is played via a Winamp input plugin.
Message
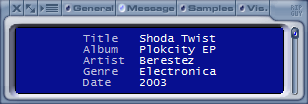
The second tab is the Message tab, which shows the tags found in the current file. If an audio file comes with a CUE-sheet (either in a tag or in a separate CUE file with the same filename), the subtracks from the CUE-sheet will be shown here. On online radio stream with title updates, the current title will be shown separately. If you have overridden the tags via the Track Info Window, the original tags may be shown as well, depending on your settings (see the Library page of Options and stuff). Again, right-click to get options to Copy the text to the clipboard or open the Plugin file info window. In addition, the context menu will display any weblinks found in the tags, click them to have your default browser navigate to that address.
Samples
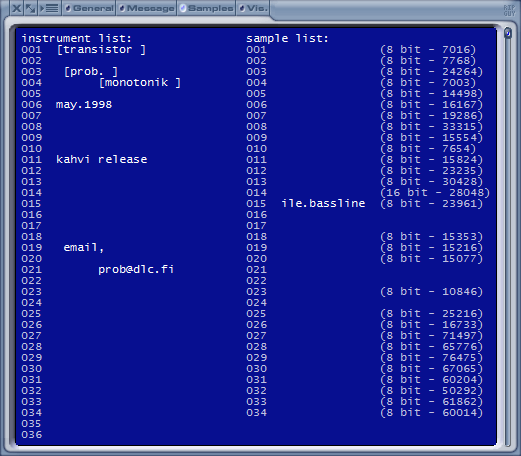
For module files, the Samples tab will show the instruments used and the samples present in the file, their names, their resolution and their size (in bytes). The names of the instruments and samples often contain information about the track. Right-click the text to open the context menu, to Copy the text to the clipboard or open the Plugin file info window.
The Visualizations tab isn't really track-related, but it's here for historical reasons. Get more visualizations from the Support Site.
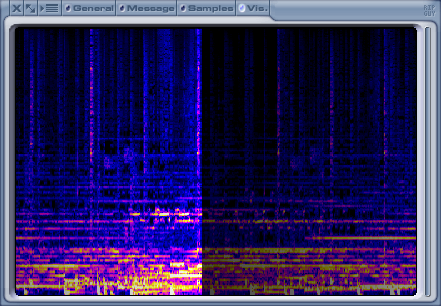
XMPlay has three built-in visualizations: Spectrum, Spectrum (3D) (shown in the image above) and the MOD Pattern Display (only works for modules). If you have installed xmp-midi, a MIDI lyrics/karaoke visualization will be available as well (only works for MIDI files, obviously). Additional visualizations should be Sonique SVP files. Place the visualization files in the Visualizations folder (see Installing XMPlay).
Select a visualization by right-clicking on the current visualization, so a context menu listing all loaded visualizations will appear. Double-clicking will make the visualization switch to fullscreen mode (note that XMPlay will prevent your screensaver from activating in this case). If a visualization allows for user interaction, use the middle mouse button to navigate through the visualizations menu. The visualizations are completely rendered by the CPU, so it can take quite some CPU power if you let it run at full resolution. You can limit the rendering resolution on the Miscellaneous page of Options and stuff.
The settings for each visualization are stored in vis.ini, in the same folder as xmplay.exe. This file is separated in several sections, each headed by the name of the visualization they apply to. The available settings vary per visualization and are often poorly documented. You can change these setting with a text editor like Notepad.
Note that xmp-wavis allows you to use Winamp visualizations, albeit in a separate window.
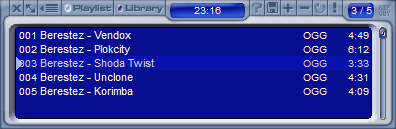
The Extended Playlist has the same function as the Playlist Panel, but the Extended Playlist is a separate, resizable window. Note that the header of the Info Window has changed, click the Track info button (third from the left) to go back to the Track info part. The Playlist and Library buttons allow you to navigate to the Playlist or Library tab. To the right of those is a timefield, which shows the total time of the tracks, alternated with the playtime of the selected tracks (if you've selected multiple tracks).
Next to the timefield are the playlist manipulation buttons as on the Playlist panel, with the addition of the Find track(s) button (the !). Left-clicking this button opens the Find window, right-clicking it will give you the options to Select all matching entries, Skip playback of non-matching entries or to Clear the Find text. On the far right is another field, which displays the number of the current track and the total number of tracks in the playlist. The rest of the Extended Playlist behaves the same as the Playlist Panel, so you can move tracks around, drop new tracks or folders on it, or use the track context menu to modify tracks. Note that the Display columns settings are configured separately from the Playlist Panel.
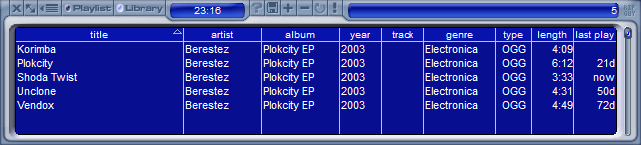
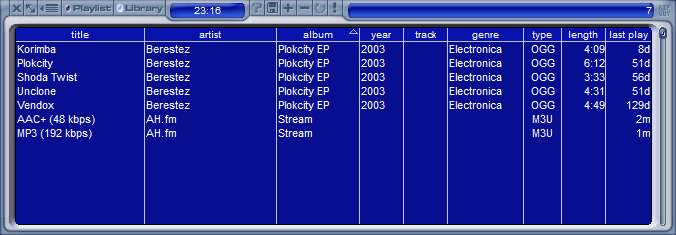
The playlist will keep all the tracks to be played, but XMPlay also has the ability to index all your music in its Library. To play files, you have to add them to the playlist first.
You can add tracks to the library by choosing Add to library from the Track context menu, by dropping them on the library, by using the Add file button at the top of the Library tab of the Info Window, or by using monitored directories. XMPlay doesn't do anything to the files themselves when you add them to the library, it just reads and saves all tag information. Click the Save button to export all entries of the library into a playlist file.
The information about the entries are shown in different colums. Left-click a column header to sort the tracks using that column. You can sort by multiple fields by left-clicking the column headers in reverse sorting order. For example, click track, then album and then artist to sort by artist, then by album and finally by track. Right-click a column header to select which columns to show.
The File column shows the filename, or the full path and filename if you tick Full path/file. The Size column shows the file size in bytes, or in something more easily readable if you tick Abbreviate filesize. The Play count column shows the total number of times you've played a track, or the number of times you've played a track divided by the number of months the track is in the library if you tick Average play count/month.
The field on the top right usually shows the total number of tracks in the library, but it'll also show the search terms and the number of hits if you've used Find.
![]()
The Track context menu is mainly the same as the one in the playlist, but there are some small differences.
Add to playlist will add the currently selected file(s) to the bottom of the playlist, while Replace playlist will clear the current playlist and put the selected tracks into it. Play will select the file in the playlist (or add it if it's not there yet) and play it directly. If you've selected multiple files, XMPlay will add all of them and start playing the first one. Queue selects or adds the file as well, but adds it to the queue rather than playing it. Dequeue removes the file from the queue, or does nothing if the file is not in the queue. Select all matching allows you to extend the current selection based on track information; you can choose from Title, Artist, Album, Year, Track, Genre, Comment, Type and Folder.
Finally, Track info allows you to view and override tags for all selected files.
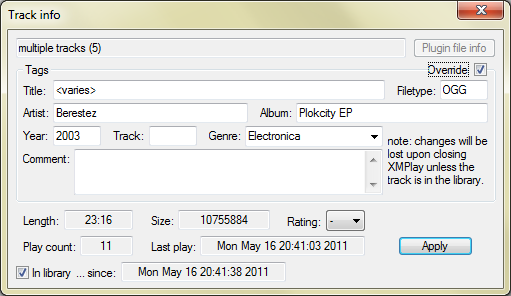
The changes you make here are applied to all entries currently selected, which allows for mass-adjusting of the tags.
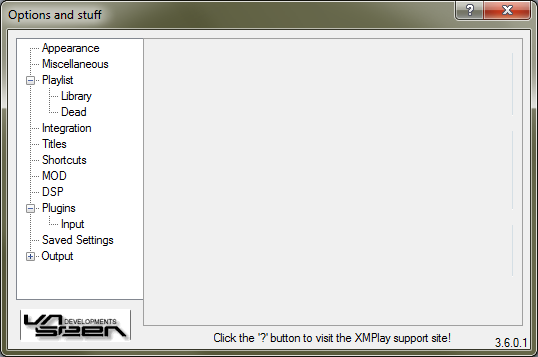
This section will treat every page of Options and stuff indepedently. First, click the button, or right-click somewhere in the Main Window and select Options and stuff.

The ?-button at the top will take you to this Support site, while the Un4seen Developments-button takes you to the homepage of Un4seen Developments. On the bottom right, the current version number of XMPlay is shown.
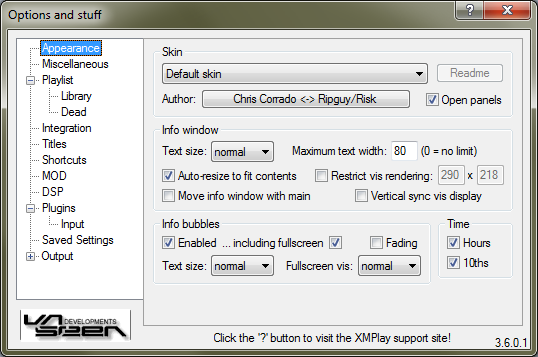
Select a skin from the dropdown box to apply it. Clicking the Readme button opens the readme of the skin, usually containing some information from the author about copyright or how he/she got the inspiration for this skin. Clicking the author's name will launch your default e-mail application to send an e-mail to the author. Checking the Open panels checkbox will cause the panels of the main window to always be opened when switching skins.
Here you can set the text size in the Info Window (of the contents, not of the buttons) and set a maximum width to the text shown. If some field, for example a comment tag, exceeds this length, it will be shown in multiple lines. Set it to 0 to disable the wrapping. Since not all files contain the same amount of information, the Info Window may be nearly empty on some files if it's left at the same size. Ticking Auto-resize to fit contents will make the window fit nicely to show all content.
The Info Window can be moved with the Main Window by ticking Move with main window. Note that this does not work the other way around, i.e. it does not move the Main Window with the Info Window. Another way of moving the Info Window with the Main Window, is dragging the Main Window with the left and right mouse button (first hold down the left mouse button, then the right one as well, then move the window). This method does move the Main Window with the Info Window.
The visualizations can be tweaked as well, by restricting the maximum allowed resolution. If the Info Window is smaller than this resolution, XMPlay obviously uses that smaller resolution. If the size of the visualization exceeds this restriction, it's streched with a linear filter. Ticking the Vertical sync box will synchronize the refreshing of the visualization display to your monitor, to avoid flickering and tearing.
XMPlay can display bubbles when you press a shortcut, to give you feedback on the current volume or the current equalizer state, for example. Here you can switch those bubbles on for the normal mode (Enabled) and for when visualizations are running in fullscreen mode (including fullscreen). The bubbles can appear and disappear with a fade (tick Fading, note that it only works on Windows 2000 and newer), or instantly, and you can set the text size for the normal mode and for fullscreen visualizations.
The Main Window has a time display, and everybody has his or her own preference for that. If you're easily distracted by changing numbers, you might want to switch of displaying 10ths of seconds. Ticking the Hours box will make XMPlay show hours, rather than over 60 minutes, if your track runs for that long.
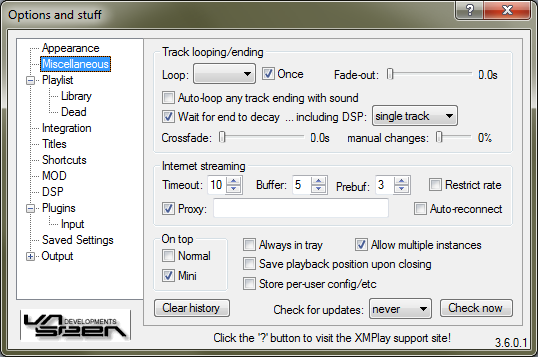
Here you can tweak some settings concerning track changes. You can set Loop to never, always, or auto. Auto will loop the track if the track contains proper looping information (mostly modules), or when you check Auto-loop any track ending with sound and a track does not end with silence. You can set a Fade-out at the end of every looped track. Some particular formats, like MIDI, have notes that extend beyond the actual playback time, and XMPlay can wait for those to decay (Wait for end to decay). Some DSPs can generate echoes as well, so XMPlay can wait for those as well (Single track will only wait for that if auto-advance is off). An often-requested feature is crossfading, and that's built right into XMPlay. You can change the Crossfade length here, as well as adjust how long the crossfade should be when you manually change a track (a percentage of the regular crossfade length). Note that crossfading only works between files with the same sample format, unless you tell XMPlay to resample all output.
Here you can set the various options XMPlay uses when streaming over the network. The Timeout specifies how long in seconds to wait for a response before a server is marked as being offline. The Buffer determines how much audio XMPlay loads into memory to account for network problems. If your online radio stream frequently drops out and re-buffers, try increasing this value. The Prebuf value specifies how much audio XMPlay should load before starting to actually play the stream. For fixed-length streams (e.g. not live radio, but files on a server), XMPlay can download them as fast as possible, or at a rate sufficient to keep the audio playing (Restrict rate). In the Proxy-field, you can specify the proxy configuration XMPlay should use, in the form of user:password@server:port. Ticking the Proxy box but not specifying an address will have XMPlay use Windows proxy settings. If you provide only user:password@ will use the Windows proxy as well, while server:post will use the proxy without authentication. If a stream drops out, for example because of network issues, you can have XMPlay reconnect automatically by ticking Auto-reconnect.
Note that these streaming settings are applied to all network streams, including streams played through plugins like RealAudio and Windows Media streams.
Just two checkboxes, so you can choose to have XMPlay on top of other windows when it is in Normal and in Mini mode.
The Clear history-button removes the folder and URL history from the Open file-dialog, as well as clearing the list of recent searches. Always in tray specifies whether XMPlay should always have a tray icon, or whether it should appear on the taskbar like regular programs. Save playback position upon closing makes the close-button on the Main Window default to Close with position saved, so you don't have to go through the context menu for that. Store per-user config/etc makes XMPlay save its settings, playlist and library in the user's Application Data folder, rather than right next to xmplay.exe. This can be useful if you're using the same XMPlay with different users, or if you don't have sufficient privileges to change files in C:\Program Files (for example on Windows Vista/7 or on corporate installations of XMPlay ;) ). If you'd like to have multiple XMPlays running at the same time, for example to transcode some modules in the background, tick Allow multiple instances. If the box is unticked and you open files from Explorer, they will be loaded in the current XMPlay. Finally, XMPlay can check for updates, either manually using the Check now-button, or regularly using the dropdown box. The check will give you a notification when there is a new major version of XMPlay, or when there is a new revision of one of the native plugins you have installed.
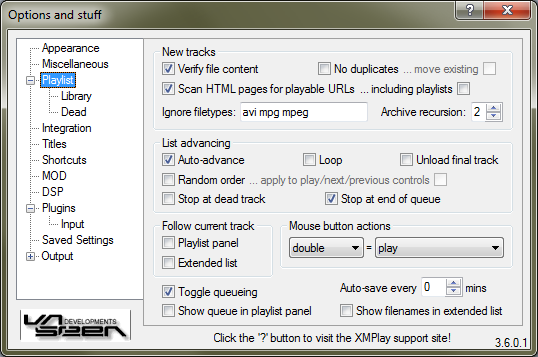
Tick Verify file content to check whether files are actually playable, instead of just checking the extension. If you add files, you can prevent adding duplicates to your playlist by ticking No duplicates. If you then do add a duplicate, you can choose to move the file to where it would be added (tick move existing). If you try to add an HTML page, XMPlay can search for online streams on that page (Scan HTML pages for playable URLs), or for links to playlists (including playlists). The found entries are then treated as added tracks. In the Ignore filetypes-textbox, you can add extension which XMPlay should never load, separated by spaces. Using archive plugins, XMPlay can load music files from compressed archives, but also from archives in archives. The Archive recursion setting determines how many levels of archives-in-archives XMPlay will accept.
By default, XMPlay continues playing the next file after the current file has finished, but you can prevent that by unticking Auto-advance. If you'd like XMPlay to randomly choose the next song, check Random order. Note that this does not change your playlist, so you can't see what song will be played next. In random mode, the next button selects the actual next track in the playlist, not a random one, except if you check apply to play/next/previous controls. If XMPlay encounters a dead track in the playlist, you can have it try the next one by unticking Stop at dead track, otherwise it'll halt at the dead track. If XMPlay reaches the end of the playlist, it'll start at the beginning again if you have Loop checked. If XMPlay reaches the end of the queue, it'll continue with the next track from the playlist if you have Stop at end of queue unticked. Finally, if XMPlay reaches the final track and stops after that one, be it of your playlist or your queue, you can choose to keep it loaded, or to unload it from your computer's memory (Unload final track).
If ticked, XMPlay will keep the current track visible in the Playlist panel or in the Extended Playlist by scrolling the playlist on track changes.
Here you can define what double-clicking a track should do, as well as middle-clicking and clicking with the two additional buttons you might have on your mouse. You can choose none, play, queue, dequeue, add to/from library, track info, plugin info or remove for each button
Toggle queueing lets you queue a track only once, trying to queue it again will dequeue it. If you untick this box, you can queue a track multiple times, but you have to remove it from the queue with the dequeue action or shortcut. The playlist panel in the Main Window can show the queue if you tick Show queue in playlist panel. The Extended Playlist does not have this functionality. Auto-save every .. mins saves the playlist and the library periodically, so you don't lose too much playback information should anything crash. Finally, Show filenames in extended list forces XMPlay to show full filenames in the Extended Playlist, rather than the formatted titles.
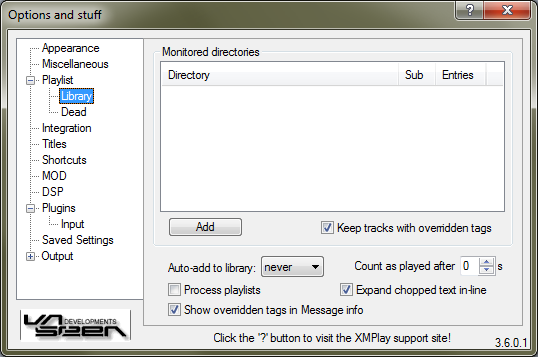
Click Add to add a directory. XMPlay will scan these folders for audio files and will add everything it finds to the library. This will take a while, and it'll show scan in the Entries column when scanning is still in progress. In addition, XMPlay will monitor these directories, so files added to these folders appear in the library automatically. The update is not instantaneous, but you can force a rescan by right-clicking a directory and choosing Rescan. The context menu also allows you to change the inclusion of Sub-folders, and you can Remove the directory from the monitored folders list. Removing a monitored folder will not remove files from the library, it'll only stop the automatic scanning of that folder. By ticking Keep tracks with overridden tags, you can force XMPlay to keep the manually entered data even if the file is removed from the library. This is especially useful if you're moving tracks to other folders and don't want to re-enter the tags.
Auto-add to library specifies when files should be added to the library, either when they're added to the playlist, when they are played, or never. Unticking Process playlists allows you to add playlists to the library, rather than the files in those playlists. This functionality enables you to add the (online) playlist files for online radio stations, so XMPlay always gets the up-to-date stream server address.
If you've entered overridden tags, you can show the original tags in the Message tab of the Info Window as well by ticking Show overridden tags in Message info. XMPlay keeps the play count and the last play moment of tracks in the library, but it will only count a track as played after the number of seconds you put in Count as played after. Tags which are too long for the columns will be shown partially, but if you hover over them they will be shown completely if you've checked Expand chopped text in-line.
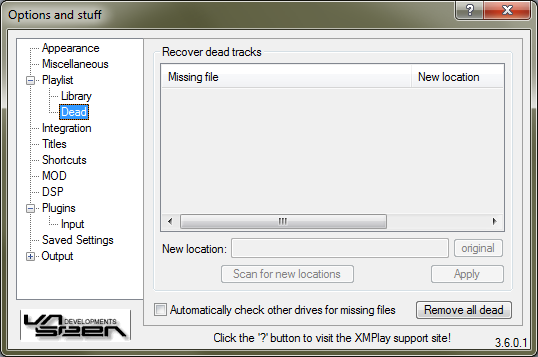
Tracks are marked as Dead if they are somehow unplayable for XMPlay. This can either be because the file format is not supported, because the file is corrupted or because the file is missing altogether.
If you somehow end up with dead tracks in your playlist or library, you can try to fix them here. Dead tracks are usually caused by a user moving files, for example when you're reorganizing you music library. You can manually enter the new location in the New location box, or open the folder selector by clicking Scan for new locations. XMPlay looks for files with the same filename and of the same filesize as the missing file. If XMPlay finds your missing track in the new location, hit Apply to update the entries in the playlist and the library.
If you run XMPlay from a portable drive, you'll notice that the drive letter can change when you re-plug devices. Instead of manually re-adding or restoring all entries in the playlist or library, you can have XMPlay check for the same paths on other drives if it misses some entries by ticking Automatically check other drives for missing files. On the far right there is a button to use if it all went wrong, so you can Remove all dead entries from the playlist and the library.
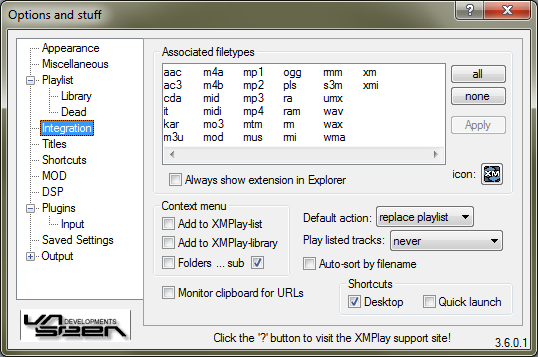
The box will list all filetypes which XMPlay can play, including those played by plugins. Select the extensions you'd like to use XMPlay for and hit Apply to apply the changes to the registry. You can also select extensions using the all or none buttons. All the extensions you highlighted will be grouped under XMPlay-able file. If you'd like to be able to discern the different formats, tick Always show extension in Explorer to make sure Windows doesn't hide the extension because it's known. On the bottom right is an Icon button, which allows you to assign a custom icon to the XMPlay-able filetype. If you want to use multiple filetypes for the association, refer to Custom filetypes and icons.
Instead of just opening a file by double-clicking it in Explorer, you can also use some more specific actions in the context menu. Add to XMPlay-list will add the file to the playlist, while Add to XMPlay-library will add it to the library. To load complete folders via their context menu in XMPlay, tick Folders. The sub options determines whether XMPlay should look in subfolders of the added folder as well (note that this option also applies to drag-and-dropped folders and folders passed via the command line).
A quick way to create a shortcut for XMPlay. Tick the ones you'd like to have, on the Desktop or on the Quick launch bar (not on Windows 7).
Default action determines what XMPlay should do with incoming files: either remove all current entries and replace the playlist with the new files, or keep the current entries and add the new files to the playlist, or add the new files to the playlist and add them to the queue. This setting applies to all files coming into XMPlay, except via the Open or Add file/directory dialog.
After the tracks are placed in the playlist, you can choose what XMPlay should do with them with the Play listed tracks option: never play those tracks, or always, or only if no other track is playing, or after bookmarking the position in the current track.
If you've added files via drag-and-dropping, there's a good chance Windows gave them a different order than you expected, so you can Auto-sort the files by filename by ticking the box.
Finally, a nice option if you're looking for new online radio stations, Monitor clipboard for URLs. When XMPlay recognizes a stream or playlist address on the clipboard, it'll add it to the playlist. (In your browser, right-click a link and choose Copy shortcut or Copy link to copy the link to the clipboard.)
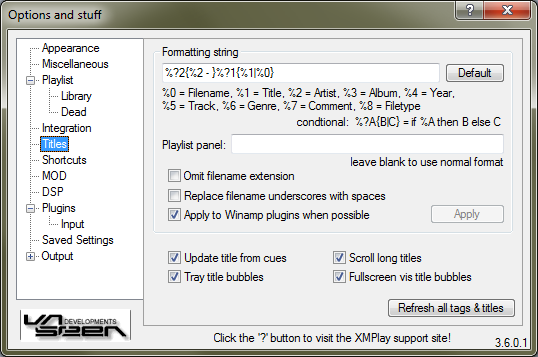
In the top box you can type in the title formatting you'd like to use. You can create conditional entries (%?2{%2|} shows the Artist tag if it is present) and entries with a maximum length (%cut{%2|10|.} will cut the Artist tag if it is longer than 10 characters and replace the cut part with .). The Playlist panel on the Main Window is usually smaller than the Extended Playlist or the title display, so you define an alternate title formatting for that. If you leave the box blank, the regular formatting string will be used on the Playlist Panel as well. If you're using the filename (%0) in your title formatting, there are two options to make things prettier: one to not show the file extension (Omit filename extension) and one to Replace filename underscores with spaces. Some Winamp plugins tend to use their own title formatting settings, but with Apply to Winamp plugins when possible you can tell XMPlay to try to fix that. Once you've changed the formatting string, click Apply to start using it.
If you have CUE-files with your audio files, XMPlay can load the subtracks from it if you tick Update title from cues. The CUE-file should have the same filename as the audio file (except the extension, which should be .cue). CUE-sheets can also be embedded in tags, for example in FLAC files. This option applies to title information from internet streams as well, which can be found on most ShoutCast streams. If a title is too long for the title field in the Main Window, you can have XMPlay Scroll the long titles so you can see all of it. XMPlay can show bubbles when the title changes, and you can configure to show them near the tray icon (Tray title bubbles) and when fullscreen visualizations are active (Fullscreen vis title bubbles). Note that these are title bubbles, the info bubbles can be configured on the Appearance page. On the bottom right is a big button to force XMPlay start Refreshing all tags and titles, so you can see how it works out for all your tracks.
Once you know your way around XMPlay, you'll notice that you're often performing the same action with the mouse. Nearly everything can be controlled with the keyboard, and this page allows you to configure that.
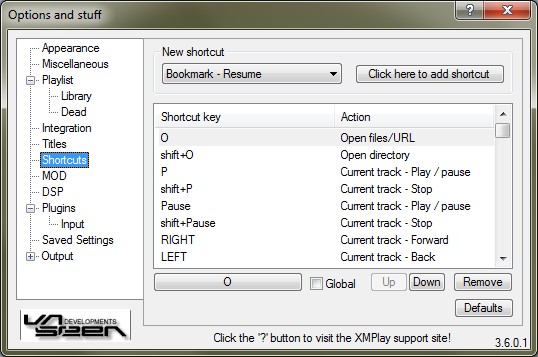
From the dropdown box, select the shortcut you'd like to set up, for example Current track - Play/pause. The click the Click here to add shortcut button. Now press the key (or key combination) you'd like to use, for example the Pause button on the top right of your keyboard. The shortcut will be added to the shortcut list below.
This list shows the shortcuts currently configured. Note that a key combination can be assigned to multiple actions, so XMPlay will execute a chain of actions with just one press of a button (like selecting the current track, selecting all tracks from the same album and then removing them from the playlist). The actions are executed in the order in which they are listed (top to bottom). Select a shortcut to tweak its settings. With the buttons on the bottom, you can change the keyboard key the selected shortcut is assigned to (in this case O). Ticking the Global checkbox will make that particular shortcut work even when you're using a different program and XMPlay doesn't have focus. With the Up and Down buttons, you can order the shortcuts in the list. The Remove button removes the shortcut. To revert back to the basic settings, hit the Default button.
This is the list of default shortcut bindings. You can change them on the Shortcuts page.
| Shortcut key | Action |
|---|---|
| O | Open files/URL |
| shift+O | Open directory |
| P/Pause | Current track - Play / pause |
| shift+P/Pause | Current track - Stop |
| Home | Current track - Restart |
| right | Current track - Forward |
| left | Current track - Back |
| shift+right | Current track - Next subsong |
| shift+left | Current track - Prev subsong |
| Page Up | Change track - Previous |
| Page Down | Change track - Next |
| End | Change track - Random |
| Insert | List - Add files/URL |
| shift+Insert | List - Add directory |
| ctrl+Z | List - Undo |
| Q | List - Show queue in list |
| shift+/ | List - Clear queue |
| up | List nav - Up |
| down | List nav - Down |
| ctrl+up/down | List nav - Jump to current |
| shift+up | List nav - Select extend up |
| shift+down | List nav - Select extend down |
| ctrl+A | List nav - Select all |
| ctrl+I | List nav - Invert selection |
| ctrl+F | List nav - Find |
| alt+F | List nav - Find quick |
| F | List nav - Find next |
| shift+F | List nav - Find previous |
| ctrl+shift+F | List nav - Find all |
| Enter | List track - Play |
| Space | List track - Skip |
| / | List track - Queue |
| ctrl+/ | List track - Dequeue |
| Delete | List track - Remove |
| shift+Delete | List track - Remove & delete file |
| + (numpad) | DSP - Volume up |
| - (numpad) | DSP - Volume down |
| / (numpad) | DSP - Balance left |
| * (numpad) | DSP - Balance right |
| M | Toggle mini mode |
| N | Minimize / restore |
| shift+N | Minimize to tray / restore |
| alt+F4 | Close |
| alt+shift+F4 | Close with position saved |
| F9 | Options and stuff |
| F1 | Info - General |
| F2 | Info - Message |
| F3 | Info - Samples |
| F4 | Info - Visuals |
| F5 | Info - Extended list |
| F6 | Info - Library |
| ctrl+C | Info - Copy to clipboard |
| 8 (numpad) | Info - Scroll up |
| 2 (numpad) | Info - Scroll down |
| 4 (numpad) | MOD pattern - Prev channel |
| 6 (numpad) | MOD pattern - Next channel |
| 5 (numpad) | MOD pattern - Mute channel |
| 7 (numpad) | MOD pattern - Unmute all |
| 9 (numpad) | MOD pattern - Invert all |
| F12 | Reload skin |
This page only applies to playback of module files (XM, MO3, IT, S3M, MTM, MOD and UMX).
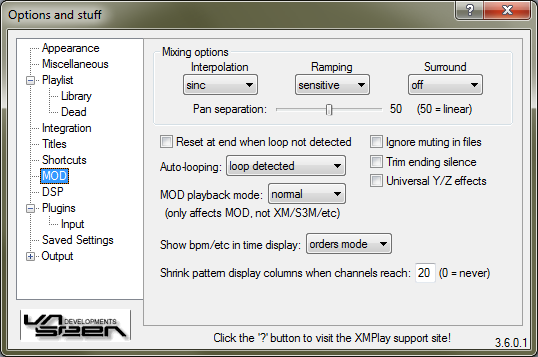
If XMPlay plays a sample, it can Interpolate it using a linear or sinc algorithm, or use no interpolation. The sinc method sounds smoother, but requires more CPU power. Some samples will produce clicks when large volume or panning changes are applied, but the Ramping setting will introduce a short fade-in to prevent that when set to normal. When set to sensitive, the ramping is only applied it the sample would otherwise produce a click, while it remains off for others samples, like percussion. The Surround setting at mode1 emulates a surround setup of the module, and mode2 does the same while ignoring panning of samples. The Pan separation (distance between left and right) for modules can be adjusted using the slider.
If you're looping a modules which is not intended to be looped, some settings (like channel volume) may be off. XMPlay can Reset these at the end of the file when a looppoint is not detected. If you've set track looping to auto (at the Miscellaneous page), this determines how modules should be looped: never, when a loop point is detected, or only if the detected loop point is not the start of the file. Since not all trackers played MODs the same way, you can choose how XMPlay should play them with the MOD playback mode. It can be set to normal, FT2 (FastTracker 2), PT1 (ProTracker for Amiga) and PT1 -filter (Protracker without Amiga filter). XMPlay can show additional information when playing modules, like beats-per-minute, speed and channel usage. With Show bpm/etc in time display you can choose what to show in the title area of the Main Window: nothing additional (never), only the order display (orders mode, as an alternative to elapsed/remaining time), or everything (always). If you're using the MOD Pattern Display visualization, the number of channels may exceed you screen width, so you can Shrink the pattern display columns when channel count reaches when it grows too large. When shrinking, XMPlay will remove the volume/instrument column from view. Ticking Ignore muting in files will make XMPlay ignore channel muting in IT or S3M files. Trim ending silence will remove the silence at the end of the track, and instead XMPlay will continue playing the next track. Universal Y/Z effects enables Yxx and Zxx IT effects in XM and S3M files, as used in MPT (ModPlug Tracker).
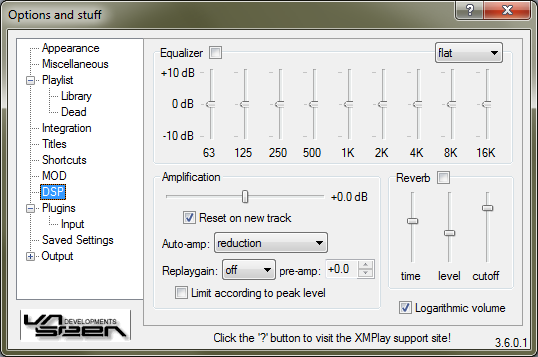
XMPlay's internal Digital Signal Processing has three functions. Note that the delay in the effects is determined by the output buffer used.
With the checkbox, you can switch the Equalizer on or off (note that there's a shortcut for that as well). The dropdown box on the far right allows you to select a preset. With the sliders, you can adjust the attenuation of the frequency bands. Right-clicking a slider will reset it to zero.
The amplification controls the audio level of the decoder. The slider is the amplification slider. Right-click it to reset it to 0 dB. Ticking Reset on new track will have XMPlay reset the amplification to 0 dB when going to the next track, or to the Replaygain value if present. The Auto-amp has four modes.
![]()
![]()
![]()
![]()
simplified overview: off / reduction / fade-in & reduction / dynamic
XMPlay can read Replaygain tags from OGG, ID3v2 and APEv2 tags. Native input plugins, like xmp-flac, can provide Replaygain tags as well. Winamp input plugins do not support Replaygain tags. With the dropdown box you can select which tag to use: off (use none), track or album. If you've chosen for the track setting and XMPlay encounters a file with only an album Replaygain tag, it'll use that instead (and vice versa if you chose the album setting). If you choose either track or album, the auto-amp is automatically disabled until you move the slider manually. The pre-amp allows you to add a constant value to the Replaygain value. Replaygain tags can contain peak levels as well, and if you tick Limit according to peak level XMPlay will use those values to determine the amplification at which the audio will not clip (note that this does not take any other DSPs into account).
Reverberation simulations a large chamber in which your music is played, with echoes coming back from the walls. Activate the Reverb by ticking the checkbox. You can adjust the reverb time, the reverb level and the cutoff frequency to tune it to your liking.
Logarithmic volume control enables logarithmic behaviour (in decibels, from silence to +0 dB) of the volume slider, rather than linear behaviour (from 0 to 100).
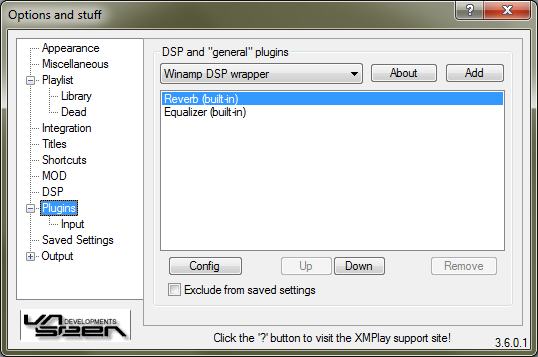
DSP and functionality plugins are listed here. If you'd like to add a plugin, select it from the dropdown box and click Add. The About button opens the about dialog of the plugin, which usually contains version information. Once a plugin is added, it'll be shown in the list. The Reverb and Equalizer DSPs are built-in, so they are always present. To open a plugin's configuration, select it in the list and click the Config button below the list. The Up and Down buttons allow you to change the order of the DSPs, the Remove button removes the selected plugin from the DSP chain. In some cases (for example xmp-scrobbler), you'd like a plugin to persist for all tracks, even if those have separate Saved Settings. In that case, you can tick Exclude from saved settings, to make sure the plugin is always loaded. Note that this option is only available for plugins which allow only a single instance.
XMPlay can use most of the DSP plugins built for Winamp via a wrapper. Add the wrapper to the DSP list and click Config to open the wrapper config.

One instance of the wrapper can load a single Winamp DSP plugin, but you can put multiple wrappers in the DSP chain. From the Plugin list, select the plugin you'd like to use. The Config button opens the plugins configuration window. Note that you have to tick the Enabled checkbox for the wrapper to actually feed audio to the plugin. The rest of the options apply to the wrapper. The Resolution dropdown box determines the resolution of the audio XMPlay passes to the plugin. 24 and 32 bit is supported, but most Winamp DSP plugins only support 16 bit. The Reset buffer checkbox resets the audio buffer of the plugin when seeking or changing tracks, to remove any sound from the previous tracks. If a plugin increases the volume of the sound, the audio may sometimes start to clip. To avoid this, the wrapper can Borrow a bit for headroom. If a DSP introduces some kind of echo or reverb, there will be sound just after the original file goes silent. To notify XMPlay of this, tick Effect has tail, so XMPlay doesn't cut off the track.
A detailed guide on how to set up an IceCast stream with XMPlay can be found in Advanced output: Icecast streaming.

On top is a list of all the input and archive plugins currently loaded, both native and Winamp input plugins. About opens the about dialog of the plugin currently select, Config opens the configuration dialog, if applicable. The Supported filetypes box displays the extensions the selected plugin supports. When XMPlay tries to play a file, it'll try its internal decoders first, followed by the plugins in the order they are listed here. If you'd like a plugin to get the first try on a particular filetype, type that in the Priority filetypes textbox. You can add multiple extensions by separating them with spaces.
Note that Winamp plugins which use their own output are not supported by XMPlay.

Once you play a lot of different tracks and formats, you'll notice the preferences for certain tracks can be different. Instead of manually changing everything each time, XMPlay can save 4 groups of settings:
These settings are saved for a certain group of files, determined by the dropdown box:
The Add button adds the current settings to the list below. The name of the settings can be edited by clicking on it. Right-clicking the setting will allow you to Load the setting, Update it with the current setting or Remove it. Clicking the Save settings button will save the settings (to the file xmplay.set), otherwise all changes are discarded.
To Automatically load saved settings, tick the checkbox. When loading a track XMPlay will now look for a match within the saved settings. It looks for a matching file entry first, if that's not available if looks for a matching tags entry, then for type and then for path. If there are multiple matching path entries, XMPlay will use the longest one. If a match is found, the settings from that entry are loaded.
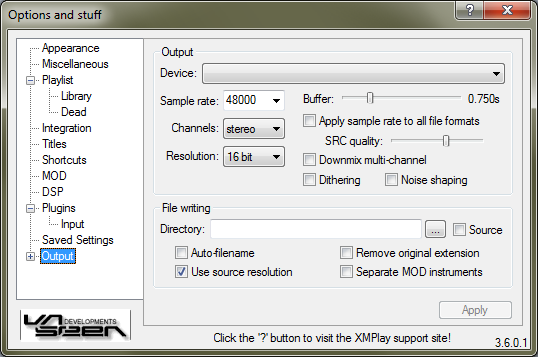
From the dropdown box, select the output device you want XMPlay to use. There are a number of devices available:
The last three types will only be available if you have the respective output plugins installed. The Sample rate dropdown box determines the sample rate in Hz. Channels sets the number of channels, mono or stereo. Resolution is the resolution at which the data is sent to the soundcard. The Buffer slider sets the amount of audio XMPlay keeps in the output buffer, to prevent hiccups. Normally, the sample rate only applies to module formats, stream formats are outputted at their own sample rate (or higher, if the soundcard doesn't support the original sample rate). If you tick Apply sample rate to all file formats, all output is resampled to the sample rate you choose before it is sent to the output device. You can choose the resampling algorithm quality with the SRC quality slider (left=lowest quality with 4 points, right=highest quality with 128 points). Multi-channel audio is only downmixed if you tick Downmix multi-channel. Dither adds white noise to the audio to randomize quantization problems, and Noise shaping improves the process quality when lowering the audio resolution. Changing any of these settings requires the output device to be re-initialized, so hit the Apply button to activate the new settings.
In the Directory box, you can choose a default directory to write files to. Ticking the Source box will have XMPlay write the file to the same directory as the input file. Once you start a file-writing process (either with the WAV-writer or with an encoder), XMPlay will pop up a dialog box asking for the output filename. Checking Auto-filename will give the output file the same name as the input file, with the new extension added. Remove original extension will remove the extension of the input file from the output filename (e.g. file.wav instead of file.mo3.wav). Use source resolution is for lossless tracks, so the output file has the same resolution as the input file, making your output truly lossless. If you're writing a module file, you can create a separate output file for each instrument by ticking Separate MOD instruments. The instrument number is added at the end of the output filename.
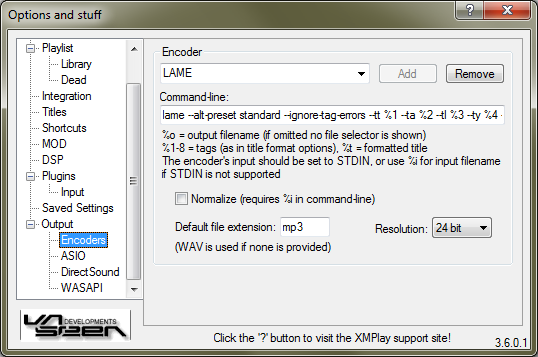
Instead of sending the audio to your soundcard, XMPlay can also pass it to an encoder. Any encoder that has a command line interface can be used with XMPlay. From the dropdown box, you can select a preset. If you type a new name in the box, you can click the Add button to create a new preset. Remove deletes the current preset. In the Command-line box you should put the command line syntax XMPlay should use to run the encoder. If the encoder supports STDIN (most modern encoders do), use - on the command line. If it doesn't, use %i and XMPlay will write a temporary WAV-file for the encoder to work with. Ticking Normalize will use the normalized WAV-writer rather than the regular one. The Default file extension box should contain the extension the file should have after encoding, so XMPlay can name the output file properly. Finally, Resolution determines the bit depth of the audio being sent to the encoder, either a specific resolution (8, 16, 24 or 32 bit) or the one following from the output settings.
For more information on setting up encoders, refer to Advanced Output: External Encoders.
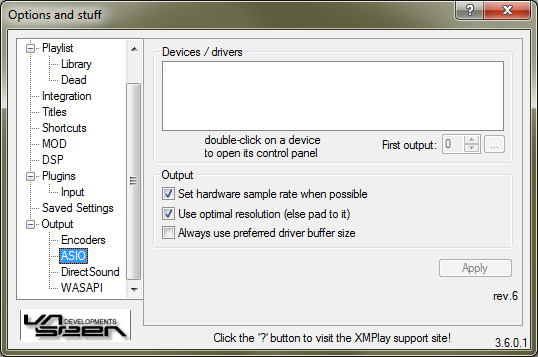
Audio Stream Input/Output (ASIO) is Steinbergs low-latency protocol designed for musicians. It completely bypasses Windows sound mixers and has XMPlay communicate with the soundcard directly. Note that your soundcard needs a specific ASIO driver, or try ASIO4ALL. Audio output over ASIO is bit-perfect. Click the Apply button to apply the changes.
The listbox will show the ASIO output currently available on your system. Double-click an entry to open its control panel. First output determines the first output channel to use. If you set it to two, a stereo file will be played on channel 2 and 3. Clicking the button next to it will show what channels the device has available.
Set hardware sample rate whenever possible will try to set the soundcard to the sample rate of the current file, to avoid the need for resampling. If unticked, the sample rate of the device will be left as it currently is and XMPlay will resample to that. Use optimal resolution will have XMPlay generate the audio at the resolution the soundcard supports (instead of the resolution you chose on the Output page). If unticked, XMPlay will use the resolution of the Output page and pad the audio up to the resolution of the soundcard. Always use preferred buffer size lets the device use the buffer set in its control panel, otherwise XMPlay will calculate a buffersize for the device.
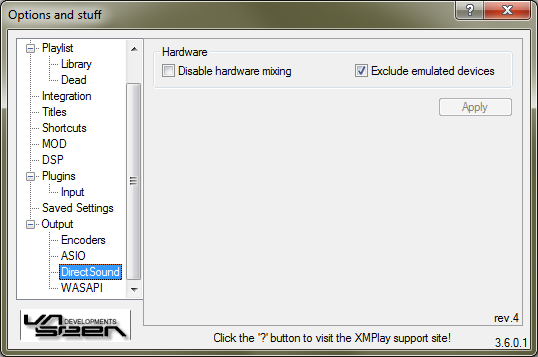
DirectSound uses the Microsoft DirectX library to communicate with the soundcard. This plugin is designed to be used on systems with Windows XP (or earlier versions of Windows). You can select the DirectSound device you want to use on the main Output page. If your soundcard driver supports it, audio may be upmixed from stereo to all channels, but that happens outside of XMPlay. Disable hardware mixing will force all mixing on the CPU, rather than having the soundcard itself handle it. This option should only be used to circumvent dodgy soundcard drivers. Note that ticking this option will disable the upmixing. Exclude emulated devices will hide any devices which are not true DirectSound devices, for example when your systems lacks the correct DirectSound drivers for your soundcard and emulates it through WaveOut. If you change either of these settings, hit Apply to apply the change.
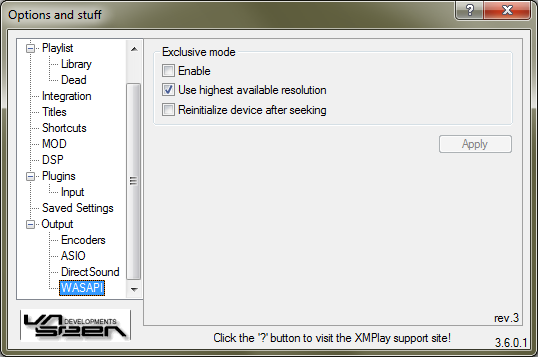
For Windows Vista, Microsoft completely reworked the audio processing path into a new system, WASAPI. If you have Windows Vista (or a newer version, like Windows 7), this is the preferred output method, since WaveOut and DirectSound are converted into WASAPI instances by Windows as well. WASAPI has two distinct output modes, Shared mode and Exclusive mode. Shared mode is default, and has Windows combine audio from all programs into a single stream for the soundcard. If you Enable exclusive mode, XMPlay will be the only program allowed to send audio to the soundcard and the output to the soundcard will be bit-perfect. Use highest available resolution has XMPlay use the highest resolution the soundcard supports, rather than what you chose on the Output page. If your soundcard seems to replay and old bit of audio when you seek, or when it just hangs on seeking, tick Reinitialize device after seeking to have XMPlay work around this problem. And ofcourse, hit Apply to apply the changes.
If you want to remove XMPlay for some reason, you'll have to do a couple of things. First, go to the Integration page of Options and stuff to make Windows forget about XMPlay.
Remove all filetype associations by clicking the none button, followed by the Apply button. Untick all Context menu boxes (except ...sub). Also untick both Shortcuts boxes. Second, navigate Explorer to the folder where you installed XMPlay, probably C:\Program Files\XMPlay.
Select the main folder (XMPlay in this case) and delete it. Finally, you might need to clean up some files in your user directory. If you've used Store per user config/etc, navigate Explorer to C:\Users\[username]\AppData (or Application data) and remove the XMPlay directory you find there. If you've used XMPlay from the Program Files directory on Windows Vista or 7, also check C:\Users\[username]\Local\VirtualStore\Program Files (or Program Files (x86) on 64-bit systems) and remove the XMPlay directory.
Next page: Advanced configuration
There are various things in XMPlay which you don't need in day-to-day use, but that might be interesting nonetheless.
Next page: MOD Pattern Display visualization
This is XMPlay's separate visualization for modules files.
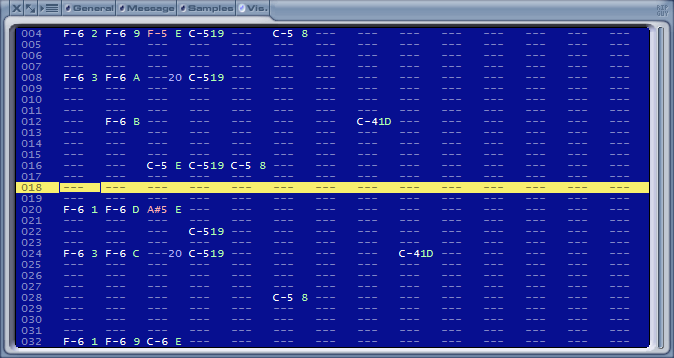
The Pattern Display shows the pattern similar to how it would appear in a tracker, though the number of effects displayed is limited for clarity. All numbers, except the row numbers, are shown in hex. The following items are shown:
The channels can be selected with numpad buttons 4 and 6. The currently selected channel can be muted with numpad button 5, or by middle-clicking a channel with your mouse. With numpad button 7 all channels can be unmuted, and with numpad button 9 channel muting is inverted. These buttons are configurable on the Shortcuts page of Options and stuff. The column size may be shrunk if a module contains a lot of channels, see the MOD page of Options and stuff.
Note that if you'd like to separate each instrument when writing WAV files, you can tick Separate MOD instruments on the Output page of Options and stuff, there is no need to mute all the channels manually.
Next page: Secret INI settings
How things work normally:
When XMPlay starts for the first time, an xmplay.ini file is created that holds the original program settings. Thereafter, most settings that affect the operation and appearance of XMPlay are modified through the built-in menu system. To reach this menu system, right-click on an unused portion of the XMPlay screen and select "Options and Settings". When changes are made, XMPlay keeps track by writing them to the xmplay.ini file.
For the more advanced user:
Certain settings are either too new, too unique, being tested, or for some other reason do not appear in the "Options and Settings" menu system. An advanced user can apply these "secret" settings by manually editing the xmplay.ini file with a text editor such as Notepad. Do not use a wordprocessor as it will probably insert unwanted control codes into xmplay.ini and may cause undesired issues.
Will this always work?
Often a "secret" setting is introduced as a new feature in a test version of XMPlay that is not available in the official distribution package. Such a version has become known as "stuff", because it is stored in and downloaded from the stuff folder of the webserver. You may need to get a newer version to use a certain "secret" setting as a version will ignore settings it doesn't understand. The latest stuff version can be downloaded from the official XMPlay forum.
How to use a "secret" setting:
The "secret" settings are entered as a line in the [XMPlay] section of xmplay.ini file. As the xmplay.ini can have several different sections, you must be careful when editing since the "secret" setting will not work if it isn't in the [XMPlay] section. Perhaps the easiest way to ensure correct placement is to find the [XMPlay] section header (often the first line in the xmplay.ini file) and insert your line immediately below it. This also places your edits at the top of the list, making them easier to find or change later. The format is the setting name, an equals sign, and the desired value of the setting. For example, a line could be "SingleClickTray=1" and is entered without the quotes.

Put them all there:
Some of the cutting edge users intentionally put all of the "secret" settings (each with the default value) into the xmplay.ini file even if they don't intend to modify the setting. If they want to experiment later, they can see the setting's correctly-spelled name and change from the default value on that line.
Restart XMPlay to activate:
XMPlay reads the xmplay.ini file when it starts. When you change a "secret" setting by manually editing the xmplay.ini file, XMPlay won't know. Restart XMPlay to re-read the xmplay.ini file and make the setting take effect.
XMPlay "Secret" Settings
Last updated on: 2026-03-09
| Setting Name | Default | Brief Description |
|---|---|---|
| Boost | n/a | Boost (merely present, regardless of type/value assigned) increases the priority Windows assigns to the XMPlay GUI. The audio decoding and playback thread is always at real-time priority, so Boost has no affect on audio, but may help minimize visualization choppiness if you have other programs competing for CPU resources. Forum Link |
| CueMark | 0 | [3.6.0.53 and later] When using CUE files, CueMark=1 will enable a one-pixel markers on the seekbar to denote the track borders to aid position seeking. Forum Link |
| EndPadding | 0 | [3.6.0.66 and later] Specify amount of padding (in milliseconds) to add at the end of playback to eliminate cutting the music selection short. "EndPadding=50" would add 50ms of padding. Forum Link |
| FlashTrack | 0 | [3.6.0.82 and later] The currently playing track on the playlist or library can be visually difficult to identify, especially with certain skins and/or colors. FlashTrack=1 enables flashing of the current track to enhance visibility. Forum Link |
| HLSDelay | 30 | [3.8.4 and later] Specify how much delay (in seconds) to aim for in live HLS streams. |
| NetBufferOld | 0 | [3.6.0.74 and later] NetBufferOld sets an amount (in seconds) to buffer the output of a ShoutCast stream (in addition to the incoming buffer set in Miscellaneous options) and use that buffer when "write to disk" is started. "NetBufferOld=10" would establish a 10 second buffer. Forum Link |
| NoBackup | 0 | As a safety feature, XMPlay backs up xmplay.library to xmplay.library~ before writing any changes to the library. NoBackup=1 disables this feature. This setting might appeal to people with large libraries and limited disc storage space, such as on a USB drive. Also, this setting limits the numbers of writes, which is also a concern on a USB drive. Forum Link |
| NoBeeps | 0 | NoBeeps=1 disables all beeping, such as the Windows critical stop sound. Forum Link |
| NoCheckScan | 0 | NoCheckScan=1 disables display of the "Title scanning in progress" warning when closing XMPlay. Forum Link |
| NoDDE | 0 | [4.0.0.5 and later] NoDDE=1 disables DDE support. Forum Link |
| NoFlashPause | 0 | When XMPlay is paused, the pause button flashes as an indicator. Some people find the flashing distracting. NoFlashPause=1 will disable the pause button flashing behavoir, and allows the skin to determine visual indicators. Forum Link |
| NoFlashTotal | 0 | XMPlay alternately displays the time between total and selected tracks when multiple items are selected from a list. NoFlashTotal=1 disables this back and forth time display and maintains the display as the total time only. In that case, selected tracks total time can be found by right-clicking one of the selected tracks and choosing Track Info. Forum Link Since [3.6.0.55 and later], NoFlashTotal=2 will maintain the display as selected tracks time. Forum Link |
| NoFontWarn | 0 | [4.0 and later] NoFontWarn=1 will disable XMPlay warning about any missing/replaced fonts when changing skins. |
| NoLameRG | 0 | When LAME encodes an MP3, it can embed replaygain information in the file's header. Other softwares may use this area to enter or modify replaygain data. XMPlay reads the header to access various information about the file. NoLameRG=1 makes XMPlay ignore any LAME replay gain information that may be present. Forum Link |
| NoNetErrors | 0 | NoNetErrors=1 disables internet error messages such as "ICY 400 Server Full". The playlist entry still gets a red strikethrough as if the track were dead, but XMPlay proceeds to the next entry without having to acknowledge/dismiss the connection error. |
| NoPageScroll | 0 | XMPlay scrolls pages with the same look and feel of Windows itself (page up/down when mouse clicking above/below the slider). NoPageScroll=1 disables this default page scrolling behavior and reverts to the old way that XMPlay used to move through a large list or library (click at two-thirds on the list's scrollbar to go to two-thirds through the list). Forum Link |
| NoRandomReset | 0 | [3.8.0.6 and later] NoRandomReset=1 will disable the resetting of the "already played" tracking when the "Random order" setting is toggled. Forum Link |
| NoReg | 0 | NoReg=1 prevents XMPlay writing to the Windows registry (disables the filetype association options). Forum Link |
| NoResumeNext | 0 | [3.6.0.7 and later] If playback is currently paused or stopped, the next/previous selection will start playback. NoResumeNext=1 maintains the paused/stopped state when pressing the next/previous button. Forum Link |
| NoScanList | 0 | [3.8.3.4 and later] XMPlay scans the file titles in a playlist to reproduce formatted titles for display. If there are a lot of titles (perhaps within archives) NoScanList=1 will disable the pre-scanning when the playlist entry includes the length. Recently added variations:
|
| NoScanMP3 | 0 | For mp3 files, XMPlay scans the entire file and then maintains the file in a read-ahead buffer. NoScanMP3=1 disables the pre-scanning and read-ahead buffer for mp3 files. See ReadAhead setting (below) for related information. Forum Link |
| NoStickyMark | 0 | [3.8.1.2 and later] To remove the "Don't auto-remove" triangle markers in the playlist (doesn't affect skins that include a bitmap marker). "NoStickyMark=1" will remove the markers. Forum Link |
| NoUserConfig | 0 | When started, XMPlay defaults to the xmplay.ini in the user's directory (if it exists) to retain per-user settings. This may present undesired effects if a customized version of XMPlay is used (perhaps as a demo from a USB drive) since the local xmplay.ini may never be activated. NoUserConfig=1 in the local xmplay.ini will ignore the user's directory xmplay.ini (if found). Forum Link |
| NoWheelVol | 0 | When the main XMPlay window has focus, the mouse scroll-wheel will control volume even if the mouse is not over the XMPlay window. NoWheelVol=1 disables mouse scroll-wheel volume control unless the mouse is focused on the actual volume control. Forum Link |
| PauseStop | 0 | [3.8.2.29 and later] PauseStop=1 provides the option of stopping/releasing the output (instead of just pausing it) when the pause button is pressed. Forum Link |
| PlayDelay | 1 | [3.6.0.28 and later] When dragging/dropping a folder on XMPlay, tracks that are contained in the folder may not sort (or be randomized) as desired before audio begins. PlayDelay creates a delay (expressed in seconds) to allow the this to take place. PlayDelay=0 disables any delay. Forum Link |
| ReadAhead | 0 | [3.6.0.14 and later] For mp3 files, XMPlay scans the entire file and then maintains the file in a read-ahead buffer (unless NoScanMP3=1 is set). XMPlay does not do this for other types of files, which may cause unwanted disc activity (repeated small reads). ReadAhead=[max file size in MB] will enable the specified read-ahead buffer for non-mp3 files. Forum Link |
| RecentTracks | 5 | [3.6.0.46 and later] Configure number of entries in the Recent Tracks list. Disable Recent Track list with RecentTracks=0. Forum Link |
| SeparateToggle | 0 | [3.8.1.10 and later] When set to SeparateToggle=1, the "Separate subsongs" option will work as a toggle to separate/unseparate subsongs instead of using two menu options. Forum Link |
| SingleClickTray | 0 | SingleClickTray=1 will restore XMPlay from the system tray with a single click on the system tray icon, and another single will minimize XMPlay again. Forum Link |
| StartInTray | 0 | [3.7.0.30 and later] StartInTray=1 will force XMPlay to start and display only in the system tray. Forum Link |
| TimeHours | 1 | [4.0 and later] TimeHours=0 will disable XMPlay ever including an hours column in time displays. |
| UserProfile | 1 | [4.0 and later] UserProfile=0 will disable XMPlay using "%USERPROFILE%" for the user profile path in saved playlists and the library. Forum Link |
| VolStep | 3 | [3.6.0.2 and later] XMPlay adjusts the mouse scroll-wheel volume based on the default Windows scroll-wheel lines setting. VolStep allows setting the size of the mouse wheel volume adjustment independent of the Windows setting. Also see NoWheelVol (above). Forum Link |
| VolStepKey | 2 | [4.1.0.4 and later] The size of keyboard shortcut volume adjustments. Forum Link |
| [MIDI] section: NoteOffAll |
0 | [xmp-midi.dll rev.15 and later] To have ALL instances of a note released by a note-off, add NoteOffAll=1. Forum Link |
Next page: Command line interaction
First and foremost, XMPlay can receive files, directories or URLs from the command line, using no additional arguments, so xmplay C:\Windows\Media\ding.wav. If you give XMPlay the path to a folder, it'll put all the files in that folder it can play in the playlist, just like the Open folder dialog. Note that the settings you chose when adding files on the Integration page of Options and stuff apply here as well. Entries containing spaces should be enclosed in quotes, so xmplay "C:\Cool Music\cool.mp3". Multiple entries (separated by spaces) are supported.
Untick Allow multiple instances on the Miscellaneous page of Options and stuff to send the entries to the current instance of XMPlay, instead of starting a new instance each time.
If you want to control the current instance of XMPlay from the command line, like starting or pausing playback, take a look at XMPlay Controller.
You can have XMPlay execute lots of function by sending a key-command to it via DDE. Using an info-command, you can request information of the file currently being played. See the DDE command list for a full list of available commands, and the DDE code example page for some examples.
Files, folders and URLs can be passed to XMPlay via DDE. To do so, set the Application to XMPlay, the Topic to System and send the message [open("filename")] (to open a file) or [list("filename")] (to add a file to the playlist). Note that the message includes the brackets and parenthesis. Multiple files should be sent in multiple messages. XMPlay will treat files coming in quickly after each other as a single batch, so it can auto-sort them.
These DDE commands are used in Explorer for the associated filetypes on Windows XP and older.
The contents of the Info Window can be fetched via DDE by sending an info# message to XMPlay, where you replace # with the number from the list below.
| info | Result tab |
|---|---|
| 1 | General |
| 2 | Message |
| 3 | Samples |
Note that the returned text is in UTF-8 on Windows NT, XP and newer.
Below is a list of DDE control commands. The commands are executed by sending a key# message to XMPlay, where you replace # with the number found in the list.
| key | Command |
|---|---|
| 641 | Bookmark - Resume |
| 642 | Bookmark - Resume after queue |
| 640 | Bookmark - Set |
| 128 | Change track - Next |
| 129 | Change track - Previous |
| 130 | Change track - Random |
| 131 | Change track - Random from library |
| 10 | Close |
| 16 | Close and restart |
| 15 | Close at end of track/list |
| 11 | Close with position saved |
| 525 | Crossfade on/off |
| 83 | Current track - Back |
| 91 | Current track - Download / Extract |
| 82 | Current track - Forward |
| 92 | Current track - Go to time |
| 9 | Current track - Looping |
| 86 | Current track - Next subsong |
| 80 | Current track - Play / Pause |
| 89 | Current track - Plugin info |
| 85 | Current track - Prev subsong |
| 113 | Current track - Rating - 1 |
| 114 | Current track - Rating - 2 |
| 115 | Current track - Rating - 3 |
| 116 | Current track - Rating - 4 |
| 117 | Current track - Rating - 5 |
| 118 | Current track - Rating - down |
| 112 | Current track - Rating - none |
| 120 | Current track - Rating - show |
| 119 | Current track - Rating - up |
| 84 | Current track - Restart |
| 81 | Current track - Stop |
| 90 | Current track - Stop at end |
| 87 | Current track - Track info |
| 88 | Current track - Tray title bubble |
| 515 | DSP - Amplification down |
| 521 | DSP - Amplification reset |
| 514 | DSP - Amplification up |
| 522 | DSP - Auto amplification |
| 519 | DSP - Balance left |
| 520 | DSP - Balance right |
| 526 | DSP - Bypass |
| 516 | DSP - Equalizer on/off |
| 518 | DSP - Options |
| 524 | DSP - Replaygain |
| 517 | DSP - Reverb on/off |
| 513 | DSP - Volume down |
| 523 | DSP - Volume mute |
| 512 | DSP - Volume up |
| 264 | Info - Copy to clipboard |
| 261 | Info - Extended list |
| 265 | Info - Fullscreen visuals |
| 257 | Info - General |
| 608 | Info - Library |
| 258 | Info - Message |
| 256 | Info - Open/close window |
| 259 | Info - Samples |
| 263 | Info - Scroll down |
| 262 | Info - Scroll up |
| 266 | Info - Text size decrease |
| 267 | Info - Text size increase |
| 260 | Info - Visuals |
| 368 | List - Add files/URL |
| 369 | List - Add folder |
| 381 | List - Add from clipboard |
| 380 | List - Auto advance |
| 375 | List - Clear queue |
| 402 | List - Looping |
| 313 | List - Random play order |
| 383 | List - Remove after playing |
| 386 | List - Replace from library |
| 378 | List - Save |
| 377 | List - Show filenames in ext.list |
| 379 | List - Show queue in list |
| 400 | List - Undo |
| 347 | List nav - Bottom |
| 337 | List nav - Down |
| 352 | List nav - Find |
| 355 | List nav - Find all |
| 353 | List nav - Find next |
| 354 | List nav - Find previous |
| 356 | List nav - Find quick |
| 342 | List nav - Invert selection |
| 340 | List nav - Jump to current |
| 339 | List nav - Page down |
| 338 | List nav - Page up |
| 341 | List nav - Select all |
| 343 | List nav - Select dead |
| 345 | List nav - Select extend down |
| 349 | List nav - Select extend page down |
| 348 | List nav - Select extend page up |
| 344 | List nav - Select extend up |
| 418 | List nav - Select same album |
| 417 | List nav - Select same artist |
| 422 | List nav - Select same comment |
| 421 | List nav - Select same genre |
| 424 | List nav - Select same path |
| 416 | List nav - Select same title |
| 420 | List nav - Select same track |
| 423 | List nav - Select same type |
| 419 | List nav - Select same year |
| 346 | List nav - Top |
| 336 | List nav - Up |
| 334 | List sort - Filename |
| 322 | List sort - Filename - Full path |
| 323 | List sort - Filetype |
| 333 | List sort - Rating |
| 324 | List sort - Reverse |
| 325 | List sort - Selected to top |
| 320 | List sort - Shuffle |
| 328 | List sort - Tag - Album |
| 327 | List sort - Tag - Artist |
| 332 | List sort - Tag - Comment |
| 331 | List sort - Tag - Genre |
| 326 | List sort - Tag - Title |
| 330 | List sort - Tag - Track |
| 329 | List sort - Tag - Year |
| 321 | List sort - Title |
| 384 | List track - Add to/from library |
| 382 | List track - Dequeue |
| 389 | List track - Don't auto-remove |
| 403 | List track - Explore folder |
| 372 | List track - Play |
| 385 | List track - Plugin info |
| 374 | List track - Queue |
| 121 | List track - Rating - 1 |
| 122 | List track - Rating - 2 |
| 123 | List track - Rating - 3 |
| 124 | List track - Rating - 4 |
| 125 | List track - Rating - 5 |
| 126 | List track - Rating - down |
| 127 | List track - Rating - up |
| 370 | List track - Remove |
| 371 | List track - Remove & delete file |
| 387 | List track - Separate subsongs |
| 373 | List track - Skip |
| 376 | List track - Track info |
| 388 | List track - Unseparate subsongs |
| 300 | MOD - Force VBlank timing |
| 297 | MOD - Interpolation |
| 296 | MOD - MOD playback mode |
| 298 | MOD - Ramping |
| 299 | MOD - Surround sound |
| 293 | MOD pattern - Invert all |
| 291 | MOD pattern - Mute channel |
| 290 | MOD pattern - Next channel |
| 289 | MOD pattern - Prev channel |
| 292 | MOD pattern - Unmute all |
| 6 | Open files/URL |
| 12 | Open folder |
| 13 | Open from clipboard |
| 5 | Options and stuff |
| 624 | Output options |
| 97 | Plugins - DSP & general |
| 96 | Plugins - Input |
| 593 | Saved settings - Load current |
| 592 | Saved settings - Options |
| 17 | UI - Big |
| 14 | UI - Info bubbles |
| 1 | UI - Mini mode |
| 2 | UI - Minimize / Restore |
| 3 | UI - Minimize to tray / Restore |
| 7 | UI - On top |
| 4 | UI - Reload skin |
| 8 | UI - Time display mode |
XMPlay Controller is a standalone application which uses DDE to send commands to XMPlay. See the included manual for more information.
DDE_run is a command line application which can send DDE messages to any other program. The code to send the Play/Pause command is DDE_run -s XMPlay -t System -c key80, where -s flags the target application name, -t the link topic and -c the command. You can replace key80 with any of the keys from the DDE command list, or with a file opening command.
Create a new VB project, and dump two text boxes and a pair of command buttons on the form. Do whatever you like to them, but you'll want to make Text2 reasonably large with MultiLine enabled. Add the following code to the form (changing the names if you changed them):
Private Sub Command1_Click()
' Use this one to retrieve data, e.g. infox topics
Text2.LinkTopic = "XMPlay|" & Text1.Text ' Init link topic
Text2.LinkMode = 2 ' Open connection
Text2.LinkRequest ' Grab data
Text2.LinkMode = 0 ' Close connecton
'''' EDIT: remove next line if you get a blank line between every line ''''
Text2 = Replace(Text2, vbLf, vbCrLf) ' Reformat string as textbox needs CRLF
End Sub
Private Sub Command2_Click()
' Use this one to execute a function, e.g. keyxxx topics or playlist manipulation
Text2.LinkTopic = "XMPlay|XMPlay" ' Init link topic. The second part (after the '|') doesn't appear to matter but must not be empty.
Text2.LinkMode = 2 ' Open connection
Text2.LinkExecute Text1.Text ' Execute function
Text2.LinkMode = 0 ' Close connection
End Sub
This code example is made by BoggyB (a long time ago).
Next page: Library file format
XMPlay saves its library (and current playlist track info) in the xmplay.library file next to xmplay.exe (or in C:\Users\[username]\AppData\XMPlay if you have Store per-user config/etc ticked). You can process this file with external utilities, for example to find duplicate files in your collection.
Each entry contains a number of different fields depending on the library format version.
Library version 6 (since XMPlay 3.8.2):Each string is terminated with a null character (00). There is no length limit on strings and empty strings are allowed. Timestamps are noted in seconds since January 1st, 1970, 0:00. The track entries are closed with a null filename (00).
Each entry contains three fields.
Next page: Custom filetypes and icons
On the Integration page of Options and stuff, XMPlay can be set as the default program to open all supported audio files with. XMPlay will group all selected extensions to a single filetype, the XMPlay-able file. This also means all files with have the same icon and type description, regardless of their format. By making the file association manually, you keep separate icons and descriptions.
Now repeat the following for each extension you'd like to add:
The association works directly, the icons could take a while to be refreshed (reload your shell to force a refresh).
The file association dialog was removed from Explorer, but the Default programs page doesn't provide the same flexibility. Download ExtMan to get the file association dialog back. (Note that Extman defaults to German, but you can switch to English by clicking the flag.) With ExtMan, you can follow the steps for Windows XP.
Next page: Visualization settings
Several visualizations have the ability to be configured. There are two ways to adjust the settings of a visualization: by middle-clicking on the visualization area or by opening vis.ini. Note that not each visualization allows both methods, and some have no configuration at all.
Open the Info Window and go to the Visualizations tab. If no visualization is active, right-click the visualization area and select one. Middle-click (usually with the scroll wheel) the visualization area to interact with the visualization. This can for example change the scrollspeed (Spectrum (3D)), cycle through display modes (SpectrumBars), bring up a whole menu (Honto's Phase) or bring up a context menu (xmp-coverart).
Note that if your laptop trackpad does not have a dedicated middle-mouse button, you'll have to use and external mouse.
Open the file vis.ini located next to xmplay.exe (or in your user folder, if you've ticked Store per-user config/etc). For each visualization, this file contains a header followed by the settings. For example, the section for SpectrumBars looks like this:
[SpectrumBars]
NumberOfBars=64
SamplesPerBar=2
BarHeightPercent=100.0
BarSeparationPercent=10.0
Logarithmic=true
Mode=1
LowColour=0xFF026732
MediumColour=0xFFFFFF00
HighColour=0xFFFF0000
The entries can use various formats, like string booleans (true/false), integer and decimals numbers and hexadecimal color codes. Not all settings have clear labels and documentation is scarce, so experimenting with values is the best way to go. Save the vis.ini file and re-select the visualization in XMPlay to activate the new settings.
This section will treat the setup and configuration of various native plugins for XMPlay. If you have further question, please join the forum.
xmp-cd is the native Audio CD plugin for XMPlay. It's included in the main XMPlay download, get it from the XMPlay page at Un4seen Developments. Put xmp-cd.dll in the plugins folder (see Installing XMPlay). You can open the configuration window from the Plugins: Input page of Options and stuff.
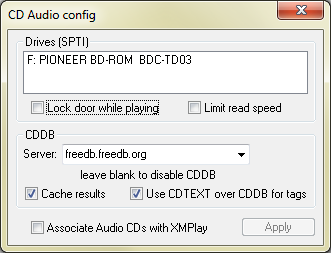
Drives
The listbox will show which drives are available on you system. When you tick Lock door while playing, Windows will not allow the CD tray to open when XMPlay is used the disc, so your music will keep going. Limit read speed will have the drive spin slowly, instead of rattling at full speed.
CDDB
XMPlay can lookup the disc you're playing in the Compact Disc Database to fetch tags like artist, album and track titles. The Server field should contain the address of the CDDB server. By default you can choose from the FreeDB server at freedb.freedb.org and the MusicBrainz-through-FreeDB server at freedb.musicbrainz.org. You can use a different server, or leave the field blank to disable CDDB lookups. If XMPlay finds multiple matches for your CD in the database, it'll pop up a window for you to select the right one. To avoid requesting information on the same disc every time, XMPlay can Cache results of the lookups. Newer Audio CDs often use CD-Text, and you can tell XMPlay to Use CDTEXT over CDDB for tags, as the tags on the disc have only a slim chance of being wrong.
Miscellaneous
Associate Audio CDs with XMPlay will make XMPlay the default program to play Audio CDs with. Hit Apply to apply this change to your registry.
If you're trying to open a mixed-mode CD (with data and audio tracks), you won't be able to find the .cda track indicators via the Open file(s) dialog. Instead, you have to open the Open folder dialog and load the whole disc.
You can play a DTS Music Disc (also known as DTS Audio CD) through XMPlay. Using the bit-perfect output of ASIO or WASAPI exclusive, you can feed the stream into your external hardware DTS decoder.
This visualization plugin will show cover art for the currently playing track in the Visualization tab. The images can be stored locally, or downloaded from various services. The plugin supports PNG and JPEG files.
Get xmp-coverart from the Support Site. Put xmp-coverart.svp in the same directory as xmplay.exe, or in your Visualizations directory. Restart XMPlay and open the visualization in the Visualization tab.
To open up the configuration menu, middle-click the visualization.
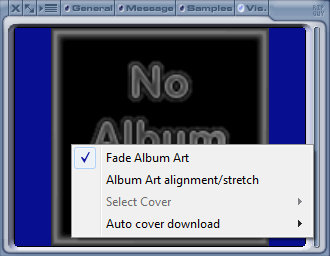
Ticking Fade Album Art will put a fade transition between each image. Album Art alignment/stretch cyles through the different image display modes (center, left, right, fill, center actual size). The Select cover sub-menu allows you to select a found cover, to Download more images and to Save the selected downloaded cover. You can also enable cycling through the found covers by ticking Cycle cover every 10 seconds. The duration to show each image can be adjusted in vis.ini (look for albumart_cycleseconds in the [coverart] section).
Note that XMPlay can restrict the resolution at which this visualization is rendering, see the Appearance page of Options and stuff.
The plugin uses the following order when looking for cover art images:
The default cover image is cover.jpg (or cover.png) stored in the same folder as xmp-coverart.svp. The default downloading image is download.jpg (or download.png) in that same folder.
The plugin can automatically find (and save) a cover image corresponding to the current track, album or artist using various image services.
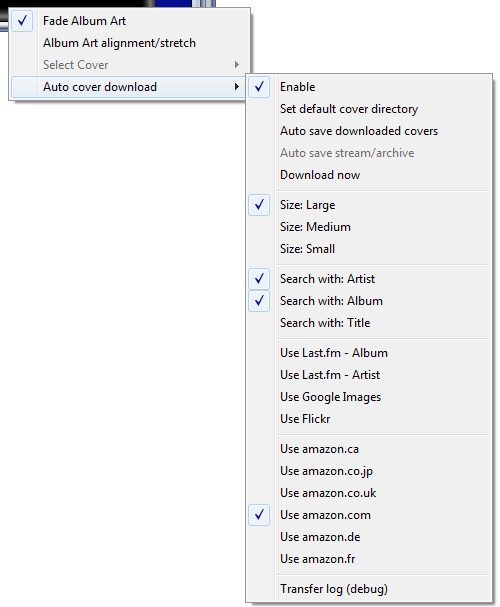
Tick Enable to activate the automatic cover image download feature. The plugin supports a default cover directory, so the image files do not have to be in the same folder as your audio files. If the plugin cannot find a local cover art file but it does find one online, it can Automatically save downloaded covers. The cover file will be saved in the same directory as the currently playing file, or in the default cover directory if that's active. For internet streams and files inside archives, covers can only be saved to the default cover directory. With Download now, you can force the plugin to query the image services again.
Select an image Size the plugin should look for, either Large, Medium or Small. With the Search with:-section, you can choose what tags the plugin should use when searching for images. Unticking for example Search with: Title will bring up less track-specific images (like covers from the single). The plugin can use Last.fm, Google Images, Flickr and Amazon as image sources. Tick each service to use it.
Ticking Transfer log (debug) will save an xml-file in the same folder as xmp-coverart.svp with information about the what the plugin downloaded. This function should only be used when debugging the plugin.
This plugin is created by Barna.
xmp-lockpause detects workstation locking and pauses your music with a short fadeout. When you unlock, the music fades in again. Get it via the forum and place xmp-lockpause.dll in the plugins folder (see Installing XMPlay). You can add the plugin to the DSP chain on the Plugins page of Options and stuff by selecting it in the dropdown box and clicking the Add button.
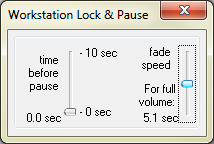
There are only two sliders. The left slider determines how long the plugin waits before starting the fade-out, ranging from 0 to 10 seconds. When you unlock again, it always instantly starts fading in. The right slider determines the fading speed, both for fade-out and fade-in, expressed in the total time the fading takes.
This plugin in created by Barna.
You can enjoy high-quality MIDI format music playback of your collection of MIDI files after installing the SoundFont compatable XMPlay MIDI Plugin. The XMPlay MIDI Plugin features:
The SoundFont compatable XMPlay MIDI Plugin supports GM, GM2, GS, and XG reset System Exclusive messages; as well as the drum channel enabling features of GS and XG when switched into those modes.
The XMPlay MIDI Plugin also supports GS and XG reverb preset control messages (e.g. "Hall 1", "Plate", "Tunnel", etc...) for adjusting reverb time, reverb delay, reverb low-pass cut-off, reverb high-pass cut-off, and reverb level; as well as chorus preset control messages (e.g. "Chorus 1", "Celeste 1", "Flanger 1", etc...) for adjusting chrorus delay, chorus depth, chorus rate, chorus feedback, chorus level, and chorus to reverb send level.
Refer to the XMPlay MIDI Plugin MIDI Implementation Chart below for a complete list of MIDI controllers, functions, and System Exclusive messages that the XMPlay MIDI Plugin supports.
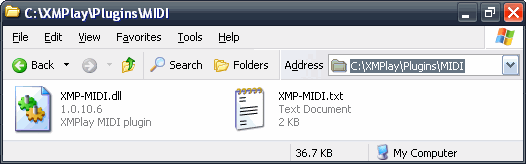
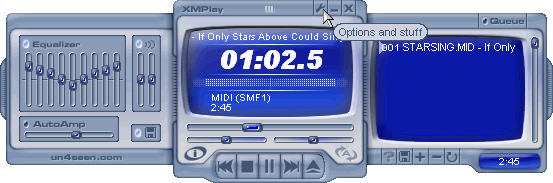
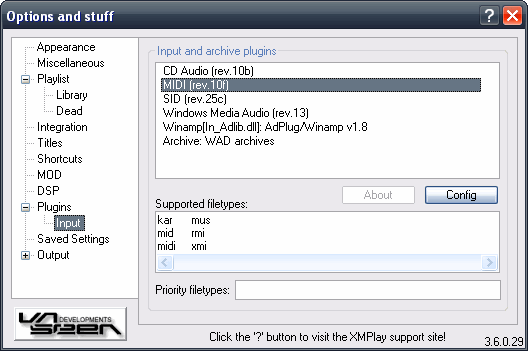
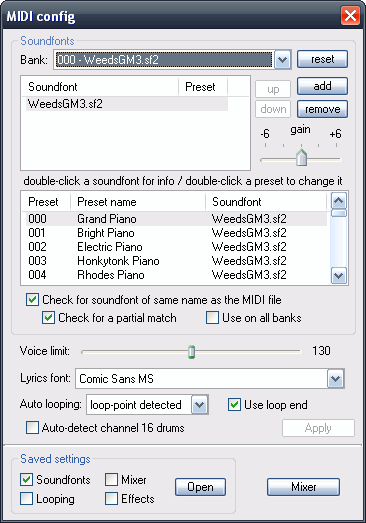
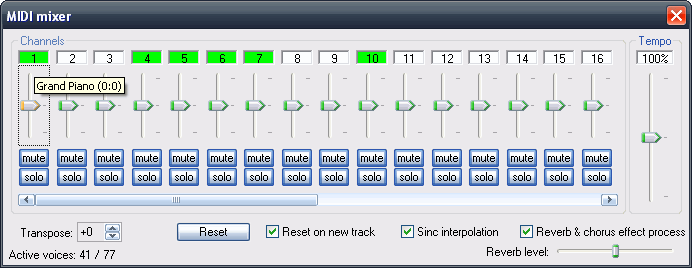
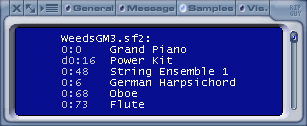
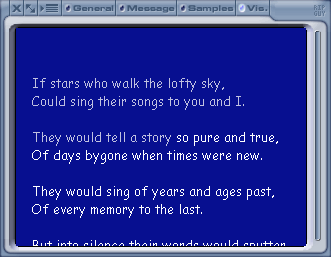
The following is a list of high-quality General MIDI compatible freeware SoundFonts that can be used with the XMPlay MIDI Plugin (* = Useful for emulating various MIDI modules and sound cards):
"General MIDI" AWE32 ROM Dump SoundFont, by E-mu Systems (1.1 megabytes) *
http://heretics-hexens.ucoz.com/1mgm.sf2
http://connect.creativelabs.com/developer/SoundFont/SoundFont Librarian.zip (SFLib10c.zip)
"GS Sound Set (GM.dls)" Sound Canvas SoundFont, by Roland (3.5 megabytes) *
http://soundfonts.homemusician.net/collections_soundfonts/roland_gs_soundset.html
"Gravis Ultrasound Classic Patch Set v1.6b" Gravis Ultrasound SoundFont, by Arek Rak (5.9 megabytes) *
http://www.rarek.ceron.pl/gus.htm
"8MBGM E-mu Rev B (EmuAPS8.sf2/8MBGM.sf2)" SoundFont, by E-mu Systems (7.6 megabytes)
http://www.helpdrivers.com/sound/E-MU/Audio_Production_Studio_8mb_E-MU_GM_SoundFont_Bank/
"Roland SC-55 v1.1 (GM.dls)" Sound Canvas SoundFont, by DJ Tony (9.9 megabytes) *
http://www.mediafire.com/?a6qn1tc811b2ce1
"Chorium Revision A" SoundFont, by Open World (28.9 megabytes)
http://www.un4seen.com/download.php?extra/ChoriumRevA.rar
"General User GS" SoundFont, by Chris Collins (31.3 megabytes)
http://www.schristiancollins.com/generaluser.php
"OPL-3 FM 128M" Sound Blaster 16 FM Synthesis SoundFont, by Zandro Reveille (135 megabytes) *
http://woolyss.com/chipmusic/chipmusic-soundfonts/OPL-3_FM_128M.zip
ftp://fm:fm@atomu.ath.cx:6872/OPL-3 FM 128M.sfpack
"Fluid R3 GM" SoundFont, by Frank Wen (148.4 megabytes)
http://soundfonts.homemusician.net/collections_soundfonts/fluid_release_3.html
"Arachno SoundFont v1.0" SoundFont, by Maxime Abbey (155.4 megabytes)
http://www.arachnosoft.com/main/download.php?id=soundfont
"SGM v2.01" SoundFont, by David Shan (247.4 megabytes)
http://www.geocities.jp/shansoundfont
The following MIDI implementation chart details the MIDI controllers, functions, and System Exclusive messages that the XMPlay MIDI Plugin supports.
Note that all of the "XGEdit 95" Compatible parameters shown in the image below this chart that are displayed in bright green are standard GM/GS MIDI controllers and System Exclusive messages, while all of the parameters shown in the image displayed in bright yellow are special XG MIDI controllers and System Exclusive messages directly referenced by this chart.
| Function | Transmitted | Received | Description / Remarks | |
|---|---|---|---|---|
| Basic Channel | No | Yes | 1..16 | |
| Note Number | No | Yes | 0..127 | |
| Velocity | No | Yes | Note On | |
| Aftertouch | No | Yes | Channel | |
| Pitch Bend | No | Yes | -8192..0..+8192 | |
| Program Change | No | Yes | 0..127 | |
| Controller Change | 0 | No | Yes | Bank Select |
| 1 | No | Yes | Modulation | |
| 5 | No | Yes | Portamento Time | |
| 6 | No | Yes | Data entry MSB | |
| 7 | No | Yes | Volume | |
| 10 | No | Yes | Panning | |
| 11 | No | Yes | Expression | |
| 38 | No | Yes | Data Entry LSB | |
| 64 | No | Yes | Sustain Pedal | |
| 65 | No | Yes | Portamento | |
| 67 | No | Yes | Soft Pedal | |
| 71 | No | Yes | Low-Pass Filter Resonance (XGEdit 95 Compatible: RES) |
|
| 72 | No | Yes | Release Time (XGEdit 95 Compatible: AMP EG) |
|
| 73 | No | Yes | Attack Time (XGEdit 95 Compatible: AMP EG) |
|
| 74 | No | Yes | Low-Pass Filter Cutoff (XGEdit 95 Compatible: CUTOFF) |
|
| 84 | No | Yes | Portamento Control | |
| 91 | No | Yes | Reverb Depth | |
| 93 | No | Yes | Chorus Depth | |
| 98, 99 | No | Yes | NRPN LSB, MSB | |
| 100, 101 | No | Yes | RPN LSB, MSB | |
| 120 | No | Yes | All Sounds Off | |
| 121 | No | Yes | Reset All Controllers | |
| 123 | No | Yes | All Notes Off | |
| 126, 127 | No | Yes | Polyphonic Mode (0 = Poly, 1 = Mono) | |
| System Exclusive Messages | No | Yes | ||
| GM/GS/XG Mode Reset (refer to Setup Events below) |
||||
| Scale Tuning (GS/XG) (refer to Scale Tuning below) |
||||
| Instrument/Drums Channel Switch (GS) | ||||
| Master Volume (GS) | ||||
| Reverb Type (XG) (refer to Reverb Types below) |
||||
| Reverb Level (XG) (refer to Reverb Parameters below) |
||||
| Reverb Time (XG) (refer to Reverb Parameters below) |
||||
| Reverb Initial Delay (XG) (refer to Reverb Parameters below) |
||||
| Reverb High-Pass Cutoff (XG) (refer to Reverb Parameters below) |
||||
| Reverb Low-Pass Cutoff (XG) (refer to Reverb Parameters below) |
||||
| Chorus Type (XG) (refer to Chorus Types below) |
||||
| Chorus Level (XG) (refer to Chorus Parameters below) |
||||
| Chorus Send to Reverb (XG) (refer to Chorus Parameters below) |
||||
| Chorus Modulation Frequency (XG) (refer to Chorus Parameters below) |
||||
| Chorus Modulation Depth (XG) (refer to Chorus Parameters below) |
||||
| Chorus Feedback Level (XG) (refer to Chorus Parameters below) |
||||
| Chorus Modulation Delay Offset (XG) (refer to Chorus Parameters below) |
||||
| RPN | Data entry MSB | Description / Remarks |
|---|---|---|
| MSB: 0 LSB: 0 |
0..127 | Pitch Bend Sensitivity (Data entry MSB: 0..127 semitones), Initial Value = 2 (2 semitones) |
| MSB: 0 LSB: 1 |
0..64..127 | Master Fine Tuning (Data entry MSB: -100..0..+99.99 cents), Initial Value = 64 (0 cent) |
| MSB: 0 LSB: 2 |
0..64..127 | Master Coarse Tuning (Data entry MSB: -64..0..+63), Initial Value = 64 (0 semitones) |
| NRPN | Data entry MSB | Description / Remarks |
|---|---|---|
| MSB: 1 LSB: 32 |
0..64..127 | Cutoff Frequency (relative change) (Data entry MSB: -64..0..+63) |
| MSB: 1 LSB: 33 |
0..64..127 | Resonance Frequency (relative change) (Data entry MSB: -64..0..+63) |
| MSB: 20 LSB: 0..127 |
0..64..127 | Low-Pass Filter Cutoff of drum instrument (relative change on specified drum instrument) NRPN LSB: key number of drum instrument (Data entry MSB: -64..0..+63 semitones) |
| MSB: 21 LSB: 0..127 |
0..64..127 | Low-Pass Filter Resonance of drum instrument (relative change on specified drum instrument) NRPN LSB: key number of drum instrument (Data entry MSB: -64..0..+63 semitones) |
| MSB: 24 LSB: 0..127 |
0..64..127 | Coarse tuning (pitch) of drum instrument (relative change on specified drum instrument) NRPN LSB: key number of drum instrument (Data entry MSB: -64..0..+63 semitones) |
| MSB: 25 LSB: 0..127 |
0..64..127 | Fine tuning of drum instrument (relative change on specified drum instrument) NRPN LSB: key number of drum instrument (Data entry MSB: -100..0..+100 semitones) |
| MSB: 26 LSB: 0..127 |
0..127 | Key volume level of drum instrument (absolute change on specified drum instrument) NRPN LSB: key number of drum instrument (Data entry MSB: zero-normal/full) |
| MSB: 28 LSB: 0..127 |
0..64..127 | Panpot of drum instrument (absolute change on specified drum instrument) NRPN LSB: key number of drum instrument (Data entry MSB: Left-Center-Right) |
| MSB: 29 LSB: 0..127 |
0..127 | Reverb send level of drum instrument (absolute change on specified drum instrument) NRPN LSB: key number of drum instrument (Data entry MSB: zero-maximum) |
| MSB: 30 LSB: 0..127 |
0..127 | Chorus send level of drum instrument (absolute change on specified drum instrument) NRPN LSB: key number of drum instrument (Data entry MSB: zero-maximum) |
| Mode | System Exclusive Data | Description / Remarks |
|---|---|---|
| GM Mode On | F0 7E 7F 09 01 F7 | Enables General MIDI mode |
| GS Mode Reset | F0 41 10 42 12 40 00 7F 00 41 F7 | Resets all General Standard mode parameters |
| XG Mode On | F0 43 10 4C 00 00 7E 00 F7 | Enables Yamaha Extended MIDI mode |
| Scale Tuning Key (XGEdit 95 Compatible: TUNE) |
System Exclusive Data (Hex) |
MIDI Channel (Hex) | (Decimal) |
Cents Offset (Hex) | (Decimal) |
||
|---|---|---|---|---|---|
| Scale Tuning C | F0 43 10 4C 08 Channel 41 Cents F7 | 00..0F | 00..15 | 00..40..7F | -64..00..+63 |
| Scale Tuning C# | F0 43 10 4C 08 Channel 42 Cents F7 | 00..0F | 00..15 | 00..40..7F | -64..00..+63 |
| Scale Tuning D | F0 43 10 4C 08 Channel 43 Cents F7 | 00..0F | 00..15 | 00..40..7F | -64..00..+63 |
| Scale Tuning D# | F0 43 10 4C 08 Channel 43 Cents F7 | 00..0F | 00..15 | 00..40..7F | -64..00..+63 |
| Scale Tuning E | F0 43 10 4C 08 Channel 45 Cents F7 | 00..0F | 00..15 | 00..40..7F | -64..00..+63 |
| Scale Tuning F | F0 43 10 4C 08 Channel 46 Cents F7 | 00..0F | 00..15 | 00..40..7F | -64..00..+63 |
| Scale Tuning F# | F0 43 10 4C 08 Channel 47 Cents F7 | 00..0F | 00..15 | 00..40..7F | -64..00..+63 |
| Scale Tuning G | F0 43 10 4C 08 Channel 48 Cents F7 | 00..0F | 00..15 | 00..40..7F | -64..00..+63 |
| Scale Tuning G# | F0 43 10 4C 08 Channel 49 Cents F7 | 00..0F | 00..15 | 00..40..7F | -64..00..+63 |
| Scale Tuning A | F0 43 10 4C 08 Channel 4A Cents F7 | 00..0F | 00..15 | 00..40..7F | -64..00..+63 |
| Scale Tuning A# | F0 43 10 4C 08 Channel 4B Cents F7 | 00..0F | 00..15 | 00..40..7F | -64..00..+63 |
| Scale Tuning B | F0 43 10 4C 08 Channel 4C Cents F7 | 00..0F | 00..15 | 00..40..7F | -64..00..+63 |
| Effect Type (XGEdit 95 Compatible: EFFECT NAME) |
System Exclusive Data | Description / Remarks |
|---|---|---|
| Hall 1 | F0 43 10 4C 02 01 00 01 00 F7 | Reverb simulating the resonance of a hall |
| Hall 2 | F0 43 10 4C 02 01 00 01 01 F7 | Reverb simulating the resonance of a hall |
| Room 1 | F0 43 10 4C 02 01 00 02 00 F7 | Reverb simulating the resonance of a room |
| Room 2 | F0 43 10 4C 02 01 00 02 01 F7 | Reverb simulating the resonance of a room |
| Room 3 | F0 43 10 4C 02 01 00 02 02 F7 | Reverb simulating the resonance of a room |
| Stage 1 | F0 43 10 4C 02 01 00 03 00 F7 | Reverb simulating the resonance of a stage |
| Stage 2 | F0 43 10 4C 02 01 00 03 01 F7 | Reverb simulating the resonance of a stage |
| Plate | F0 43 10 4C 02 01 00 04 00 F7 | Reverb simulating a metal-plate reverb unit |
| White Room | F0 43 10 4C 02 01 00 10 00 F7 | Unique short reverb with a bit of initial delay |
| Tunnel | F0 43 10 4C 02 01 00 11 00 F7 | Reverb simulating a tunnel (expanding to left and right) |
| Basement | F0 43 10 4C 02 01 00 13 00 F7 | Reverb simulating a basement (initial delay, followed by reverb with unique resonance) |
| No Effect | F0 43 10 4C 02 01 00 00 00 F7 | Reverb effect deactivated |
| Parameter Type (XGEdit 95 Compatible) |
System Exclusive Data (Hex) |
Range (Hex) |
Range (Decimal) |
|---|---|---|---|
| Reverb Level (LEVEL) | F0 43 10 4C 02 01 0C 40 F7 | 00..7F | 000..127 |
| Reverb Time (TIME) | F0 43 10 4C 02 01 02 12 F7 | 00..45 | 000..069 |
| Reverb Initial Delay (I.DEL) | F0 43 10 4C 02 01 04 08 F7 | 00..3F | 000..063 |
| Reverb High-Pass Cutoff (HPF) | F0 43 10 4C 02 01 05 0D F7 | 00..34 | 000..052 |
| Reverb Low-Pass Cutoff (LPF) | F0 43 10 4C 02 01 06 31 F7 | 22..3C | 034..060 |
Note: The example data bytes shown in the chart above are the default parameters for the "Hall 1" reverb effect type (refer to Reverb Types above).
| Effect Type (XGEdit 95 Compatible: EFFECT NAME) |
System Exclusive Data | Description / Remarks |
|---|---|---|
| Chorus 1 | F0 43 10 4C 02 01 20 41 00 F7 | Conventional chorus effect that adds natural spaciousness |
| Chorus 2 | F0 43 10 4C 02 01 20 41 01 F7 | Conventional chorus effect that adds natural spaciousness |
| Chorus 3 | F0 43 10 4C 02 01 20 41 02 F7 | Conventional chorus effect that adds natural spaciousness |
| Chorus 4 | F0 43 10 4C 02 01 20 41 08 F7 | Chorus with stereo input (using MIDI channel panning setting) |
| Celeste 1 | F0 43 10 4C 02 01 20 42 00 F7 | 3-phase LFO that adds modulation and spaciousness |
| Celeste 2 | F0 43 10 4C 02 01 20 42 01 F7 | 3-phase LFO that adds modulation and spaciousness |
| Celeste 3 | F0 43 10 4C 02 01 20 42 02 F7 | 3-phase LFO that adds modulation and spaciousness |
| Celeste 4 | F0 43 10 4C 02 01 20 42 08 F7 | Celeste with stereo input (using MIDI channel panning setting) |
| Flanger 1 | F0 43 10 4C 02 01 20 43 00 F7 | Conventional flanger effect that adds a jet-engine effect |
| Flanger 2 | F0 43 10 4C 02 01 20 43 01 F7 | Conventional flanger effect that adds a jet-engine effect |
| Flanger 3 | F0 43 10 4C 02 01 20 43 08 F7 | Conventional flanger effect that adds a jet-engine effect |
| No Effect | F0 43 10 4C 02 01 20 00 00 F7 | Chorus effect deactivated |
| Parameter Type (XGEdit 95 Compatible) |
System Exclusive Data (Hex) |
Range (Hex) |
Range (Decimal) |
|---|---|---|---|
| Chorus Level (LEVEL) | F0 43 10 4C 02 01 2C 40 F7 | 00..7F | 000..127 |
| Chorus Send to Reverb (ToREV) | F0 43 10 4C 02 01 2E 40 F7 | 00..7F | 000..127 |
| Chorus Modulation Frequency (FREQ) | F0 43 10 4C 02 01 22 06 F7 | 00..7F | 000..127 |
| Chorus Modulation Depth (DEPTH) | F0 43 10 4C 02 01 23 36 F7 | 00..7F | 000..127 |
| Chorus Feedback Level (FB) | F0 43 10 4C 02 01 24 4D F7 | 01..7F | 001..127 |
| Chorus Modulation Delay Offset (DELAY) | F0 43 10 4C 02 01 25 6A F7 | 00..7F | 000..127 |
Note: The example data bytes shown in the chart above are the default parameters for the "Chorus 1" chorus effect type (refer to Chorus Types above).
xmp-ra is the native RealAudio (by Real Networks) plugin. Get the plugin from the forum or from Fraggie's website. Put xmp-ra.dll in the plugins folder (see Installing XMPlay).
xmp-ra uses libraries from Real Alternative, a freeware project spanning all RealAudio codecs. You can get Real Alternative from Free-Codecs.com (get the light version). You don't need to have Real Alternative installed, you just need the following DLLs:
The files may have a version number in their filename, so 14_43260.dll, that's no problem for xmp-ra. You can leave out the libraries for formats you don't intend to use. Put pncrt.dll in the same folder as xmplay.exe or in Windows\System32., and put all the other DLLs is a subfolder of XMPlay's plugins folder, for example in a folder named realalternative.
Start XMPlay, open Options and stuff, go the Plugins: Input page, select the RealAudio plugin and click Config.
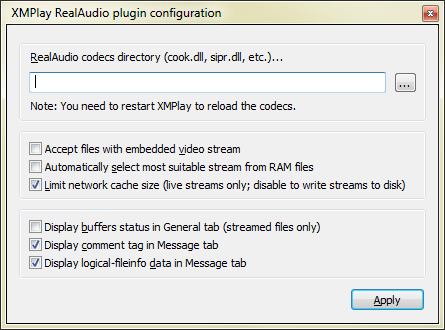
You'll have to tell the plugin where it can find the Real Alternative libraries. Click the browse button (...) and select the folder where you put the Real Alternative DLLs mentioned above. You have to restart XMPlay for the plugin to load the libraries.
From now on, your XMPlay is able to parse RealAudio Metadata (RAM-files), play RealAudio files (RM and RA-files) and streams (through HTTP, PNM and RTSP/RDT) without you having to install RealPlayer! As a bonus, you can save the RealAudio streams to a local file as well. Opening files and streams can be done via XMPlay's regular Open file(s)-dialog.
Bug reports and questions should be posted in the forum thread for xmp-ra.
This plugin is created by Fraggie.
xmp-scrobbler is XMPlay's Last.fm (Last.fm Homepage) plugin. Get the plugin from the forum. Put xmp-scrobbler.dll in the plugins folder (see Installing XMPlay).
Open Options and stuff and go to the Plugins page. From the dropdown box, select xmp-scrobbler and click Add. Select xmp-scrobbler in the list and click Config to open the configuration window.
The Username and Password boxes obviously requires your Last.fm username and password (Last.fm registration page). Tick Enable xmp-scrobbler to activate the plugin. To give XMPlay some time to read the tags in a file, tick Delay info fetch and put in the number of seconds to wait after starting a new track.
If your connection to Last.fm requires a proxy server, you should put in the required information here. Host and Port specify the server, User and Password specify the optional username and password. (Note that xmp-scrobbler does not use the proxy settings from Options and stuff - Miscellaneous, the plugin handles the connection to Last.fm itself.)
Since this plugin is still in beta state, it creates a logfile, xmp-scrobbler.txt, right next to xmplay.exe. Tick Limit log file size to make sure the logfile doesn't grow out of control. Ticking Create new log file at each startup will do so. Enable debug mode can be helpful if the plugin seems not to work, and will put a lot of extra information in the logfile. View Log File opens the logfile with the associated text editor, Clear Log File removes the logfile.
Remember to hit the Save button to save any changes, or Cancel them.
xmp-scrobbler adheres to the Audioscrobbler 1.1 protocol.
The plugin reports to Last.fm that you're playing through XMPlay. xmp-scrobbler supports submission of files with CUE sheets (also see Options and stuff - Titles), it'll submit each subtrack separately. Note that xmp-scrobbler requires the PERFORMER tag to be specified per track in that case.
xmp-scrobbler has a cache, to avoid losing your scrobbles if the Last.fm server is unreachable for some reason. A separate file, xmp-scrobbler.cache (right next to xmplay.exe), will hold all entries until they can be submitted, even if you've restarted XMPlay.
To avoid submitting tracks from a specific folder, use XMPlay's Saved settings. xmp-scrobbler is treated as a DSP plugin.
If you have any problems concerning xmp-scrobbler, please join the forum and post your problem (including a relavant snippet of your logfile) in the xmp-scrobbler thread.
A normal logfile (with debug mode disabled) looks like this.
2012-01-01 02:02:02 ----
2012-01-01 02:02:02 [INFO] Hello, this is xmp-scrobbler 0.9.6
2012-01-01 02:02:02 [INFO] Number of entries in the cache: 0
2012-01-01 02:02:05 [INFO] Handshake with Last.fm server successful!
2012-01-01 02:02:10 [WARNING] No valid MusicBrainz ID found, consider using MusicBrainz taggers to tag this file properly!
2012-01-01 02:02:10 [INFO] Current track: Artist - Title (Album)
2012-01-01 02:02:10 [INFO] Submitting in 7 seconds...
2012-01-01 02:02:17 [INFO] Track added to the cache for submission
2012-01-01 02:02:17 [INFO] Preparing to submit 1 track(s) from the cache
2012-01-01 02:02:17 [INFO] Submission succeeded!
The plugin identifies itself, check the cache, connects to Last.fm and waits for the next track. Once it finds a new track, it'll fetch the tags to submit it. Submission is always handled via the cache, to avoid losing tracks. The warning about the missing MusicBrainz tag can safely be ignored (though MusicBrainz is a very reliable method to make sure you have the correct tags for a track!).
This plugin is created by yagood and Xander.
Someday you'll want to output your music to something other than your speakers.
XMPlay can use external encoders to compress the audio output (see the Output - Encoders page of Options and stuff). The command line syntax required for proper compression depends on the encoder used. On this page the configuration of a number of popular encoders is described more extensively.
Note that XMPlay does not display any messages the encoders might return. This means that debugging is impossible, so you should work out the correct command line syntax before starting to encode your music. Determining the correct syntax is done in Windows' own command prompt (Start > Run > cmd) using a test file. For example, you can try lame - test.mp3 < test.wav to test LAME via stdin.
LAME (LAME Ain't an Mp3 Encoder) is an open source MP3 encoder. It performs very well at medium and high bitrates, especially when using VBR (Variable Bitrate). Get the executable from the Support Site or from RareWares. Put lame.exe in the same folder as xmplay.exe. The rest of the files are not required. The default file extension is mp3 and the resolution is 24-bit.
Basic
The basic syntax for LAME is lame input.wav output.mp3. This will convert input.wav, the input stereo PCM WAV-file, to output.mp3, the output MP3 file, with a constant bitrate of 128 kbit/s (about 1 MB per minute of audio). To use LAME with XMPlay, you should replace the input file with an stdin marker (a -) and the output file with the output field (%o), so lame - %o.
Bitrate
The default setting may not be good enough, but you can easily tune it. One of the first things you can do is change the bitrate with the -b command, like lame -b 256 - %o. Instead of the default 128 kbit/s, this will produce a 256 kbit/s file, with the higher bitrate resulting in a higher quality audio file. Not all bitrates are allowed in MP3 (run lame --longhelp to see which are), and using low bitrates will cause LAME to resample the audio to a lower sample rate.
VBR
One of the strong features of LAME is its implementation of VBR-encoding. You specify a quality parameter, and LAME will determine, for each piece of your file, the bitrate required to achieve this quality. VBR-encoding is activated by using the -V command, so lame -V 4 - %o. The parameter can range from 0 (highest quality and largest file) to 9 (lowest quality and smallest file). 4 is usually good enough for common music, and 2 produces audio that is hardly discernible from the original audio.
Tags
LAME can write an ID3 tag, containing fields like Artist and Title, if you supply it with the information to be put in the tag. Defining tags from the command line is done with --tx "value" pairs (note the double minus), where x defines the type of tag and "value" is the string to be saved. For example, lame -V 4 --tt "title" --ta "artist" --tl "album" --ty "year" --tc "comment" --tn "tracknumber" --tg "genre" - %o. Luckily, XMPlay can provide all these tags directly from the file using the same formatting as with track titles. This results in lame -V 4 --tt %1 --ta %2 --tl %3 --ty %4 --tn %5 --tg %6 --tc %7 - %o.
Note that LAME defaults to a ID3v1 tag, and will only add an ID3v2 tag if one of the fields is longer than v1 would allow.
More
lame --longhelp
The Helix MP3 encoder is created by RealNetworks, based on the code of the Xing encoder, and is currently open source (see the Helix Community). It is aimed at very fast encoding (it's roughly three times as fast as LAME) and prefers VBR (Variable Bitrate). Get the executable from RareWares. Put hmp3.exe in the same folder as xmplay.exe, you won't need the rest of the files. The default file extension is mp3 and the resolution is 16-bit.
Basic
The basic syntax for Helix is hmp3 input.wav output.mp3, to convert input.wav, a stereo PCM WAV-file, to output.mp3, the output MP3 file, with a bitrate of around 128 kbit/s. As with LAME, you should replace the input file with the stdin marker and the output file with the output field, so hmp3 - %o.
VBR
Helix can determine the bitrate required to compress a piece of audio based on a quality setting. VBR-encoding is on by default, but you can specify the quality with the -V command, so hmp3 -V80 - %o. The quality parameter can range from 0 (lowest quality and smallest file) up to 150 (highest quality and largest file). 80 is usually good enough . If you're going for high quality MP3s, you're probably better off with LAME, since that has been tested thoroughly.
High frequencies
Helix by default activates a 16 kHz lowpass filter. If you're annoyed by this, add the high frequency switch -HF2 to allow higher frequencies to be encoded as well, so hmp3 -V80 -HF2 - %o. This requires a VBR quality of at least 80, and will increase the bitrate of the output file.
MP3 TOC
When encoding with VBR, seeking becomes more difficult, because a number of bits does not always correspond to the same number of seconds. XMPlay knows how to handle this, but it's better to tell the encoder to include a sort of map in the output file. This is done by adding the header flag -X2 to the command line, so hmp3 -V80 -HF2 -X2 - %o.
Encoding speed
To reach the maximum encoding speed, you have to tell Helix to use SSE, a processor operation set. This is done by adding the optimization flag -U2 to the command line, so hmp3 -V80 -HF2 -X2 -U2 - %o.
Tags
The Helix MP3 encoder does not write tags. You'll have to apply the tags with an external program, for example Mp3tag.
More
hmp3 -h (though it's not that much...)
OggEnc2 is an open source Ogg Vorbis encoder based upon the official encoder by Xiph. Get the executable from the Support Site, or get a processor-specific version from RareWares. Put oggenc2.exe in the same folder as xmplay.exe. The default file extension is ogg.
Basic
The basic syntax for Oggenc2 is oggenc2 input.wav, to convert input.wav, a PCM WAV-file (multichannel as well), to input.ogg, the output Ogg Vorbis file, with a bitrate of around 128 kbit/s. To use this encoder with XMPlay, use oggenc2 - -o %o, with the stdin marker and the output field. Note that OggEnc2 needs the output file flag -o, otherwise it won't create an output file.
VBR
Ogg Vorbis is a VBR (Variable Bitrate) codec, so the encoder chooses a bitrate based on a quality setting. With the -q command, you can define a quality setting, so oggenc2 -q 4 - -o %o. The quality parameter can range from -1 (lowest quality and smallest file) to 10 (highest quality and largest file), and fractions are allowed. 4 is pretty good for common music, 9 will preserve pretty much anything you can hear. If you're trying to save disk space, be sure to try 0 as well.
Note that it is possible to specify a target bitrate using the -b flag (oggenc2 -b 256 - -o %o), but that just calculates the quality setting based on the sample rate and the number of channels.
Tags
OggEnc2 can write a Vorbis tag to the output file, containing fields like Artist and Title, if you supply it with the information to be put in the tag. With the various flags, this results in oggenc2 -q 4 -t "title" -a "artist" -l "album" -d "date" -N "tracknumber" -G "genre" -c "comment". To have XMPlay supply the encoder with these tags, use the same formatting as with track titles, so oggenc2 -q 4 -t %1 -a %2 -l %3 -d %4 -N %5 -G %6 -c %7 - -o %o.
More
oggenc2 -h
NeroAacEnc is an AAC encoder built by Nero AG, which outputs files in the MP4 format. Get the executable from the Nero website and put neroAacEnc.exe (from the Win32 folder) in the same folder as xmplay.exe. The rest of the files are not required. The default file extension is m4a and the resolution is 32-bit. Note that mp4 and acc work as well for the extension, and XMPlay supports all of them with xmp-aac. (In reality the encoder puts the AAC audio stream in an MPEG4 box, which can appear with the extension mp4 or m4a, with the latter containing only an audio stream.)
Basic
The basic syntax for neroAacEnc is neroAacEnc -if input.wav -of output.m4a, to convert input.wav, a PCM WAV-file, to output.m4a, the output MA4 file with an AAC audio track with a bitrate of around 175 kbit/s. Replace the input file and the output file with the stdin marker and the output field respectively to use this encoder with XMPlay, so neroAacEnc -if - -of %o.
VBR
The AAC audio in the output MP4 file can be VBR (Variable Bitrate), so the encoder can choose a bitrate based on the requested compression quality. You can select a quality with the -q command, so neroAacEnc -q 40 -if - -of %o. The quality setting can range from 0 (lowest quality and smallest output file) up to 150 (highest quality and largest output file). Generally a setting of 40 should be good enough for common music.
Profiles
AAC has various profiles (see MPEG-4 Part 3 on Wikipedia for more info). The Nero encoder can create audio using three different profiles: Low Complexity (LC), High Efficiency (HE, is LC with SBR) and High Efficiency v2 (HEv2, is LC with SBR and PS). The encoder selects the profile best matching your quality setting (e.g. a low quality setting activates the HEv2 profile), but you can also force the profiles using the -lc, -he or -hev2 commands respectively, so neroAacEnc -q 40 -hev2 -if - -of %o. If you're trying to save disk space, give the HEv2 profile a try. XMPlay can decode all three profiles with xmp-aac. Mobile phones usually support all three profiles, but other (hardware or software) decoders might not.
Tags
The Nero AAC encoder does not write tags. You'll have to apply the tags with an external program, for example Mp3tag.
More
neroAacEnc -help
FLAC is the reference Free Lossless Audio Codec encoder. Get the executable from the Support Site or from Rarewares and put flac.exe in the same folder as xmplay.exe. You don't need the rest of the files or sources to encode FLAC files. The default extension is flac, but ogg is possible as well (producing Ogg FLAC files). The resolution is 24-bit.
Basic
The basic syntax for FLAC is flac input.wav -o output.flac, converting the input PCM WAV-file input.wav losslessly to the output FLAC file output.flac. To use the encoder with XMPlay, set it to use stdin and specify the output field, so flac - -o %o.
Compression
The FLAC format is lossless, so it's not possible to select a certain bitrate. What can be selected is the amount of time the encoder spends in trying to compress the data, ranging from -0 (fastest encoding and largest file) to -8 (slowest encoding and smallest file). -5 is the default setting, so flac -5 - -o %o.
Tags
FLAC can write FLAC tags to the output file, but you have to define both the field names and the information they should contain. Using the same formatting as for track titles, this creates the encoder command-line flac -5 --tag=title=%1 --tag=artist=%2 --tag=album=%3 --tag=year=%4 --tag=track=%5 --tag=genre=%6 --tag=comment=%7 - -o %o.
More
flac -h or, with even more detailed information, flac --explain.
In the graph below is the encoding time for a small set of audio files, just to give you an indication .
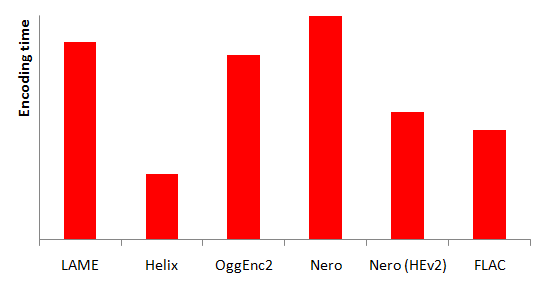
XMPlay can tune in to internet radio streams, so you can listen to music mixed on the other side of the world. With some additional software, XMPlay can also stream your music to your own listeners, so you have your own internet radio station. In that case, XMPlay generates a compressed audio stream, sends it to a server, and then the server sends it off to your listeners.
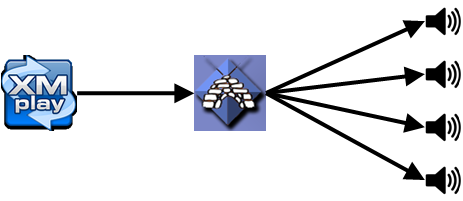
All the audio stuff is handled by XMPlay, and all things considering streaming it to your listeners is handled by the server, Icecast in the case of this article. The server does not need to be running on the same machine (it could also be on another machine you have, or on a machine on the other side of the world), and the server can serve multiple different streams. You should set up the server first, and then have XMPlay connect to it via a plugin.
Note that broadcasting music to the public will require appropriate licenses, since most music is covered by copyright. Respect the artists who make the music you like!
Icecast is an open-source media server platform. Get the Icecast server from Icecast.org, the official site from Xiph. Download and install the Win32 version of the Icecast server. You do not have to install it as a Windows service, but you can choose to. Start the server executable (Icecast2win.exe or Icecast2 Win32 in your Start menu), and you'll be presented with the main server interface.
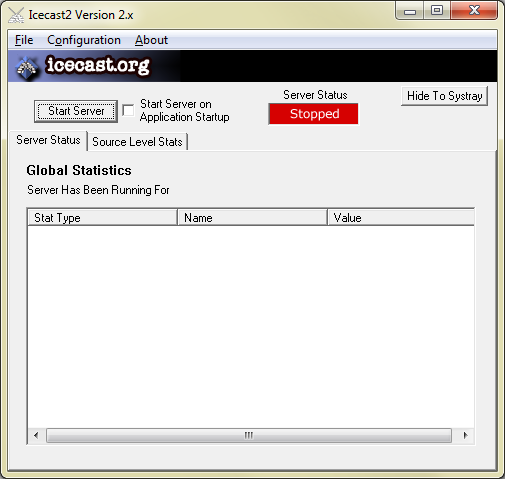
As you can see, the server is currently stopped. Open the Configuration menu and click Edit configuration. This will launch Notepad to edit the Icecast server configuration file, icecast.xml. You can keep most of the settings the same (perhaps increase the maximum number of allowed source streams from 2 to 8 if you plan on running multiple streams), but you really should change the passwords. Note that if you're running on a limited account, Notepad may not have sufficient privileges to save the configuration file directly to the Program Files directory, so you'll have to move the new file manually (save it somewhere else and copy it back to the appropriate folder with Explorer). Hit the Start server button, and the Hide to Systray to move the window out of the way. If you get a server startup error, this probably means the port you've chosen to run the server from is already in use, so you should change that in the server configuration file.
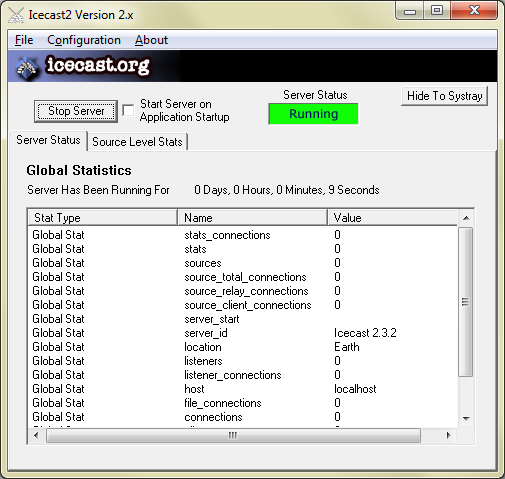
Note that Icecast will have to be able to accept incoming connections, so you should configure your firewall as such. If you're planning to stream to listeners via the Internet, you may also have to forward the port you've chosen from your router to your server.
Icecast can obviously do a whole lot more, like stream relaying, listener authentication and serving HTML from the built-in webserver. Xiph has put the whole documentation for the Icecast server online at Icecast.org.
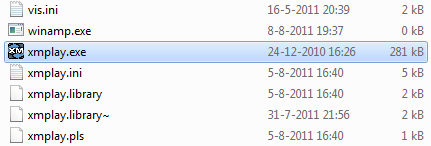
Now point the installer to your XMPlay directory and let it extract its files, including the Ogg Vorbis encoder. It'll place a bunch of encoder files next to XMPlay's executable (bass.dll, libFLAC.dll, libOggFLAC.dll, ogg.dll, pthreadVSE.dll and vorbis.dll) and the plugin into your plugins directory (dsp_edcast.dll). Perfect! You'll probably be wanting to stream in the MP3 format as well, so download LAME (from the Support Site or from Rarewares) and put lame_enc.dll next to xmplay.exe. If you'd like to stream in AAC, get the FAAC encoder (for example from Rarewares) and place libfaac.dll next to the other files.
Start XMPlay, open Options and stuff and go to the Plugins page. From the dropdown box, select Winamp DSP wrapper and click the Add button. Select the wrapper in the list and click Config. Tick Enabled and select Edcast DSP v3. This will instantly open the configuration window of Edcast itself.
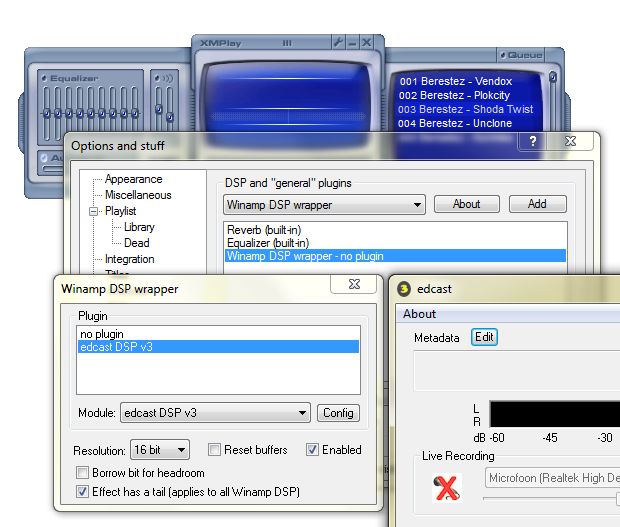
In the Edcast window, click Add Encoder to add a new encoder with default settings. Double-click the encoder in the list to edit its settings. Configure it to connect to the Icecast server you've set up before. In this example, the server runs on the same machine (Server IP is localhost) on Port 8400, and the Encoder password is xmplay. Check your icecast.xml if you've forgotten the values you've used. Be sure to set the Mountpoint to the correct format, stream.ogg in this case.
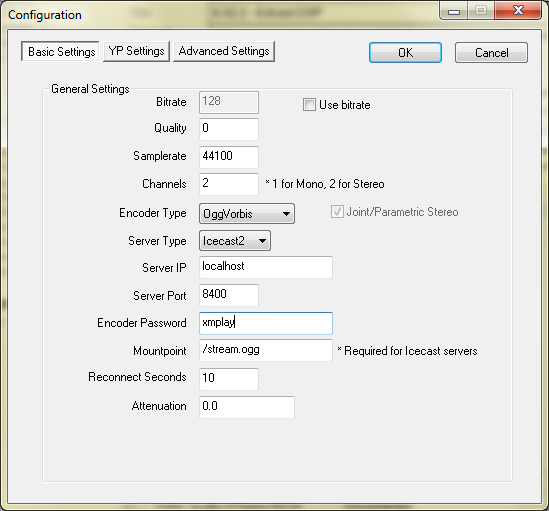
Click YP settings, untick Public and change the server name (which is what'll be displayed in the playlist of your listeners). Then hit OK to close the encoder configuration window. Now select the encoder in the list and click Connect to have the plugin connect to your Icecast server, it'll display Connected behind the encoder. Start playing a file in XMPlay to have Edcast start the stream.
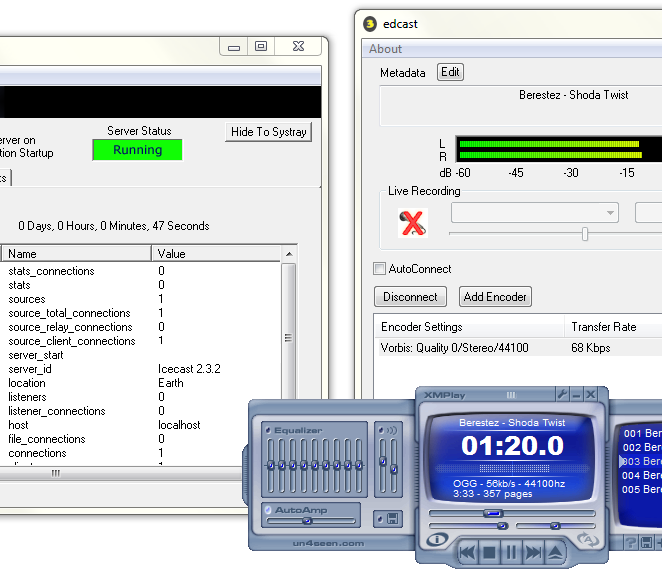
As you can see, Edcast is encoding the audio into a Ogg Vorbis audio stream. The title gets updated with the title provided by XMPlay, and the encoded audio is sent off to the Icecast server. You can now connect another player to your stream to listen to it. Direct your browser to http://serverip:port/status.xsl (http://localhost:8400/status.xsl in this case) and click M3U at the top right, or just point your player directly to http://serverip:port/mountpoint (http://localhost:8400/stream.ogg in this case).
The variant with an MP3 stream is very similar. Just change the Encoder type from Ogg Vorbis to MP3 LAME and set the Mountpoint to stream.mp3. Now even Windows Media Player is able to tune in!
As one of the active users on the XMPlay forum, I've found out that most users tend not to read the text-only manual which comes with XMPlay. With a complete re-write of that manual, I was able to make it more accessible, more colourful and more extensive. I don't expect you, as a new user, to read everything before you start using XMPlay, but I do hope that it provides a nice reference for all your questions.
Writing this Illustrated Manual took quite some time. I started somewhere in February 2011, attempting to write a short introductory guide for XMPlay. Over time I added more and more text, so I decided to just take the plunge and write a complete manual. By June 2011, chapters 1 up to 4 were complete, and chapter 5 was added in July 2011, at the same time as the actual publication here on the Support Site.
Chapters 6 up to 9 are being worked on, and pieces will come online every once in a while. At the same time, the first part is corrected of any mistakes, omissions and grammar errors (PM me if you find some!).
The changelog for each major and minor version of XMPlay.
* Too many things to remember! :)