Skins (156)
Visuals (115)
Input Plugins (34)
Output Plugins (6)
General Plugins (14)
Archive Readers (15)
Input Plugins (41)
DSP Plugins (10)
External Add-ons (16)
XMPlay Archive (71)
Skins (156)
Visuals (115)
Input Plugins (34)
Output Plugins (6)
General Plugins (14)
Archive Readers (15)
Input Plugins (41)
DSP Plugins (10)
External Add-ons (16)
XMPlay Archive (71)
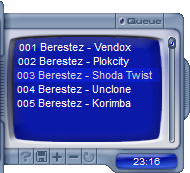
The Playlist panel contains a small view of the playlist. Note that you can create a different title formatting if you like (see the Titles page of Options and stuff). Left-clicking on an entry will select it (select multiple entries using Shift or Ctrl, like in Explorer), double-clicking will play it and middle-clicking will queue the entry. Hovering over an entry will bring up a popup bubble with the title and the location of the track. If a file isn't playable, it'll have a single red line through it. A double red line means XMPlay couldn't find the file. The playlist supports drag-and-dropping, both for files and folders coming in (just drop them on the playlist) and for files going out (hold down both mouse buttons, first left, then right). If you drop files on XMPlay outside the playlist (for example on the Main Window, or on the tray icon), the playlist will be cleared and the dropped files will be added. You can invert this behaviour by holding down the Shift key when dropping files.
Buttons
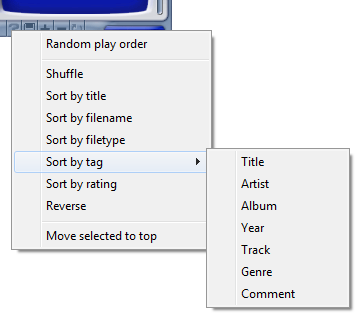
On the top is a large button to show the Queue. On the right is a scroller to scroll through the playlist. Right-clicking the scroller will jump the playlist view to the current track. On the bottom right is a timefield, which displays the total time of the entries in the playlist or the total time of the entries you've selected. Click it to have it show the number of tracks in the playlist. The buttons on the bottom all have their own functions. The first button on the left (?) switches random mode on or off, so XMPlay chooses the next track randomly. Right-clicking it brings up sorting options, like sort by filetype, rating or artist tag. The sorting applies to the tracks you've selected, or to the complete playlist.
The next button allows you to save the playlist to a file (PLS or M3U), so you can easily load all the tracks again. The next two buttons, + and -, add or remove entries from the playlist. Adding tracks brings up a similar dialog as when opening tracks. Right-clicking the add button brings up the Add folder dialog, right-clicking the remove button allows you to choose which entries to remove, for example all dead tracks, or to clear the queue. The last button toggles list looping (note that this is not the same as track looping, described earlier), its context menu gives you some more options regarding list advancing.
The DSP panel contains the most common sound-processing functions.
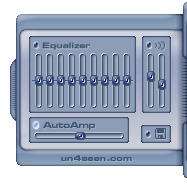
On the top left is the Equalizer, click the title to switch it on. You can adjust the different bands, or reset them by right-clicking them. Right-clicking the title allows you to load various presets. On the top right is Reverb, which simulates a large chamber in which your music is played. You can adjust the reverb time and reverb level to tune it to your liking. On the bottom left is the Auto-amp slider, which control the level of decoding audio (read more about it on the DSP page of Options and stuff). On the bottom right is a switch to Automatically load saved settings, which concerns the Saved Settings in Options and stuff. Right-clicking the button allows you to directly load a setting saved as a preset.