Skins (156)
Visuals (115)
Input Plugins (34)
Output Plugins (6)
General Plugins (14)
Archive Readers (15)
Input Plugins (41)
DSP Plugins (10)
External Add-ons (16)
XMPlay Archive (71)
Skins (156)
Visuals (115)
Input Plugins (34)
Output Plugins (6)
General Plugins (14)
Archive Readers (15)
Input Plugins (41)
DSP Plugins (10)
External Add-ons (16)
XMPlay Archive (71)
This section will treat every page of Options and stuff indepedently. First, click the button, or right-click somewhere in the Main Window and select Options and stuff.

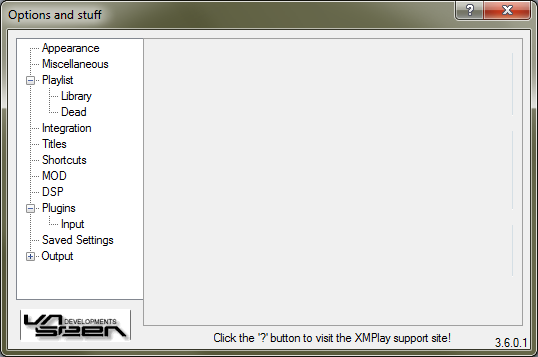
The ?-button at the top will take you to this Support site, while the Un4seen Developments-button takes you to the homepage of Un4seen Developments. On the bottom right, the current version number of XMPlay is shown.
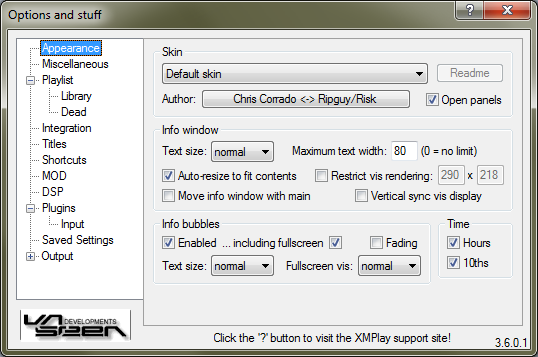
Select a skin from the dropdown box to apply it. Clicking the Readme button opens the readme of the skin, usually containing some information from the author about copyright or how he/she got the inspiration for this skin. Clicking the author's name will launch your default e-mail application to send an e-mail to the author. Checking the Open panels checkbox will cause the panels of the main window to always be opened when switching skins.
Here you can set the text size in the Info Window (of the contents, not of the buttons) and set a maximum width to the text shown. If some field, for example a comment tag, exceeds this length, it will be shown in multiple lines. Set it to 0 to disable the wrapping. Since not all files contain the same amount of information, the Info Window may be nearly empty on some files if it's left at the same size. Ticking Auto-resize to fit contents will make the window fit nicely to show all content.
The Info Window can be moved with the Main Window by ticking Move with main window. Note that this does not work the other way around, i.e. it does not move the Main Window with the Info Window. Another way of moving the Info Window with the Main Window, is dragging the Main Window with the left and right mouse button (first hold down the left mouse button, then the right one as well, then move the window). This method does move the Main Window with the Info Window.
The visualizations can be tweaked as well, by restricting the maximum allowed resolution. If the Info Window is smaller than this resolution, XMPlay obviously uses that smaller resolution. If the size of the visualization exceeds this restriction, it's streched with a linear filter. Ticking the Vertical sync box will synchronize the refreshing of the visualization display to your monitor, to avoid flickering and tearing.
XMPlay can display bubbles when you press a shortcut, to give you feedback on the current volume or the current equalizer state, for example. Here you can switch those bubbles on for the normal mode (Enabled) and for when visualizations are running in fullscreen mode (including fullscreen). The bubbles can appear and disappear with a fade (tick Fading, note that it only works on Windows 2000 and newer), or instantly, and you can set the text size for the normal mode and for fullscreen visualizations.
The Main Window has a time display, and everybody has his or her own preference for that. If you're easily distracted by changing numbers, you might want to switch of displaying 10ths of seconds. Ticking the Hours box will make XMPlay show hours, rather than over 60 minutes, if your track runs for that long.
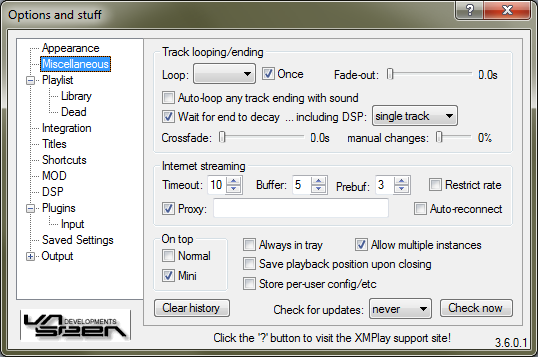
Here you can tweak some settings concerning track changes. You can set Loop to never, always, or auto. Auto will loop the track if the track contains proper looping information (mostly modules), or when you check Auto-loop any track ending with sound and a track does not end with silence. You can set a Fade-out at the end of every looped track. Some particular formats, like MIDI, have notes that extend beyond the actual playback time, and XMPlay can wait for those to decay (Wait for end to decay). Some DSPs can generate echoes as well, so XMPlay can wait for those as well (Single track will only wait for that if auto-advance is off). An often-requested feature is crossfading, and that's built right into XMPlay. You can change the Crossfade length here, as well as adjust how long the crossfade should be when you manually change a track (a percentage of the regular crossfade length). Note that crossfading only works between files with the same sample format, unless you tell XMPlay to resample all output.
Here you can set the various options XMPlay uses when streaming over the network. The Timeout specifies how long in seconds to wait for a response before a server is marked as being offline. The Buffer determines how much audio XMPlay loads into memory to account for network problems. If your online radio stream frequently drops out and re-buffers, try increasing this value. The Prebuf value specifies how much audio XMPlay should load before starting to actually play the stream. For fixed-length streams (e.g. not live radio, but files on a server), XMPlay can download them as fast as possible, or at a rate sufficient to keep the audio playing (Restrict rate). In the Proxy-field, you can specify the proxy configuration XMPlay should use, in the form of user:password@server:port. Ticking the Proxy box but not specifying an address will have XMPlay use Windows proxy settings. If you provide only user:password@ will use the Windows proxy as well, while server:post will use the proxy without authentication. If a stream drops out, for example because of network issues, you can have XMPlay reconnect automatically by ticking Auto-reconnect.
Note that these streaming settings are applied to all network streams, including streams played through plugins like RealAudio and Windows Media streams.
Just two checkboxes, so you can choose to have XMPlay on top of other windows when it is in Normal and in Mini mode.
The Clear history-button removes the folder and URL history from the Open file-dialog, as well as clearing the list of recent searches. Always in tray specifies whether XMPlay should always have a tray icon, or whether it should appear on the taskbar like regular programs. Save playback position upon closing makes the close-button on the Main Window default to Close with position saved, so you don't have to go through the context menu for that. Store per-user config/etc makes XMPlay save its settings, playlist and library in the user's Application Data folder, rather than right next to xmplay.exe. This can be useful if you're using the same XMPlay with different users, or if you don't have sufficient privileges to change files in C:\Program Files (for example on Windows Vista/7 or on corporate installations of XMPlay ;) ). If you'd like to have multiple XMPlays running at the same time, for example to transcode some modules in the background, tick Allow multiple instances. If the box is unticked and you open files from Explorer, they will be loaded in the current XMPlay. Finally, XMPlay can check for updates, either manually using the Check now-button, or regularly using the dropdown box. The check will give you a notification when there is a new major version of XMPlay, or when there is a new revision of one of the native plugins you have installed.
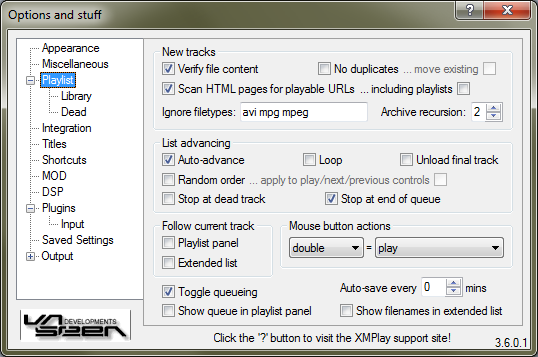
Tick Verify file content to check whether files are actually playable, instead of just checking the extension. If you add files, you can prevent adding duplicates to your playlist by ticking No duplicates. If you then do add a duplicate, you can choose to move the file to where it would be added (tick move existing). If you try to add an HTML page, XMPlay can search for online streams on that page (Scan HTML pages for playable URLs), or for links to playlists (including playlists). The found entries are then treated as added tracks. In the Ignore filetypes-textbox, you can add extension which XMPlay should never load, separated by spaces. Using archive plugins, XMPlay can load music files from compressed archives, but also from archives in archives. The Archive recursion setting determines how many levels of archives-in-archives XMPlay will accept.
By default, XMPlay continues playing the next file after the current file has finished, but you can prevent that by unticking Auto-advance. If you'd like XMPlay to randomly choose the next song, check Random order. Note that this does not change your playlist, so you can't see what song will be played next. In random mode, the next button selects the actual next track in the playlist, not a random one, except if you check apply to play/next/previous controls. If XMPlay encounters a dead track in the playlist, you can have it try the next one by unticking Stop at dead track, otherwise it'll halt at the dead track. If XMPlay reaches the end of the playlist, it'll start at the beginning again if you have Loop checked. If XMPlay reaches the end of the queue, it'll continue with the next track from the playlist if you have Stop at end of queue unticked. Finally, if XMPlay reaches the final track and stops after that one, be it of your playlist or your queue, you can choose to keep it loaded, or to unload it from your computer's memory (Unload final track).
If ticked, XMPlay will keep the current track visible in the Playlist panel or in the Extended Playlist by scrolling the playlist on track changes.
Here you can define what double-clicking a track should do, as well as middle-clicking and clicking with the two additional buttons you might have on your mouse. You can choose none, play, queue, dequeue, add to/from library, track info, plugin info or remove for each button
Toggle queueing lets you queue a track only once, trying to queue it again will dequeue it. If you untick this box, you can queue a track multiple times, but you have to remove it from the queue with the dequeue action or shortcut. The playlist panel in the Main Window can show the queue if you tick Show queue in playlist panel. The Extended Playlist does not have this functionality. Auto-save every .. mins saves the playlist and the library periodically, so you don't lose too much playback information should anything crash. Finally, Show filenames in extended list forces XMPlay to show full filenames in the Extended Playlist, rather than the formatted titles.
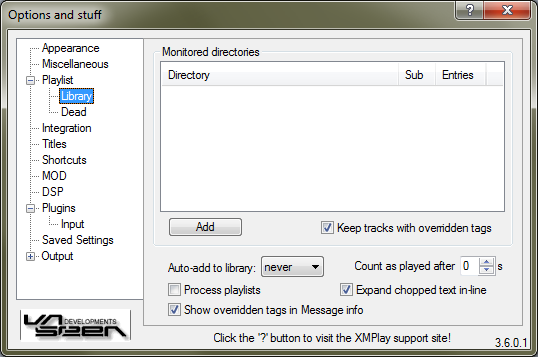
Click Add to add a directory. XMPlay will scan these folders for audio files and will add everything it finds to the library. This will take a while, and it'll show scan in the Entries column when scanning is still in progress. In addition, XMPlay will monitor these directories, so files added to these folders appear in the library automatically. The update is not instantaneous, but you can force a rescan by right-clicking a directory and choosing Rescan. The context menu also allows you to change the inclusion of Sub-folders, and you can Remove the directory from the monitored folders list. Removing a monitored folder will not remove files from the library, it'll only stop the automatic scanning of that folder. By ticking Keep tracks with overridden tags, you can force XMPlay to keep the manually entered data even if the file is removed from the library. This is especially useful if you're moving tracks to other folders and don't want to re-enter the tags.
Auto-add to library specifies when files should be added to the library, either when they're added to the playlist, when they are played, or never. Unticking Process playlists allows you to add playlists to the library, rather than the files in those playlists. This functionality enables you to add the (online) playlist files for online radio stations, so XMPlay always gets the up-to-date stream server address.
If you've entered overridden tags, you can show the original tags in the Message tab of the Info Window as well by ticking Show overridden tags in Message info. XMPlay keeps the play count and the last play moment of tracks in the library, but it will only count a track as played after the number of seconds you put in Count as played after. Tags which are too long for the columns will be shown partially, but if you hover over them they will be shown completely if you've checked Expand chopped text in-line.
Tracks are marked as Dead if they are somehow unplayable for XMPlay. This can either be because the file format is not supported, because the file is corrupted or because the file is missing altogether.
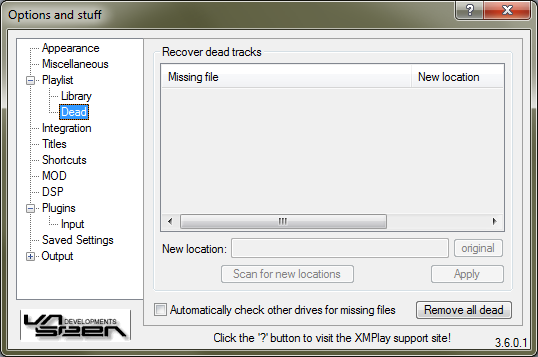
If you somehow end up with dead tracks in your playlist or library, you can try to fix them here. Dead tracks are usually caused by a user moving files, for example when you're reorganizing you music library. You can manually enter the new location in the New location box, or open the folder selector by clicking Scan for new locations. XMPlay looks for files with the same filename and of the same filesize as the missing file. If XMPlay finds your missing track in the new location, hit Apply to update the entries in the playlist and the library.
If you run XMPlay from a portable drive, you'll notice that the drive letter can change when you re-plug devices. Instead of manually re-adding or restoring all entries in the playlist or library, you can have XMPlay check for the same paths on other drives if it misses some entries by ticking Automatically check other drives for missing files. On the far right there is a button to use if it all went wrong, so you can Remove all dead entries from the playlist and the library.
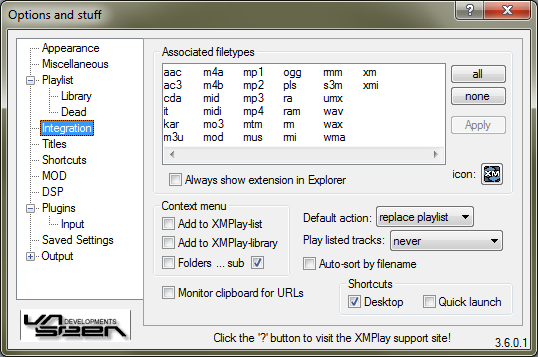
The box will list all filetypes which XMPlay can play, including those played by plugins. Select the extensions you'd like to use XMPlay for and hit Apply to apply the changes to the registry. You can also select extensions using the all or none buttons. All the extensions you highlighted will be grouped under XMPlay-able file. If you'd like to be able to discern the different formats, tick Always show extension in Explorer to make sure Windows doesn't hide the extension because it's known. On the bottom right is an Icon button, which allows you to assign a custom icon to the XMPlay-able filetype. If you want to use multiple filetypes for the association, refer to Custom filetypes and icons.
Instead of just opening a file by double-clicking it in Explorer, you can also use some more specific actions in the context menu. Add to XMPlay-list will add the file to the playlist, while Add to XMPlay-library will add it to the library. To load complete folders via their context menu in XMPlay, tick Folders. The sub options determines whether XMPlay should look in subfolders of the added folder as well (note that this option also applies to drag-and-dropped folders and folders passed via the command line).
A quick way to create a shortcut for XMPlay. Tick the ones you'd like to have, on the Desktop or on the Quick launch bar (not on Windows 7).
Default action determines what XMPlay should do with incoming files: either remove all current entries and replace the playlist with the new files, or keep the current entries and add the new files to the playlist, or add the new files to the playlist and add them to the queue. This setting applies to all files coming into XMPlay, except via the Open or Add file/directory dialog.
After the tracks are placed in the playlist, you can choose what XMPlay should do with them with the Play listed tracks option: never play those tracks, or always, or only if no other track is playing, or after bookmarking the position in the current track.
If you've added files via drag-and-dropping, there's a good chance Windows gave them a different order than you expected, so you can Auto-sort the files by filename by ticking the box.
Finally, a nice option if you're looking for new online radio stations, Monitor clipboard for URLs. When XMPlay recognizes a stream or playlist address on the clipboard, it'll add it to the playlist. (In your browser, right-click a link and choose Copy shortcut or Copy link to copy the link to the clipboard.)
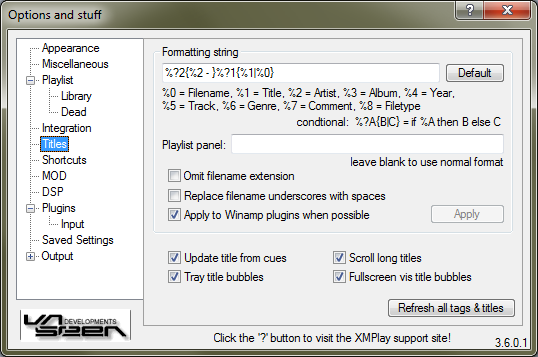
In the top box you can type in the title formatting you'd like to use. You can create conditional entries (%?2{%2|} shows the Artist tag if it is present) and entries with a maximum length (%cut{%2|10|.} will cut the Artist tag if it is longer than 10 characters and replace the cut part with .). The Playlist panel on the Main Window is usually smaller than the Extended Playlist or the title display, so you define an alternate title formatting for that. If you leave the box blank, the regular formatting string will be used on the Playlist Panel as well. If you're using the filename (%0) in your title formatting, there are two options to make things prettier: one to not show the file extension (Omit filename extension) and one to Replace filename underscores with spaces. Some Winamp plugins tend to use their own title formatting settings, but with Apply to Winamp plugins when possible you can tell XMPlay to try to fix that. Once you've changed the formatting string, click Apply to start using it.
If you have CUE-files with your audio files, XMPlay can load the subtracks from it if you tick Update title from cues. The CUE-file should have the same filename as the audio file (except the extension, which should be .cue). CUE-sheets can also be embedded in tags, for example in FLAC files. This option applies to title information from internet streams as well, which can be found on most ShoutCast streams. If a title is too long for the title field in the Main Window, you can have XMPlay Scroll the long titles so you can see all of it. XMPlay can show bubbles when the title changes, and you can configure to show them near the tray icon (Tray title bubbles) and when fullscreen visualizations are active (Fullscreen vis title bubbles). Note that these are title bubbles, the info bubbles can be configured on the Appearance page. On the bottom right is a big button to force XMPlay start Refreshing all tags and titles, so you can see how it works out for all your tracks.
Once you know your way around XMPlay, you'll notice that you're often performing the same action with the mouse. Nearly everything can be controlled with the keyboard, and this page allows you to configure that.
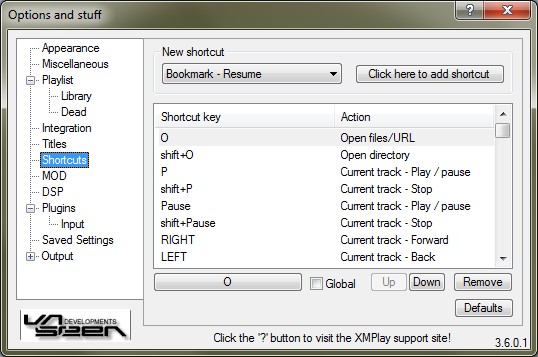
From the dropdown box, select the shortcut you'd like to set up, for example Current track - Play/pause. The click the Click here to add shortcut button. Now press the key (or key combination) you'd like to use, for example the Pause button on the top right of your keyboard. The shortcut will be added to the shortcut list below.
This list shows the shortcuts currently configured. Note that a key combination can be assigned to multiple actions, so XMPlay will execute a chain of actions with just one press of a button (like selecting the current track, selecting all tracks from the same album and then removing them from the playlist). The actions are executed in the order in which they are listed (top to bottom). Select a shortcut to tweak its settings. With the buttons on the bottom, you can change the keyboard key the selected shortcut is assigned to (in this case O). Ticking the Global checkbox will make that particular shortcut work even when you're using a different program and XMPlay doesn't have focus. With the Up and Down buttons, you can order the shortcuts in the list. The Remove button removes the shortcut. To revert back to the basic settings, hit the Default button.
This is the list of default shortcut bindings. You can change them on the Shortcuts page.
| Shortcut key | Action |
|---|---|
| O | Open files/URL |
| shift+O | Open directory |
| P/Pause | Current track - Play / pause |
| shift+P/Pause | Current track - Stop |
| Home | Current track - Restart |
| right | Current track - Forward |
| left | Current track - Back |
| shift+right | Current track - Next subsong |
| shift+left | Current track - Prev subsong |
| Page Up | Change track - Previous |
| Page Down | Change track - Next |
| End | Change track - Random |
| Insert | List - Add files/URL |
| shift+Insert | List - Add directory |
| ctrl+Z | List - Undo |
| Q | List - Show queue in list |
| shift+/ | List - Clear queue |
| up | List nav - Up |
| down | List nav - Down |
| ctrl+up/down | List nav - Jump to current |
| shift+up | List nav - Select extend up |
| shift+down | List nav - Select extend down |
| ctrl+A | List nav - Select all |
| ctrl+I | List nav - Invert selection |
| ctrl+F | List nav - Find |
| alt+F | List nav - Find quick |
| F | List nav - Find next |
| shift+F | List nav - Find previous |
| ctrl+shift+F | List nav - Find all |
| Enter | List track - Play |
| Space | List track - Skip |
| / | List track - Queue |
| ctrl+/ | List track - Dequeue |
| Delete | List track - Remove |
| shift+Delete | List track - Remove & delete file |
| + (numpad) | DSP - Volume up |
| - (numpad) | DSP - Volume down |
| / (numpad) | DSP - Balance left |
| * (numpad) | DSP - Balance right |
| M | Toggle mini mode |
| N | Minimize / restore |
| shift+N | Minimize to tray / restore |
| alt+F4 | Close |
| alt+shift+F4 | Close with position saved |
| F9 | Options and stuff |
| F1 | Info - General |
| F2 | Info - Message |
| F3 | Info - Samples |
| F4 | Info - Visuals |
| F5 | Info - Extended list |
| F6 | Info - Library |
| ctrl+C | Info - Copy to clipboard |
| 8 (numpad) | Info - Scroll up |
| 2 (numpad) | Info - Scroll down |
| 4 (numpad) | MOD pattern - Prev channel |
| 6 (numpad) | MOD pattern - Next channel |
| 5 (numpad) | MOD pattern - Mute channel |
| 7 (numpad) | MOD pattern - Unmute all |
| 9 (numpad) | MOD pattern - Invert all |
| F12 | Reload skin |
This page only applies to playback of module files (XM, MO3, IT, S3M, MTM, MOD and UMX).
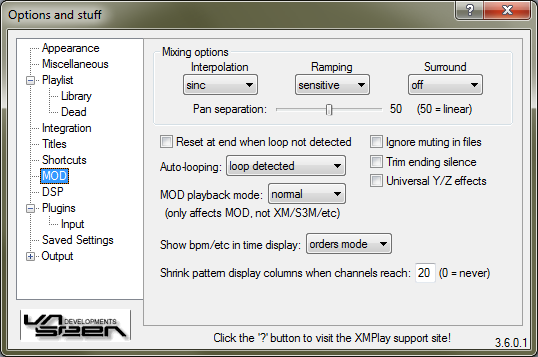
If XMPlay plays a sample, it can Interpolate it using a linear or sinc algorithm, or use no interpolation. The sinc method sounds smoother, but requires more CPU power. Some samples will produce clicks when large volume or panning changes are applied, but the Ramping setting will introduce a short fade-in to prevent that when set to normal. When set to sensitive, the ramping is only applied it the sample would otherwise produce a click, while it remains off for others samples, like percussion. The Surround setting at mode1 emulates a surround setup of the module, and mode2 does the same while ignoring panning of samples. The Pan separation (distance between left and right) for modules can be adjusted using the slider.
If you're looping a modules which is not intended to be looped, some settings (like channel volume) may be off. XMPlay can Reset these at the end of the file when a looppoint is not detected. If you've set track looping to auto (at the Miscellaneous page), this determines how modules should be looped: never, when a loop point is detected, or only if the detected loop point is not the start of the file. Since not all trackers played MODs the same way, you can choose how XMPlay should play them with the MOD playback mode. It can be set to normal, FT2 (FastTracker 2), PT1 (ProTracker for Amiga) and PT1 -filter (Protracker without Amiga filter). XMPlay can show additional information when playing modules, like beats-per-minute, speed and channel usage. With Show bpm/etc in time display you can choose what to show in the title area of the Main Window: nothing additional (never), only the order display (orders mode, as an alternative to elapsed/remaining time), or everything (always). If you're using the MOD Pattern Display visualization, the number of channels may exceed you screen width, so you can Shrink the pattern display columns when channel count reaches when it grows too large. When shrinking, XMPlay will remove the volume/instrument column from view. Ticking Ignore muting in files will make XMPlay ignore channel muting in IT or S3M files. Trim ending silence will remove the silence at the end of the track, and instead XMPlay will continue playing the next track. Universal Y/Z effects enables Yxx and Zxx IT effects in XM and S3M files, as used in MPT (ModPlug Tracker).
XMPlay's internal Digital Signal Processing has three functions. Note that the delay in the effects is determined by the output buffer used.
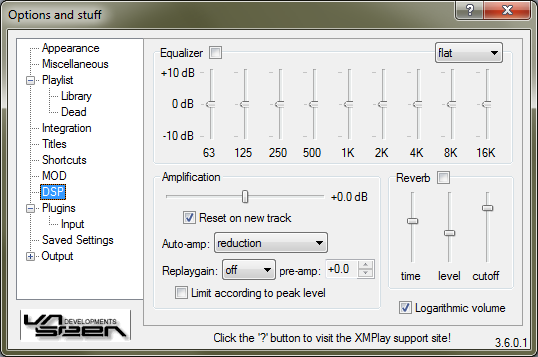
With the checkbox, you can switch the Equalizer on or off (note that there's a shortcut for that as well). The dropdown box on the far right allows you to select a preset. With the sliders, you can adjust the attenuation of the frequency bands. Right-clicking a slider will reset it to zero.
The amplification controls the audio level of the decoder. The slider is the amplification slider. Right-click it to reset it to 0 dB. Ticking Reset on new track will have XMPlay reset the amplification to 0 dB when going to the next track, or to the Replaygain value if present. The Auto-amp has four modes.
![]()
![]()
![]()
![]()
simplified overview: off / reduction / fade-in & reduction / dynamic
XMPlay can read Replaygain tags from OGG, ID3v2 and APEv2 tags. Native input plugins, like xmp-flac, can provide Replaygain tags as well. Winamp input plugins do not support Replaygain tags. With the dropdown box you can select which tag to use: off (use none), track or album. If you've chosen for the track setting and XMPlay encounters a file with only an album Replaygain tag, it'll use that instead (and vice versa if you chose the album setting). If you choose either track or album, the auto-amp is automatically disabled until you move the slider manually. The pre-amp allows you to add a constant value to the Replaygain value. Replaygain tags can contain peak levels as well, and if you tick Limit according to peak level XMPlay will use those values to determine the amplification at which the audio will not clip (note that this does not take any other DSPs into account).
Reverberation simulations a large chamber in which your music is played, with echoes coming back from the walls. Activate the Reverb by ticking the checkbox. You can adjust the reverb time, the reverb level and the cutoff frequency to tune it to your liking.
Logarithmic volume control enables logarithmic behaviour (in decibels, from silence to +0 dB) of the volume slider, rather than linear behaviour (from 0 to 100).
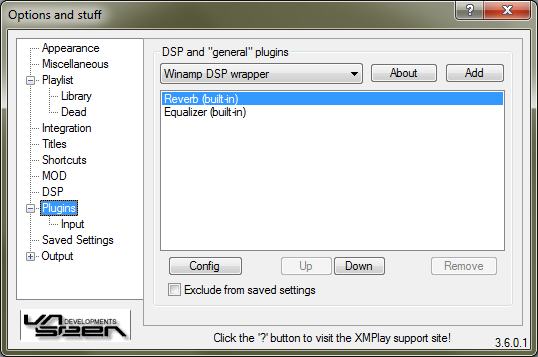
DSP and functionality plugins are listed here. If you'd like to add a plugin, select it from the dropdown box and click Add. The About button opens the about dialog of the plugin, which usually contains version information. Once a plugin is added, it'll be shown in the list. The Reverb and Equalizer DSPs are built-in, so they are always present. To open a plugin's configuration, select it in the list and click the Config button below the list. The Up and Down buttons allow you to change the order of the DSPs, the Remove button removes the selected plugin from the DSP chain. In some cases (for example xmp-scrobbler), you'd like a plugin to persist for all tracks, even if those have separate Saved Settings. In that case, you can tick Exclude from saved settings, to make sure the plugin is always loaded. Note that this option is only available for plugins which allow only a single instance.
XMPlay can use most of the DSP plugins built for Winamp via a wrapper. Add the wrapper to the DSP list and click Config to open the wrapper config.

One instance of the wrapper can load a single Winamp DSP plugin, but you can put multiple wrappers in the DSP chain. From the Plugin list, select the plugin you'd like to use. The Config button opens the plugins configuration window. Note that you have to tick the Enabled checkbox for the wrapper to actually feed audio to the plugin. The rest of the options apply to the wrapper. The Resolution dropdown box determines the resolution of the audio XMPlay passes to the plugin. 24 and 32 bit is supported, but most Winamp DSP plugins only support 16 bit. The Reset buffer checkbox resets the audio buffer of the plugin when seeking or changing tracks, to remove any sound from the previous tracks. If a plugin increases the volume of the sound, the audio may sometimes start to clip. To avoid this, the wrapper can Borrow a bit for headroom. If a DSP introduces some kind of echo or reverb, there will be sound just after the original file goes silent. To notify XMPlay of this, tick Effect has tail, so XMPlay doesn't cut off the track.
A detailed guide on how to set up an IceCast stream with XMPlay can be found in Advanced output: Icecast streaming.

On top is a list of all the input and archive plugins currently loaded, both native and Winamp input plugins. About opens the about dialog of the plugin currently select, Config opens the configuration dialog, if applicable. The Supported filetypes box displays the extensions the selected plugin supports. When XMPlay tries to play a file, it'll try its internal decoders first, followed by the plugins in the order they are listed here. If you'd like a plugin to get the first try on a particular filetype, type that in the Priority filetypes textbox. You can add multiple extensions by separating them with spaces.
Note that Winamp plugins which use their own output are not supported by XMPlay.

Once you play a lot of different tracks and formats, you'll notice the preferences for certain tracks can be different. Instead of manually changing everything each time, XMPlay can save 4 groups of settings:
These settings are saved for a certain group of files, determined by the dropdown box:
The Add button adds the current settings to the list below. The name of the settings can be edited by clicking on it. Right-clicking the setting will allow you to Load the setting, Update it with the current setting or Remove it. Clicking the Save settings button will save the settings (to the file xmplay.set), otherwise all changes are discarded.
To Automatically load saved settings, tick the checkbox. When loading a track XMPlay will now look for a match within the saved settings. It looks for a matching file entry first, if that's not available if looks for a matching tags entry, then for type and then for path. If there are multiple matching path entries, XMPlay will use the longest one. If a match is found, the settings from that entry are loaded.
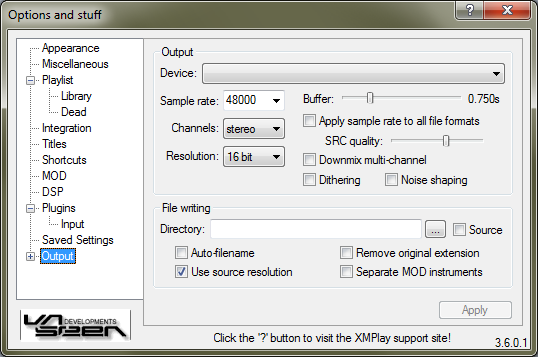
From the dropdown box, select the output device you want XMPlay to use. There are a number of devices available:
The last three types will only be available if you have the respective output plugins installed. The Sample rate dropdown box determines the sample rate in Hz. Channels sets the number of channels, mono or stereo. Resolution is the resolution at which the data is sent to the soundcard. The Buffer slider sets the amount of audio XMPlay keeps in the output buffer, to prevent hiccups. Normally, the sample rate only applies to module formats, stream formats are outputted at their own sample rate (or higher, if the soundcard doesn't support the original sample rate). If you tick Apply sample rate to all file formats, all output is resampled to the sample rate you choose before it is sent to the output device. You can choose the resampling algorithm quality with the SRC quality slider (left=lowest quality with 4 points, right=highest quality with 128 points). Multi-channel audio is only downmixed if you tick Downmix multi-channel. Dither adds white noise to the audio to randomize quantization problems, and Noise shaping improves the process quality when lowering the audio resolution. Changing any of these settings requires the output device to be re-initialized, so hit the Apply button to activate the new settings.
In the Directory box, you can choose a default directory to write files to. Ticking the Source box will have XMPlay write the file to the same directory as the input file. Once you start a file-writing process (either with the WAV-writer or with an encoder), XMPlay will pop up a dialog box asking for the output filename. Checking Auto-filename will give the output file the same name as the input file, with the new extension added. Remove original extension will remove the extension of the input file from the output filename (e.g. file.wav instead of file.mo3.wav). Use source resolution is for lossless tracks, so the output file has the same resolution as the input file, making your output truly lossless. If you're writing a module file, you can create a separate output file for each instrument by ticking Separate MOD instruments. The instrument number is added at the end of the output filename.
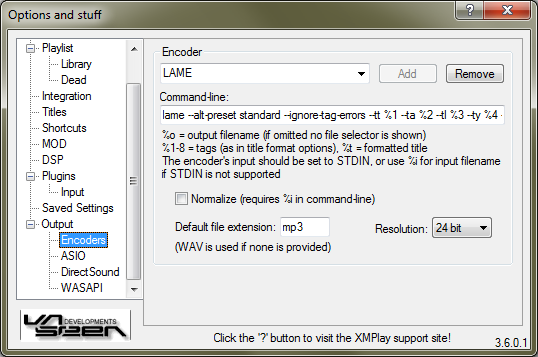
Instead of sending the audio to your soundcard, XMPlay can also pass it to an encoder. Any encoder that has a command line interface can be used with XMPlay. From the dropdown box, you can select a preset. If you type a new name in the box, you can click the Add button to create a new preset. Remove deletes the current preset. In the Command-line box you should put the command line syntax XMPlay should use to run the encoder. If the encoder supports STDIN (most modern encoders do), use - on the command line. If it doesn't, use %i and XMPlay will write a temporary WAV-file for the encoder to work with. Ticking Normalize will use the normalized WAV-writer rather than the regular one. The Default file extension box should contain the extension the file should have after encoding, so XMPlay can name the output file properly. Finally, Resolution determines the bit depth of the audio being sent to the encoder, either a specific resolution (8, 16, 24 or 32 bit) or the one following from the output settings.
For more information on setting up encoders, refer to Advanced Output: External Encoders.
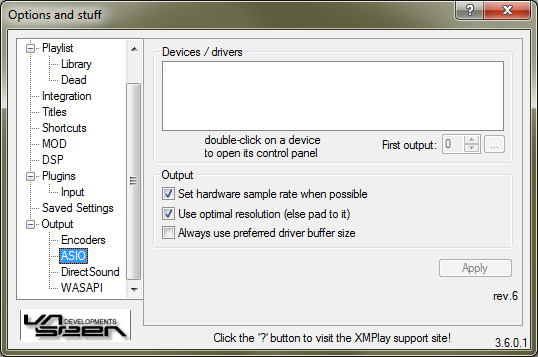
Audio Stream Input/Output (ASIO) is Steinbergs low-latency protocol designed for musicians. It completely bypasses Windows sound mixers and has XMPlay communicate with the soundcard directly. Note that your soundcard needs a specific ASIO driver, or try ASIO4ALL. Audio output over ASIO is bit-perfect. Click the Apply button to apply the changes.
The listbox will show the ASIO output currently available on your system. Double-click an entry to open its control panel. First output determines the first output channel to use. If you set it to two, a stereo file will be played on channel 2 and 3. Clicking the button next to it will show what channels the device has available.
Set hardware sample rate whenever possible will try to set the soundcard to the sample rate of the current file, to avoid the need for resampling. If unticked, the sample rate of the device will be left as it currently is and XMPlay will resample to that. Use optimal resolution will have XMPlay generate the audio at the resolution the soundcard supports (instead of the resolution you chose on the Output page). If unticked, XMPlay will use the resolution of the Output page and pad the audio up to the resolution of the soundcard. Always use preferred buffer size lets the device use the buffer set in its control panel, otherwise XMPlay will calculate a buffersize for the device.
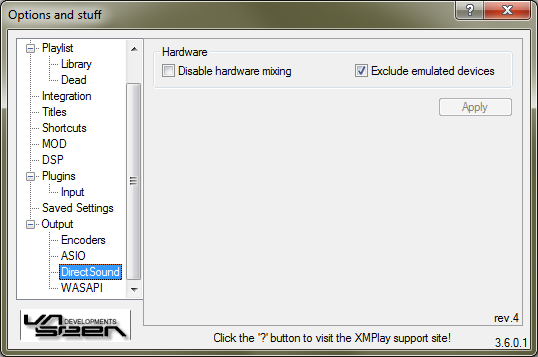
DirectSound uses the Microsoft DirectX library to communicate with the soundcard. This plugin is designed to be used on systems with Windows XP (or earlier versions of Windows). You can select the DirectSound device you want to use on the main Output page. If your soundcard driver supports it, audio may be upmixed from stereo to all channels, but that happens outside of XMPlay. Disable hardware mixing will force all mixing on the CPU, rather than having the soundcard itself handle it. This option should only be used to circumvent dodgy soundcard drivers. Note that ticking this option will disable the upmixing. Exclude emulated devices will hide any devices which are not true DirectSound devices, for example when your systems lacks the correct DirectSound drivers for your soundcard and emulates it through WaveOut. If you change either of these settings, hit Apply to apply the change.
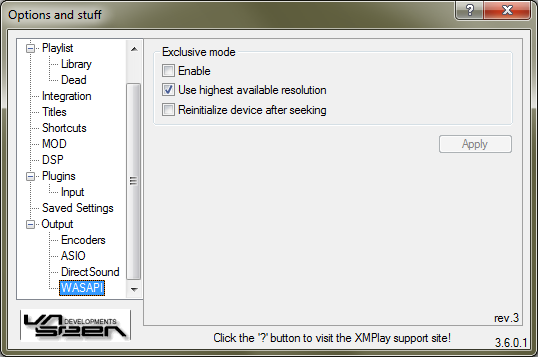
For Windows Vista, Microsoft completely reworked the audio processing path into a new system, WASAPI. If you have Windows Vista (or a newer version, like Windows 7), this is the preferred output method, since WaveOut and DirectSound are converted into WASAPI instances by Windows as well. WASAPI has two distinct output modes, Shared mode and Exclusive mode. Shared mode is default, and has Windows combine audio from all programs into a single stream for the soundcard. If you Enable exclusive mode, XMPlay will be the only program allowed to send audio to the soundcard and the output to the soundcard will be bit-perfect. Use highest available resolution has XMPlay use the highest resolution the soundcard supports, rather than what you chose on the Output page. If your soundcard seems to replay and old bit of audio when you seek, or when it just hangs on seeking, tick Reinitialize device after seeking to have XMPlay work around this problem. And ofcourse, hit Apply to apply the changes.