Skins (156)
Visuals (115)
Input Plugins (34)
Output Plugins (6)
General Plugins (14)
Archive Readers (15)
Input Plugins (41)
DSP Plugins (10)
External Add-ons (16)
XMPlay Archive (71)
Skins (156)
Visuals (115)
Input Plugins (34)
Output Plugins (6)
General Plugins (14)
Archive Readers (15)
Input Plugins (41)
DSP Plugins (10)
External Add-ons (16)
XMPlay Archive (71)
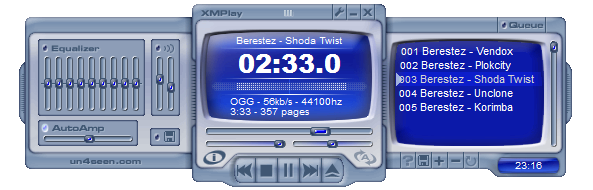
The title area shows the title of the current track, the elapsed time, a volume bar and information about the format of the track. Clicking on the time display will make it switch to the remaining track time. If you're playing modules, clicking the time display again will make it go to order postion (with the active channel count on the left and the beats per minute (BPM) and speed on the right). The Playlist panel and the DSP panel can slide out by dragging their handles, or by double-clicking on the handles.
Playback buttons and sliders
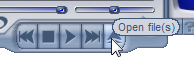
At the center bottom of the Main Window, you can find the regular buttons. From left to right: previous, stop, play/pause, next and open file. Above these buttons are three sliders; lower left is the volume slider, lower right the balance slider and the big one above them is the position slider. If you're playing a file over the network, the shading of the position slider will indicate how much XMPlay has downloaded of the file. The volume can be changed with the slider, but also by using the mouse scrollwheel over an unused area.
Left-clicking the buttons and sliders makes them do what you'd expect, like going to the next or previous track, pausing or stopping playback or changing the volume. Clicking the Stop button twice will unload the track. Right-clicking them brings up a context menu or does something special. Right-clicking the next or previous buttons makes XMPlay jump to the next subsong of the current track (for example, in modules or in tracks with a CUE-sheet). The stop button brings up a context menu where you can stop the playback after the current track. The play/pause button has XMPlay play a different, randomly chosen track from the playlist. Right-clicking the open file button brings up the Open folder dialog, which lets you add all the files in a folder (and optionally its subfolders) to the playlist. The right-clicking applies to the sliders as well: you can mute the volume, reset the balance slider and Set or Resume a bookmark position by right-clicking the three sliders. The bookmark is to temporarily save a single position in the current file, for example if you quickly want to preview a different file; if you Resume the bookmark, XMPlay will continue playing exactly there again. The bookmark position is lost when you close XMPlay.
Other buttons
On the top right of the Main Window are three buttons. The first one, depicting a wrench, opens up Options and stuff. The second one minimizes XMPlay to the taskbar, or to the system tray if you right-click it. The third one is the Close button, which shuts down XMPlay. Right-clicking the Close button gives you more options, so you can close XMPlay automatically at the end of the current track or at the end of the playlist. Or, a really nice one, Close with position saved, so XMPlay continues playback from the current position when you start it again.
Near the playback buttons are two additional buttons. The left one (i) opens the Info Window, right-clicking it allows you to jump to a certain page of the Info Window, like the Extended Playlist or the Library. The right one (A) controls track looping by cycling through the different loop modes (see the Miscellaneous page of Options and stuff).
By double-clicking on an unused section of the Main Window, for example on the big bar at the top, the Main Window switches to Mini mode. Double-clicking it again will make it go back to normal.

By default, the Mini mode is display on top of other windows, a setting which can be changed in Options and stuff. The Mini mode contains the most essential buttons and displays, so you can keep XMPlay visible all the time without sacrificing too much of your screen real estate. At the top right are again the buttons for Options and stuff, minimizing and closing XMPlay. The display in the middle shows the title and a volume bar. Right below it are the position slider (left) and volume slider (right). The bottom row, from left to right, has a button to open the Info Window, previous, stop, play/pause and next playback control, an Open files button, a time display and a loop button. All buttons behave the same as in the normal Main Window, including the context menus and right-click actions.
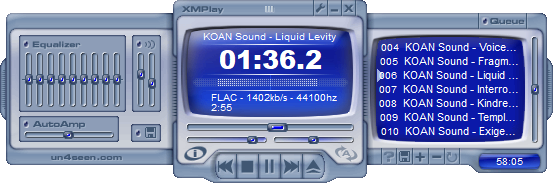
You can get various skins from the Skin section of the Support site). Switching between skins can be done via the Appearance page of Options and stuff, or by right-clicking an unused section of the Main Window and selecting the Skin submenu.
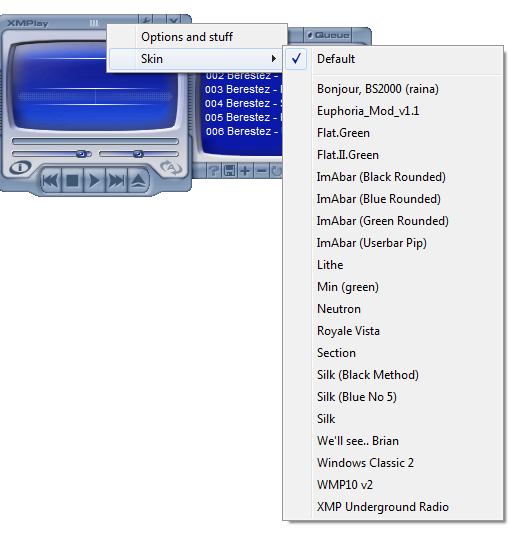
A different skin brings different button styles and placements. This manual won't point out where all the buttons are in each skin, but most of the time the buttons are quite obvious. Note that not every skin includes all buttons and fields, since none of the buttons are mandatory. If you're unsure about what the button represents, just hover over it and wait for the tooltip to appear.
Some examples of what the Main Window looks like with other skins:

 [L1].png)
The Playlist panel contains a small view of the playlist. Note that you can create a different title formatting if you like (see the Titles page of Options and stuff). Left-clicking on an entry will select it (select multiple entries using Shift or Ctrl, like in Explorer), double-clicking will play it and middle-clicking will queue the entry. Hovering over an entry will bring up a popup bubble with the title and the location of the track. If a file isn't playable, it'll have a single red line through it. A double red line means XMPlay couldn't find the file. The playlist supports drag-and-dropping, both for files and folders coming in (just drop them on the playlist) and for files going out (hold down both mouse buttons, first left, then right). If you drop files on XMPlay outside the playlist (for example on the Main Window, or on the tray icon), the playlist will be cleared and the dropped files will be added. You can invert this behaviour by holding down the Shift key when dropping files.
Buttons
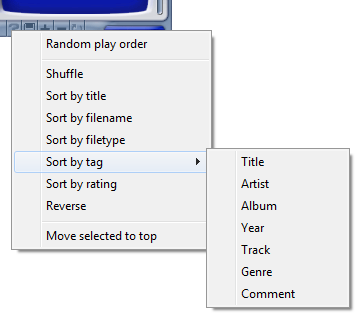
On the top is a large button to show the Queue. On the right is a scroller to scroll through the playlist. Right-clicking the scroller will jump the playlist view to the current track. On the bottom right is a timefield, which displays the total time of the entries in the playlist or the total time of the entries you've selected. Click it to have it show the number of tracks in the playlist. The buttons on the bottom all have their own functions. The first button on the left (?) switches random mode on or off, so XMPlay chooses the next track randomly. Right-clicking it brings up sorting options, like sort by filetype, rating or artist tag. The sorting applies to the tracks you've selected, or to the complete playlist.
The next button allows you to save the playlist to a file (PLS or M3U), so you can easily load all the tracks again. The next two buttons, + and -, add or remove entries from the playlist. Adding tracks brings up a similar dialog as when opening tracks. Right-clicking the add button brings up the Add folder dialog, right-clicking the remove button allows you to choose which entries to remove, for example all dead tracks, or to clear the queue. The last button toggles list looping (note that this is not the same as track looping, described earlier), its context menu gives you some more options regarding list advancing.
The DSP panel contains the most common sound-processing functions.
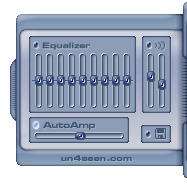
On the top left is the Equalizer, click the title to switch it on. You can adjust the different bands, or reset them by right-clicking them. Right-clicking the title allows you to load various presets. On the top right is Reverb, which simulates a large chamber in which your music is played. You can adjust the reverb time and reverb level to tune it to your liking. On the bottom left is the Auto-amp slider, which control the level of decoding audio (read more about it on the DSP page of Options and stuff). On the bottom right is a switch to Automatically load saved settings, which concerns the Saved Settings in Options and stuff. Right-clicking the button allows you to directly load a setting saved as a preset.

Play obviously plays the file. Write to disk applies to network streams only, and writes the original stream data to disk (very nice if you'd like to record an online radio show). If the stream contains title updates, you can choose to write an additional CUE file containing the titles, or to split the audio file into separate tracks with the titles as filenames. (Note that the title updates are not perfectly positioned in respect to the music, that's inherent to streaming. This means the track split may occur some seconds too early or too late.) Queue and Dequeue add or remove a file to or from the queue. Queueing a file will make sure it is the next file to be played, even if XMPlay is in random mode. Skip tells XMPlay not to play this track unless you double-click on it, and the entry will be grayed out in the playlist. Add to library simply adds the selected file(s) to the library. Locate in library selects all files in the library with for example the same artist or from the same album. (Read more about the library on the Library page). Rating gives you the ability to set a rating to a file, which makes finding your favourite tracks easier. Track Info opens a window with the tag information XMPlay has about a track.
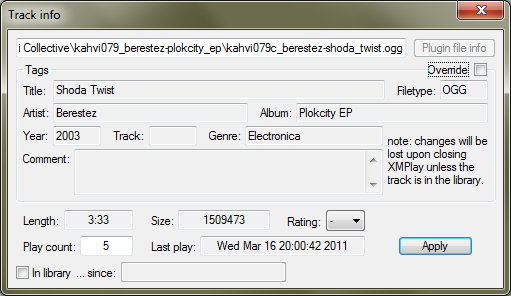
You can override the tags without changing the file by ticking Override. If the file is not in the library, XMPlay will forget the changes you made when it is closed. Going back to the context menu, Plugin file info opens the file info window of the input plugin used for this file, or of the tag writing plugin if applicable. Refresh info from file re-reads the tags of the file and rebuilds the formatted title. Explore folder opens the directory the file is in in Explorer. Remove removes the file from the playlist, Remove & delete file also deletes the file from the harddisk (to the Recycle Bin). Finally, Display columns actually applies to the playlist, not to the selected track, and allows you to select which colums should be shown (entry number, filetype, length and rating are available). The title of the track is always visible.
Next page: Opening files and folders
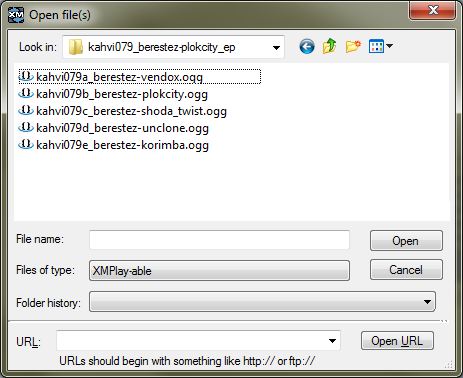
This dialog is very similar to the regular Open file dialog you see in Windows. At the top, you can use the dropdown list to select a directory. In the file view, you can select one or more files (using Shift or Ctrl) you want XMPlay to open. If you only want to see a particular filetype, use the Filetype dropdown box. The Folder history dropdown box allows you to quickly navigate to a recently used folder. The lowest part of the dialog allows you to open URLs to online streams or to their playlists. Links to podcasts can be used here as well. The history of the boxes can be cleaned via the Miscellaneous page of Options and stuff.
The audio tracks of a Mixed Mode CD can be played by loading the whole drive in the Open directory dialog.
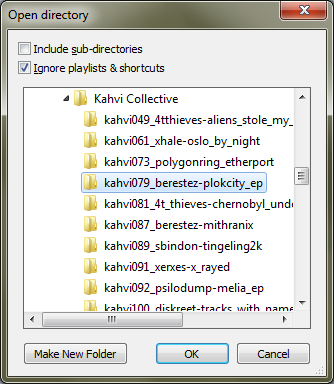
If you right-click the Open file or Add file buttons, you can add a whole folder at once. This dialog box allows you to select which folder you'd like to add. At the top are two checkboxes. Checking Include sub-directories will have XMPlay scan all directories within the directory you selected as well, and add all audio files it encounters. The Ignore playlists & shortcuts box prevents XMPlay from following shortcuts to other folders or files, and it keeps XMPlay from adding playlist files, which usually contain the same audio files that it already found in the folder.
Both these dialogs can appear in two variants: Open and Add. When using the Open one (either for files or for a folder), XMPlay will replace the current playlist with the files you've selected. The Add variant will keep the current playlist, and add the new files to the bottom.
XMPlay can have a system tray icon in two cases: when you minimize it to the system tray by right-clicking the minimize button, or when you set XMPlay to always be in the system tray on the Miscellaneous page of Options and stuff. When XMPlay is in the system tray, you can control some of the basic functions via the system tray menu. Right-click the XMPlay icon to open the menu.
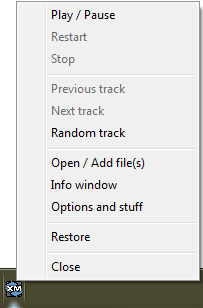
Play/Pause pauses or continues playback like the Play/Pause button does. Restart rewinds the current track and plays it again. Stop, well, stops the current track, clicking it again will unload the current track. With Previous track and Next track you can change tracks, and by clicking Random track you can have XMPlay select a random track. With Open/Add file(s) you can add files to the playlist (note that you get the Open file(s) or Add file(s) dialog based on your default setting when adding files set on the Integration page of Options and stuff). If you Shift-click this entry, you'll get the Open directory or Add directory dialog box. Info window opens the Info Window, and Options and stuff opens, you guessed it, Options and stuff. Restore brings back XMPlay's Main Window to its previous state. Finally, Close closes XMPlay as if you clicked the Close button on the Main Window.
Hit Ctrl+f to open the Find Window, or click the Find button (the !) on the Extended Playlist. Here you can find tracks in the playlist or in the library.
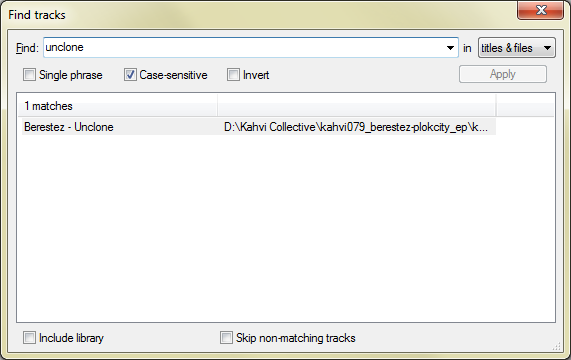
On top is the Find box, where you can type your search terms. Results will appear after a small delay. When you hit enter or click Apply, the search filter will be applied and matching tracks will be highlighted in the playlist.
With the dropdown box on the top right of the Find Window, you can choose where XMPlay should search for these terms: in titles and tags, in filenames, or in titles, tags and filenames. If you tick Single phrase, XMPlay will look for the exact phrase you put in the Find field. If it's unticked, XMPlay will look for tracks which contain all (space separated) Find terms. You can exclude certain terms by prefixing them with -, or look for either of terms using /. For example, a -b c/d would look for tracks containing a, but not b, and at least one of c and d. Ticking Case-sensitive will look for the exact (upper or lower) case you type it in. Invert turns the results around, so the result field will contain all tracks not matching your criteria. By default, all results will be selected, so you can perfom the same operation on all of them (like adding them to the playlist). On the bottom you can also choose to Include the library in the search, rather than only the files in the playlist. If you tick Skip non-matching tracks, XMPlay will set all other tracks to Skip and play only tracks matching your search criteria. Note that there is also a Find quick (a.k.a. Find as you type) shortcut (Alt+F by default), which uses all the settings from this Find dialog (except Invert), but allows you to search for tracks without opening the Find window.