Skins (156)
Visuals (115)
Input Plugins (34)
Output Plugins (6)
General Plugins (14)
Archive Readers (15)
Input Plugins (41)
DSP Plugins (10)
External Add-ons (16)
XMPlay Archive (71)
Skins (156)
Visuals (115)
Input Plugins (34)
Output Plugins (6)
General Plugins (14)
Archive Readers (15)
Input Plugins (41)
DSP Plugins (10)
External Add-ons (16)
XMPlay Archive (71)
There are various things in XMPlay which you don't need in day-to-day use, but that might be interesting nonetheless.
Next page: MOD Pattern Display visualization
This is XMPlay's separate visualization for modules files.
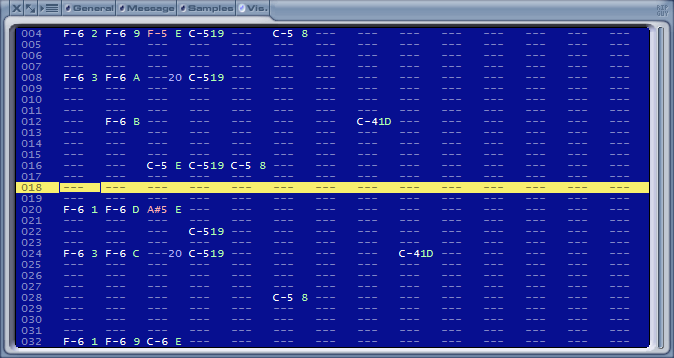
The Pattern Display shows the pattern similar to how it would appear in a tracker, though the number of effects displayed is limited for clarity. All numbers, except the row numbers, are shown in hex. The following items are shown:
The channels can be selected with numpad buttons 4 and 6. The currently selected channel can be muted with numpad button 5, or by middle-clicking a channel with your mouse. With numpad button 7 all channels can be unmuted, and with numpad button 9 channel muting is inverted. These buttons are configurable on the Shortcuts page of Options and stuff. The column size may be shrunk if a module contains a lot of channels, see the MOD page of Options and stuff.
Note that if you'd like to separate each instrument when writing WAV files, you can tick Separate MOD instruments on the Output page of Options and stuff, there is no need to mute all the channels manually.
Next page: Secret INI settings
How things work normally:
When XMPlay starts for the first time, an xmplay.ini file is created that holds the original program settings. Thereafter, most settings that affect the operation and appearance of XMPlay are modified through the built-in menu system. To reach this menu system, right-click on an unused portion of the XMPlay screen and select "Options and Settings". When changes are made, XMPlay keeps track by writing them to the xmplay.ini file.
For the more advanced user:
Certain settings are either too new, too unique, being tested, or for some other reason do not appear in the "Options and Settings" menu system. An advanced user can apply these "secret" settings by manually editing the xmplay.ini file with a text editor such as Notepad. Do not use a wordprocessor as it will probably insert unwanted control codes into xmplay.ini and may cause undesired issues.
Will this always work?
Often a "secret" setting is introduced as a new feature in a test version of XMPlay that is not available in the official distribution package. Such a version has become known as "stuff", because it is stored in and downloaded from the stuff folder of the webserver. You may need to get a newer version to use a certain "secret" setting as a version will ignore settings it doesn't understand. The latest stuff version can be downloaded from the official XMPlay forum.
How to use a "secret" setting:
The "secret" settings are entered as a line in the [XMPlay] section of xmplay.ini file. As the xmplay.ini can have several different sections, you must be careful when editing since the "secret" setting will not work if it isn't in the [XMPlay] section. Perhaps the easiest way to ensure correct placement is to find the [XMPlay] section header (often the first line in the xmplay.ini file) and insert your line immediately below it. This also places your edits at the top of the list, making them easier to find or change later. The format is the setting name, an equals sign, and the desired value of the setting. For example, a line could be "SingleClickTray=1" and is entered without the quotes.

Put them all there:
Some of the cutting edge users intentionally put all of the "secret" settings (each with the default value) into the xmplay.ini file even if they don't intend to modify the setting. If they want to experiment later, they can see the setting's correctly-spelled name and change from the default value on that line.
Restart XMPlay to activate:
XMPlay reads the xmplay.ini file when it starts. When you change a "secret" setting by manually editing the xmplay.ini file, XMPlay won't know. Restart XMPlay to re-read the xmplay.ini file and make the setting take effect.
XMPlay "Secret" Settings
Last updated on: 2026-03-09
| Setting Name | Default | Brief Description |
|---|---|---|
| Boost | n/a | Boost (merely present, regardless of type/value assigned) increases the priority Windows assigns to the XMPlay GUI. The audio decoding and playback thread is always at real-time priority, so Boost has no affect on audio, but may help minimize visualization choppiness if you have other programs competing for CPU resources. Forum Link |
| CueMark | 0 | [3.6.0.53 and later] When using CUE files, CueMark=1 will enable a one-pixel markers on the seekbar to denote the track borders to aid position seeking. Forum Link |
| EndPadding | 0 | [3.6.0.66 and later] Specify amount of padding (in milliseconds) to add at the end of playback to eliminate cutting the music selection short. "EndPadding=50" would add 50ms of padding. Forum Link |
| FlashTrack | 0 | [3.6.0.82 and later] The currently playing track on the playlist or library can be visually difficult to identify, especially with certain skins and/or colors. FlashTrack=1 enables flashing of the current track to enhance visibility. Forum Link |
| HLSDelay | 30 | [3.8.4 and later] Specify how much delay (in seconds) to aim for in live HLS streams. |
| NetBufferOld | 0 | [3.6.0.74 and later] NetBufferOld sets an amount (in seconds) to buffer the output of a ShoutCast stream (in addition to the incoming buffer set in Miscellaneous options) and use that buffer when "write to disk" is started. "NetBufferOld=10" would establish a 10 second buffer. Forum Link |
| NoBackup | 0 | As a safety feature, XMPlay backs up xmplay.library to xmplay.library~ before writing any changes to the library. NoBackup=1 disables this feature. This setting might appeal to people with large libraries and limited disc storage space, such as on a USB drive. Also, this setting limits the numbers of writes, which is also a concern on a USB drive. Forum Link |
| NoBeeps | 0 | NoBeeps=1 disables all beeping, such as the Windows critical stop sound. Forum Link |
| NoCheckScan | 0 | NoCheckScan=1 disables display of the "Title scanning in progress" warning when closing XMPlay. Forum Link |
| NoDDE | 0 | [4.0.0.5 and later] NoDDE=1 disables DDE support. Forum Link |
| NoFlashPause | 0 | When XMPlay is paused, the pause button flashes as an indicator. Some people find the flashing distracting. NoFlashPause=1 will disable the pause button flashing behavoir, and allows the skin to determine visual indicators. Forum Link |
| NoFlashTotal | 0 | XMPlay alternately displays the time between total and selected tracks when multiple items are selected from a list. NoFlashTotal=1 disables this back and forth time display and maintains the display as the total time only. In that case, selected tracks total time can be found by right-clicking one of the selected tracks and choosing Track Info. Forum Link Since [3.6.0.55 and later], NoFlashTotal=2 will maintain the display as selected tracks time. Forum Link |
| NoFontWarn | 0 | [4.0 and later] NoFontWarn=1 will disable XMPlay warning about any missing/replaced fonts when changing skins. |
| NoLameRG | 0 | When LAME encodes an MP3, it can embed replaygain information in the file's header. Other softwares may use this area to enter or modify replaygain data. XMPlay reads the header to access various information about the file. NoLameRG=1 makes XMPlay ignore any LAME replay gain information that may be present. Forum Link |
| NoNetErrors | 0 | NoNetErrors=1 disables internet error messages such as "ICY 400 Server Full". The playlist entry still gets a red strikethrough as if the track were dead, but XMPlay proceeds to the next entry without having to acknowledge/dismiss the connection error. |
| NoPageScroll | 0 | XMPlay scrolls pages with the same look and feel of Windows itself (page up/down when mouse clicking above/below the slider). NoPageScroll=1 disables this default page scrolling behavior and reverts to the old way that XMPlay used to move through a large list or library (click at two-thirds on the list's scrollbar to go to two-thirds through the list). Forum Link |
| NoRandomReset | 0 | [3.8.0.6 and later] NoRandomReset=1 will disable the resetting of the "already played" tracking when the "Random order" setting is toggled. Forum Link |
| NoReg | 0 | NoReg=1 prevents XMPlay writing to the Windows registry (disables the filetype association options). Forum Link |
| NoResumeNext | 0 | [3.6.0.7 and later] If playback is currently paused or stopped, the next/previous selection will start playback. NoResumeNext=1 maintains the paused/stopped state when pressing the next/previous button. Forum Link |
| NoScanList | 0 | [3.8.3.4 and later] XMPlay scans the file titles in a playlist to reproduce formatted titles for display. If there are a lot of titles (perhaps within archives) NoScanList=1 will disable the pre-scanning when the playlist entry includes the length. Recently added variations:
|
| NoScanMP3 | 0 | For mp3 files, XMPlay scans the entire file and then maintains the file in a read-ahead buffer. NoScanMP3=1 disables the pre-scanning and read-ahead buffer for mp3 files. See ReadAhead setting (below) for related information. Forum Link |
| NoStickyMark | 0 | [3.8.1.2 and later] To remove the "Don't auto-remove" triangle markers in the playlist (doesn't affect skins that include a bitmap marker). "NoStickyMark=1" will remove the markers. Forum Link |
| NoUserConfig | 0 | When started, XMPlay defaults to the xmplay.ini in the user's directory (if it exists) to retain per-user settings. This may present undesired effects if a customized version of XMPlay is used (perhaps as a demo from a USB drive) since the local xmplay.ini may never be activated. NoUserConfig=1 in the local xmplay.ini will ignore the user's directory xmplay.ini (if found). Forum Link |
| NoWheelVol | 0 | When the main XMPlay window has focus, the mouse scroll-wheel will control volume even if the mouse is not over the XMPlay window. NoWheelVol=1 disables mouse scroll-wheel volume control unless the mouse is focused on the actual volume control. Forum Link |
| PauseStop | 0 | [3.8.2.29 and later] PauseStop=1 provides the option of stopping/releasing the output (instead of just pausing it) when the pause button is pressed. Forum Link |
| PlayDelay | 1 | [3.6.0.28 and later] When dragging/dropping a folder on XMPlay, tracks that are contained in the folder may not sort (or be randomized) as desired before audio begins. PlayDelay creates a delay (expressed in seconds) to allow the this to take place. PlayDelay=0 disables any delay. Forum Link |
| ReadAhead | 0 | [3.6.0.14 and later] For mp3 files, XMPlay scans the entire file and then maintains the file in a read-ahead buffer (unless NoScanMP3=1 is set). XMPlay does not do this for other types of files, which may cause unwanted disc activity (repeated small reads). ReadAhead=[max file size in MB] will enable the specified read-ahead buffer for non-mp3 files. Forum Link |
| RecentTracks | 5 | [3.6.0.46 and later] Configure number of entries in the Recent Tracks list. Disable Recent Track list with RecentTracks=0. Forum Link |
| SeparateToggle | 0 | [3.8.1.10 and later] When set to SeparateToggle=1, the "Separate subsongs" option will work as a toggle to separate/unseparate subsongs instead of using two menu options. Forum Link |
| SingleClickTray | 0 | SingleClickTray=1 will restore XMPlay from the system tray with a single click on the system tray icon, and another single will minimize XMPlay again. Forum Link |
| StartInTray | 0 | [3.7.0.30 and later] StartInTray=1 will force XMPlay to start and display only in the system tray. Forum Link |
| TimeHours | 1 | [4.0 and later] TimeHours=0 will disable XMPlay ever including an hours column in time displays. |
| UserProfile | 1 | [4.0 and later] UserProfile=0 will disable XMPlay using "%USERPROFILE%" for the user profile path in saved playlists and the library. Forum Link |
| VolStep | 3 | [3.6.0.2 and later] XMPlay adjusts the mouse scroll-wheel volume based on the default Windows scroll-wheel lines setting. VolStep allows setting the size of the mouse wheel volume adjustment independent of the Windows setting. Also see NoWheelVol (above). Forum Link |
| VolStepKey | 2 | [4.1.0.4 and later] The size of keyboard shortcut volume adjustments. Forum Link |
| [MIDI] section: NoteOffAll |
0 | [xmp-midi.dll rev.15 and later] To have ALL instances of a note released by a note-off, add NoteOffAll=1. Forum Link |
Next page: Command line interaction
First and foremost, XMPlay can receive files, directories or URLs from the command line, using no additional arguments, so xmplay C:\Windows\Media\ding.wav. If you give XMPlay the path to a folder, it'll put all the files in that folder it can play in the playlist, just like the Open folder dialog. Note that the settings you chose when adding files on the Integration page of Options and stuff apply here as well. Entries containing spaces should be enclosed in quotes, so xmplay "C:\Cool Music\cool.mp3". Multiple entries (separated by spaces) are supported.
Untick Allow multiple instances on the Miscellaneous page of Options and stuff to send the entries to the current instance of XMPlay, instead of starting a new instance each time.
If you want to control the current instance of XMPlay from the command line, like starting or pausing playback, take a look at XMPlay Controller.
You can have XMPlay execute lots of function by sending a key-command to it via DDE. Using an info-command, you can request information of the file currently being played. See the DDE command list for a full list of available commands, and the DDE code example page for some examples.
Files, folders and URLs can be passed to XMPlay via DDE. To do so, set the Application to XMPlay, the Topic to System and send the message [open("filename")] (to open a file) or [list("filename")] (to add a file to the playlist). Note that the message includes the brackets and parenthesis. Multiple files should be sent in multiple messages. XMPlay will treat files coming in quickly after each other as a single batch, so it can auto-sort them.
These DDE commands are used in Explorer for the associated filetypes on Windows XP and older.
The contents of the Info Window can be fetched via DDE by sending an info# message to XMPlay, where you replace # with the number from the list below.
| info | Result tab |
|---|---|
| 1 | General |
| 2 | Message |
| 3 | Samples |
Note that the returned text is in UTF-8 on Windows NT, XP and newer.
Below is a list of DDE control commands. The commands are executed by sending a key# message to XMPlay, where you replace # with the number found in the list.
| key | Command |
|---|---|
| 641 | Bookmark - Resume |
| 642 | Bookmark - Resume after queue |
| 640 | Bookmark - Set |
| 128 | Change track - Next |
| 129 | Change track - Previous |
| 130 | Change track - Random |
| 131 | Change track - Random from library |
| 10 | Close |
| 16 | Close and restart |
| 15 | Close at end of track/list |
| 11 | Close with position saved |
| 525 | Crossfade on/off |
| 83 | Current track - Back |
| 91 | Current track - Download / Extract |
| 82 | Current track - Forward |
| 92 | Current track - Go to time |
| 9 | Current track - Looping |
| 86 | Current track - Next subsong |
| 80 | Current track - Play / Pause |
| 89 | Current track - Plugin info |
| 85 | Current track - Prev subsong |
| 113 | Current track - Rating - 1 |
| 114 | Current track - Rating - 2 |
| 115 | Current track - Rating - 3 |
| 116 | Current track - Rating - 4 |
| 117 | Current track - Rating - 5 |
| 118 | Current track - Rating - down |
| 112 | Current track - Rating - none |
| 120 | Current track - Rating - show |
| 119 | Current track - Rating - up |
| 84 | Current track - Restart |
| 81 | Current track - Stop |
| 90 | Current track - Stop at end |
| 87 | Current track - Track info |
| 88 | Current track - Tray title bubble |
| 515 | DSP - Amplification down |
| 521 | DSP - Amplification reset |
| 514 | DSP - Amplification up |
| 522 | DSP - Auto amplification |
| 519 | DSP - Balance left |
| 520 | DSP - Balance right |
| 526 | DSP - Bypass |
| 516 | DSP - Equalizer on/off |
| 518 | DSP - Options |
| 524 | DSP - Replaygain |
| 517 | DSP - Reverb on/off |
| 513 | DSP - Volume down |
| 523 | DSP - Volume mute |
| 512 | DSP - Volume up |
| 264 | Info - Copy to clipboard |
| 261 | Info - Extended list |
| 265 | Info - Fullscreen visuals |
| 257 | Info - General |
| 608 | Info - Library |
| 258 | Info - Message |
| 256 | Info - Open/close window |
| 259 | Info - Samples |
| 263 | Info - Scroll down |
| 262 | Info - Scroll up |
| 266 | Info - Text size decrease |
| 267 | Info - Text size increase |
| 260 | Info - Visuals |
| 368 | List - Add files/URL |
| 369 | List - Add folder |
| 381 | List - Add from clipboard |
| 380 | List - Auto advance |
| 375 | List - Clear queue |
| 402 | List - Looping |
| 313 | List - Random play order |
| 383 | List - Remove after playing |
| 386 | List - Replace from library |
| 378 | List - Save |
| 377 | List - Show filenames in ext.list |
| 379 | List - Show queue in list |
| 400 | List - Undo |
| 347 | List nav - Bottom |
| 337 | List nav - Down |
| 352 | List nav - Find |
| 355 | List nav - Find all |
| 353 | List nav - Find next |
| 354 | List nav - Find previous |
| 356 | List nav - Find quick |
| 342 | List nav - Invert selection |
| 340 | List nav - Jump to current |
| 339 | List nav - Page down |
| 338 | List nav - Page up |
| 341 | List nav - Select all |
| 343 | List nav - Select dead |
| 345 | List nav - Select extend down |
| 349 | List nav - Select extend page down |
| 348 | List nav - Select extend page up |
| 344 | List nav - Select extend up |
| 418 | List nav - Select same album |
| 417 | List nav - Select same artist |
| 422 | List nav - Select same comment |
| 421 | List nav - Select same genre |
| 424 | List nav - Select same path |
| 416 | List nav - Select same title |
| 420 | List nav - Select same track |
| 423 | List nav - Select same type |
| 419 | List nav - Select same year |
| 346 | List nav - Top |
| 336 | List nav - Up |
| 334 | List sort - Filename |
| 322 | List sort - Filename - Full path |
| 323 | List sort - Filetype |
| 333 | List sort - Rating |
| 324 | List sort - Reverse |
| 325 | List sort - Selected to top |
| 320 | List sort - Shuffle |
| 328 | List sort - Tag - Album |
| 327 | List sort - Tag - Artist |
| 332 | List sort - Tag - Comment |
| 331 | List sort - Tag - Genre |
| 326 | List sort - Tag - Title |
| 330 | List sort - Tag - Track |
| 329 | List sort - Tag - Year |
| 321 | List sort - Title |
| 384 | List track - Add to/from library |
| 382 | List track - Dequeue |
| 389 | List track - Don't auto-remove |
| 403 | List track - Explore folder |
| 372 | List track - Play |
| 385 | List track - Plugin info |
| 374 | List track - Queue |
| 121 | List track - Rating - 1 |
| 122 | List track - Rating - 2 |
| 123 | List track - Rating - 3 |
| 124 | List track - Rating - 4 |
| 125 | List track - Rating - 5 |
| 126 | List track - Rating - down |
| 127 | List track - Rating - up |
| 370 | List track - Remove |
| 371 | List track - Remove & delete file |
| 387 | List track - Separate subsongs |
| 373 | List track - Skip |
| 376 | List track - Track info |
| 388 | List track - Unseparate subsongs |
| 300 | MOD - Force VBlank timing |
| 297 | MOD - Interpolation |
| 296 | MOD - MOD playback mode |
| 298 | MOD - Ramping |
| 299 | MOD - Surround sound |
| 293 | MOD pattern - Invert all |
| 291 | MOD pattern - Mute channel |
| 290 | MOD pattern - Next channel |
| 289 | MOD pattern - Prev channel |
| 292 | MOD pattern - Unmute all |
| 6 | Open files/URL |
| 12 | Open folder |
| 13 | Open from clipboard |
| 5 | Options and stuff |
| 624 | Output options |
| 97 | Plugins - DSP & general |
| 96 | Plugins - Input |
| 593 | Saved settings - Load current |
| 592 | Saved settings - Options |
| 17 | UI - Big |
| 14 | UI - Info bubbles |
| 1 | UI - Mini mode |
| 2 | UI - Minimize / Restore |
| 3 | UI - Minimize to tray / Restore |
| 7 | UI - On top |
| 4 | UI - Reload skin |
| 8 | UI - Time display mode |
XMPlay Controller is a standalone application which uses DDE to send commands to XMPlay. See the included manual for more information.
DDE_run is a command line application which can send DDE messages to any other program. The code to send the Play/Pause command is DDE_run -s XMPlay -t System -c key80, where -s flags the target application name, -t the link topic and -c the command. You can replace key80 with any of the keys from the DDE command list, or with a file opening command.
Create a new VB project, and dump two text boxes and a pair of command buttons on the form. Do whatever you like to them, but you'll want to make Text2 reasonably large with MultiLine enabled. Add the following code to the form (changing the names if you changed them):
Private Sub Command1_Click()
' Use this one to retrieve data, e.g. infox topics
Text2.LinkTopic = "XMPlay|" & Text1.Text ' Init link topic
Text2.LinkMode = 2 ' Open connection
Text2.LinkRequest ' Grab data
Text2.LinkMode = 0 ' Close connecton
'''' EDIT: remove next line if you get a blank line between every line ''''
Text2 = Replace(Text2, vbLf, vbCrLf) ' Reformat string as textbox needs CRLF
End Sub
Private Sub Command2_Click()
' Use this one to execute a function, e.g. keyxxx topics or playlist manipulation
Text2.LinkTopic = "XMPlay|XMPlay" ' Init link topic. The second part (after the '|') doesn't appear to matter but must not be empty.
Text2.LinkMode = 2 ' Open connection
Text2.LinkExecute Text1.Text ' Execute function
Text2.LinkMode = 0 ' Close connection
End Sub
This code example is made by BoggyB (a long time ago).
Next page: Library file format
XMPlay saves its library (and current playlist track info) in the xmplay.library file next to xmplay.exe (or in C:\Users\[username]\AppData\XMPlay if you have Store per-user config/etc ticked). You can process this file with external utilities, for example to find duplicate files in your collection.
Each entry contains a number of different fields depending on the library format version.
Library version 6 (since XMPlay 3.8.2):Each string is terminated with a null character (00). There is no length limit on strings and empty strings are allowed. Timestamps are noted in seconds since January 1st, 1970, 0:00. The track entries are closed with a null filename (00).
Each entry contains three fields.
Next page: Custom filetypes and icons
On the Integration page of Options and stuff, XMPlay can be set as the default program to open all supported audio files with. XMPlay will group all selected extensions to a single filetype, the XMPlay-able file. This also means all files with have the same icon and type description, regardless of their format. By making the file association manually, you keep separate icons and descriptions.
Now repeat the following for each extension you'd like to add:
The association works directly, the icons could take a while to be refreshed (reload your shell to force a refresh).
The file association dialog was removed from Explorer, but the Default programs page doesn't provide the same flexibility. Download ExtMan to get the file association dialog back. (Note that Extman defaults to German, but you can switch to English by clicking the flag.) With ExtMan, you can follow the steps for Windows XP.
Next page: Visualization settings
Several visualizations have the ability to be configured. There are two ways to adjust the settings of a visualization: by middle-clicking on the visualization area or by opening vis.ini. Note that not each visualization allows both methods, and some have no configuration at all.
Open the Info Window and go to the Visualizations tab. If no visualization is active, right-click the visualization area and select one. Middle-click (usually with the scroll wheel) the visualization area to interact with the visualization. This can for example change the scrollspeed (Spectrum (3D)), cycle through display modes (SpectrumBars), bring up a whole menu (Honto's Phase) or bring up a context menu (xmp-coverart).
Note that if your laptop trackpad does not have a dedicated middle-mouse button, you'll have to use and external mouse.
Open the file vis.ini located next to xmplay.exe (or in your user folder, if you've ticked Store per-user config/etc). For each visualization, this file contains a header followed by the settings. For example, the section for SpectrumBars looks like this:
[SpectrumBars]
NumberOfBars=64
SamplesPerBar=2
BarHeightPercent=100.0
BarSeparationPercent=10.0
Logarithmic=true
Mode=1
LowColour=0xFF026732
MediumColour=0xFFFFFF00
HighColour=0xFFFF0000
The entries can use various formats, like string booleans (true/false), integer and decimals numbers and hexadecimal color codes. Not all settings have clear labels and documentation is scarce, so experimenting with values is the best way to go. Save the vis.ini file and re-select the visualization in XMPlay to activate the new settings.