Skins (156)
Visuals (115)
Input Plugins (34)
Output Plugins (6)
General Plugins (14)
Archive Readers (15)
Input Plugins (41)
DSP Plugins (10)
External Add-ons (16)
XMPlay Archive (71)
Skins (156)
Visuals (115)
Input Plugins (34)
Output Plugins (6)
General Plugins (14)
Archive Readers (15)
Input Plugins (41)
DSP Plugins (10)
External Add-ons (16)
XMPlay Archive (71)
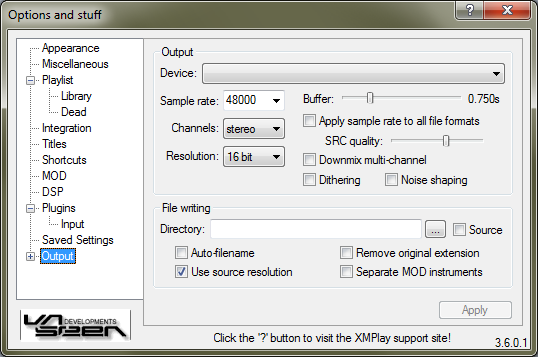
From the dropdown box, select the output device you want XMPlay to use. There are a number of devices available:
The last three types will only be available if you have the respective output plugins installed. The Sample rate dropdown box determines the sample rate in Hz. Channels sets the number of channels, mono or stereo. Resolution is the resolution at which the data is sent to the soundcard. The Buffer slider sets the amount of audio XMPlay keeps in the output buffer, to prevent hiccups. Normally, the sample rate only applies to module formats, stream formats are outputted at their own sample rate (or higher, if the soundcard doesn't support the original sample rate). If you tick Apply sample rate to all file formats, all output is resampled to the sample rate you choose before it is sent to the output device. You can choose the resampling algorithm quality with the SRC quality slider (left=lowest quality with 4 points, right=highest quality with 128 points). Multi-channel audio is only downmixed if you tick Downmix multi-channel. Dither adds white noise to the audio to randomize quantization problems, and Noise shaping improves the process quality when lowering the audio resolution. Changing any of these settings requires the output device to be re-initialized, so hit the Apply button to activate the new settings.
In the Directory box, you can choose a default directory to write files to. Ticking the Source box will have XMPlay write the file to the same directory as the input file. Once you start a file-writing process (either with the WAV-writer or with an encoder), XMPlay will pop up a dialog box asking for the output filename. Checking Auto-filename will give the output file the same name as the input file, with the new extension added. Remove original extension will remove the extension of the input file from the output filename (e.g. file.wav instead of file.mo3.wav). Use source resolution is for lossless tracks, so the output file has the same resolution as the input file, making your output truly lossless. If you're writing a module file, you can create a separate output file for each instrument by ticking Separate MOD instruments. The instrument number is added at the end of the output filename.
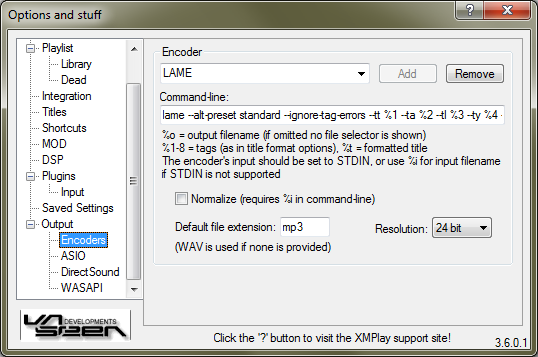
Instead of sending the audio to your soundcard, XMPlay can also pass it to an encoder. Any encoder that has a command line interface can be used with XMPlay. From the dropdown box, you can select a preset. If you type a new name in the box, you can click the Add button to create a new preset. Remove deletes the current preset. In the Command-line box you should put the command line syntax XMPlay should use to run the encoder. If the encoder supports STDIN (most modern encoders do), use - on the command line. If it doesn't, use %i and XMPlay will write a temporary WAV-file for the encoder to work with. Ticking Normalize will use the normalized WAV-writer rather than the regular one. The Default file extension box should contain the extension the file should have after encoding, so XMPlay can name the output file properly. Finally, Resolution determines the bit depth of the audio being sent to the encoder, either a specific resolution (8, 16, 24 or 32 bit) or the one following from the output settings.
For more information on setting up encoders, refer to Advanced Output: External Encoders.
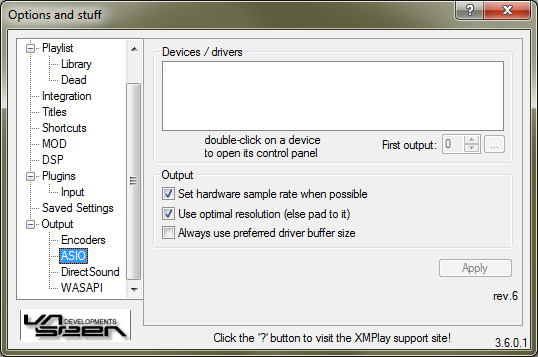
Audio Stream Input/Output (ASIO) is Steinbergs low-latency protocol designed for musicians. It completely bypasses Windows sound mixers and has XMPlay communicate with the soundcard directly. Note that your soundcard needs a specific ASIO driver, or try ASIO4ALL. Audio output over ASIO is bit-perfect. Click the Apply button to apply the changes.
The listbox will show the ASIO output currently available on your system. Double-click an entry to open its control panel. First output determines the first output channel to use. If you set it to two, a stereo file will be played on channel 2 and 3. Clicking the button next to it will show what channels the device has available.
Set hardware sample rate whenever possible will try to set the soundcard to the sample rate of the current file, to avoid the need for resampling. If unticked, the sample rate of the device will be left as it currently is and XMPlay will resample to that. Use optimal resolution will have XMPlay generate the audio at the resolution the soundcard supports (instead of the resolution you chose on the Output page). If unticked, XMPlay will use the resolution of the Output page and pad the audio up to the resolution of the soundcard. Always use preferred buffer size lets the device use the buffer set in its control panel, otherwise XMPlay will calculate a buffersize for the device.
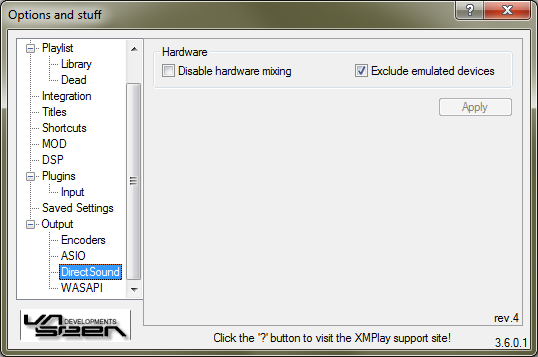
DirectSound uses the Microsoft DirectX library to communicate with the soundcard. This plugin is designed to be used on systems with Windows XP (or earlier versions of Windows). You can select the DirectSound device you want to use on the main Output page. If your soundcard driver supports it, audio may be upmixed from stereo to all channels, but that happens outside of XMPlay. Disable hardware mixing will force all mixing on the CPU, rather than having the soundcard itself handle it. This option should only be used to circumvent dodgy soundcard drivers. Note that ticking this option will disable the upmixing. Exclude emulated devices will hide any devices which are not true DirectSound devices, for example when your systems lacks the correct DirectSound drivers for your soundcard and emulates it through WaveOut. If you change either of these settings, hit Apply to apply the change.
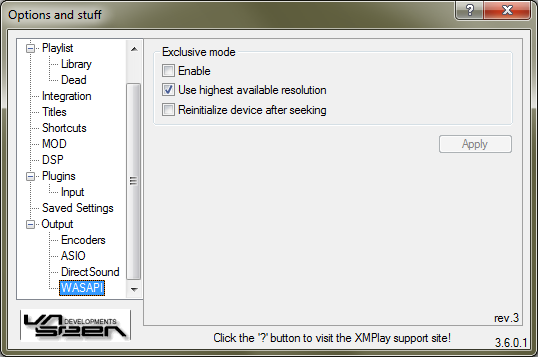
For Windows Vista, Microsoft completely reworked the audio processing path into a new system, WASAPI. If you have Windows Vista (or a newer version, like Windows 7), this is the preferred output method, since WaveOut and DirectSound are converted into WASAPI instances by Windows as well. WASAPI has two distinct output modes, Shared mode and Exclusive mode. Shared mode is default, and has Windows combine audio from all programs into a single stream for the soundcard. If you Enable exclusive mode, XMPlay will be the only program allowed to send audio to the soundcard and the output to the soundcard will be bit-perfect. Use highest available resolution has XMPlay use the highest resolution the soundcard supports, rather than what you chose on the Output page. If your soundcard seems to replay and old bit of audio when you seek, or when it just hangs on seeking, tick Reinitialize device after seeking to have XMPlay work around this problem. And ofcourse, hit Apply to apply the changes.