Skins (156)
Visuals (115)
Input Plugins (34)
Output Plugins (6)
General Plugins (14)
Archive Readers (15)
Input Plugins (41)
DSP Plugins (10)
External Add-ons (16)
XMPlay Archive (71)
Skins (156)
Visuals (115)
Input Plugins (34)
Output Plugins (6)
General Plugins (14)
Archive Readers (15)
Input Plugins (41)
DSP Plugins (10)
External Add-ons (16)
XMPlay Archive (71)
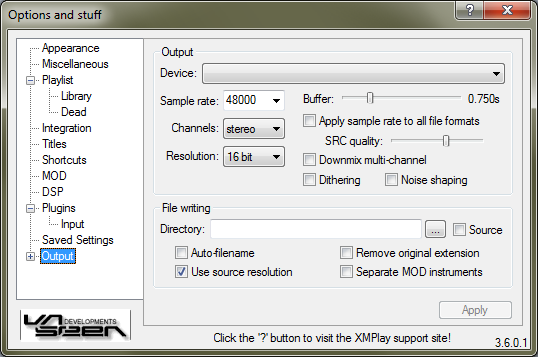
From the dropdown box, select the output device you want XMPlay to use. There are a number of devices available:
The last three types will only be available if you have the respective output plugins installed. The Sample rate dropdown box determines the sample rate in Hz. Channels sets the number of channels, mono or stereo. Resolution is the resolution at which the data is sent to the soundcard. The Buffer slider sets the amount of audio XMPlay keeps in the output buffer, to prevent hiccups. Normally, the sample rate only applies to module formats, stream formats are outputted at their own sample rate (or higher, if the soundcard doesn't support the original sample rate). If you tick Apply sample rate to all file formats, all output is resampled to the sample rate you choose before it is sent to the output device. You can choose the resampling algorithm quality with the SRC quality slider (left=lowest quality with 4 points, right=highest quality with 128 points). Multi-channel audio is only downmixed if you tick Downmix multi-channel. Dither adds white noise to the audio to randomize quantization problems, and Noise shaping improves the process quality when lowering the audio resolution. Changing any of these settings requires the output device to be re-initialized, so hit the Apply button to activate the new settings.
In the Directory box, you can choose a default directory to write files to. Ticking the Source box will have XMPlay write the file to the same directory as the input file. Once you start a file-writing process (either with the WAV-writer or with an encoder), XMPlay will pop up a dialog box asking for the output filename. Checking Auto-filename will give the output file the same name as the input file, with the new extension added. Remove original extension will remove the extension of the input file from the output filename (e.g. file.wav instead of file.mo3.wav). Use source resolution is for lossless tracks, so the output file has the same resolution as the input file, making your output truly lossless. If you're writing a module file, you can create a separate output file for each instrument by ticking Separate MOD instruments. The instrument number is added at the end of the output filename.