Skins (156)
Visuals (115)
Input Plugins (34)
Output Plugins (6)
General Plugins (14)
Archive Readers (15)
Input Plugins (41)
DSP Plugins (10)
External Add-ons (16)
XMPlay Archive (71)
Skins (156)
Visuals (115)
Input Plugins (34)
Output Plugins (6)
General Plugins (14)
Archive Readers (15)
Input Plugins (41)
DSP Plugins (10)
External Add-ons (16)
XMPlay Archive (71)
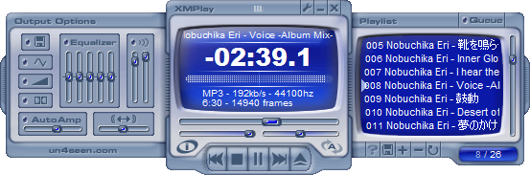
When you first start XMPlay, you will be greeted by the ReadMe and a dialog box telling you to "RTFM". After you close these, you will see something similar to this:
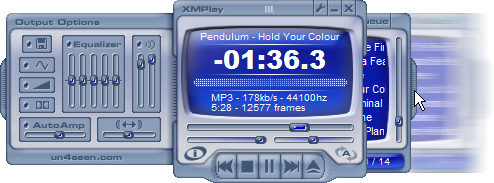
"What are these things at the sides and how do I disable them?" might be your first question. The answer to this is: these are the side panels and you can slide them in and out by dragging them at the "handles" at their sides, like this:
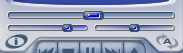
For now, let's concentrate on the main panel, which provides everything you need to open and play a file. For this, I closed both side panels - these will be discussed next.
![]()
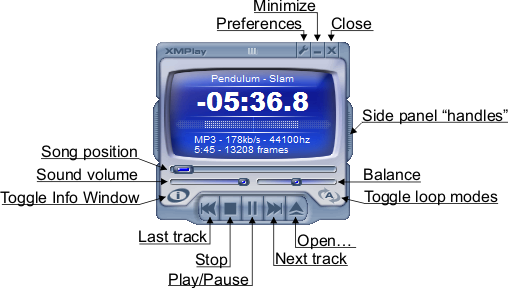
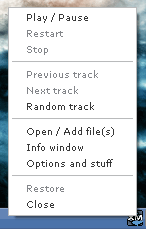
Options and stuff
This button opens up the Preferences for all areas of XMPlay, including settings that can only be found here. The Preferences can also be opened by right clicking anywhere on the Main Interface.
Minimize
Left clicking this will minimize XMPlay normally, while right clicking the minimize button will place XMPlay into the system tray. This will not have any effect if the "Always in tray" option has been enabled in the preferences.
Tip: The default Shortcut "N" minimises XMPlay normal, where "Shift+N" will minimize XMPlay to the system tray.
Close
Title
The title of the current track is displayed at the top.
Tip: A mouse over of this area causes a help bubble to appear if the track name is too large to display.
Timer
By left clicking on the timer it can be switched between the time passed, the time remaining, or the order/frame/page position (depending on if it's a MOD/MPEG/OGG format being played). When displaying the MOD position, the bpm/speed is shown to the right and the active channel count is shown to the left. The active channel count will be inverted if any virtual channels have been killed within the last few seconds.
Volume Indicator
This area provides a simple realtime display of the volume level in the left and right speakers.
File Information
At the bottom of this area some basic information on the format and length of the current track is displayed.
Tip: A "XM?" displayed during the play of an XM module means the mod was not created using Fast Tracker 2, and slightly changes the way the mod is played.
Position
The top most bar is the position indicator. It can also be used to change the playback position, except when streaming from the internet. When streaming from the net, it will light-up to indicate how much of the file has been downloaded so far.
Right-clicking the position bar allows you to set a bookmark or resume from one. See resuming playback for more info.
Tip: While streaming the position will only be shown if the file is of a fixed length.
Volume
This controls the volume of the output from XMPlay.
Balance
This slider controls the balance of output to the left and right speakers.
Track Info & Extended Playlist
This button displays details information on the current track and the extended resizable playlist. Check the Info Window for further details.
Loop Track
The looping for each individual track is controlled here. By left clicking it can be cycled through the available options of Never loop, Always loop, or Auto loop only files that are intended to be looped.
By right clicking this button you may access further options to restrict Auto Loop detection to only MOD's, and forcing XMPlay to only loop this track once before continuing.
Tip: These options can also be accessed via the "Miscellaneous Options" area of the preferences.
![]()
Previous Track
Play the previous track in the playlist, skipping over any that are set to be "skip"-ped in the playlist.
Tip: Right clicking on this allows navigation between songs while playing multi-song modules.
Stop
Stops playback, and sets the position to the start.
Tip: Pressing stop while already stopped will unload the current song (Eg. So the file can be moved or renamed.)
Play / Pause
Toggles play/pause of the track. If no track is loaded, then the currently selected track in the playlist is loaded (or the 1st track if none is selected).
Tip: Right-Clicking on this will play a randomly selected song.
Next Track
Play the next track in the playlist, skipping over any that are set to be "skip"-ped in the playlist.
Tip: Right clicking on this allows navigation between songs while playing multi-song modules.
Open file(s)
Opens and plays file(s). If you open an FTP directory URL, XMPlay will automatically scan the directory for OGG and MPEG files.
Tip: Entire directories can be added via the playlist panel.
Any currently playing track can be resumed from any point even if XMPlay has been closed during play. To do this while a track is playing, simply right click on the Close button of XMPlay.
This will save the details of the position. When XMPlay is next started, play will automatically continue from the saved point.
Another way of resuming playback is using the bookmark function, which can be accessed by right-clicking the position slider. When you set a bookmark, XMPlay remembers the file and playing position and lets you return to the exact same position later ("Resume bookmark"). You can only set one bookmark at a time.
![]()
While XMPlay is minimized here, every track change will be shown via a help bubble that appears above the system tray area, showing the new track.
By using the right click menu you can access most of the same functionality that is available through the main panel.

The response speed to all these options is dependant on the buffer size, the delay will be the length of the buffer chosen in the Device section of the Options and stuff window.
Tip: These options only effect the playback of MOD file formats (MO3/XM/IT/etc) and can also be found under the MOD section of the Options and stuff window.
![]() Linear
Linear
![]() Sinc
Sinc
Linear 2 point interpolation "draws" a straight line between the samples, Sinc 8 point interpolation "draws" a smooth curve between the samples and requires more CPU power (Supports 3DNow! Technology.).
Linear interpolation gives decent sound quality with minimal cpu usage.
Sinc interpolation has, as a result of its complexity, far higher sound quality, with the price of higher cpu usage.
Interpolation can also be disabled. This is useful for older module to provide a crisper sound.
![]() Normal
Normal
![]() Sensitive
Sensitive
Ramping makes volume and panning changes smoother so that sudden large volume/panning changes do not cause any "clicking" in the sound.
It also fades-in (very quickly) new samples so that there is no click from them.
Sensitive ramping only performs the fade-in when it's neccessary to prevent a click, so percussive sounds stay sharp.
![]() "Normal" surround adds a phased surround sound feeling to modules.
"Normal" surround adds a phased surround sound feeling to modules.
![]() "Mode 2" ignores panning, so is good for mono MODs.
"Mode 2" ignores panning, so is good for mono MODs.
The higher the setting, the more sounds are pushed away from center. Obviously can only affect things when playing in stereo.
Tip: These options can also be found under the DSP section of the Options and stuff window.
![]() Normal
Normal
![]() Fade-In
Fade-In
![]() Dynamic
Dynamic
This is different to the volume slider. The volume slider controls the level of the sound card output, the amplification slider controls the level of the actual decoding.
The higher the amplification, the greater the dynamic range of the decoding output, but if it's too high clipping may occur resulting in distortion of the sound. Right-click options:
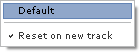
"Default" sets the amplification level back to its default amount (0.0 db).
"Reset on new track" resets the amp level when a track is loaded.
This causes the amplification level to be automatically reduced whenever clipping occurs. With fade-in enabled, it will fade-in new tracks until they clip, then it'll behave the same as normal. Dynamic mode continues to increase and decrease the amplification level throughout playback.

![]()
These are two built-in DSP settings that are available by default to improve the sound quality. The equalizer comes with some presets which may be selected by right-clicking the Equalizer button. The left reverb slider controls the frequency cutoff, i.e. the crispness of the reverb sound. The right slider controls the reverb level. Note that the reverb length is currently not adjustable.
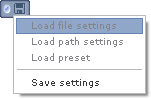
When switched on, this enables the automatic loading of settings that have been saved for the track being loaded. Right-clicking brings up options to load settings specific to the file, load settings for the file's path, and load presets.
Tip: Advanced settings and further information can be found in the Saved settings section of the Options and stuff window.
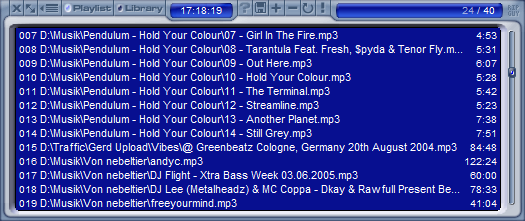
Besides the obvious functionality of playing a list of files, the XMPlay playlist has some other neat features, like the Queue and "Dragon Droppings", which will be explained later. First, let's look at the basic functionality.
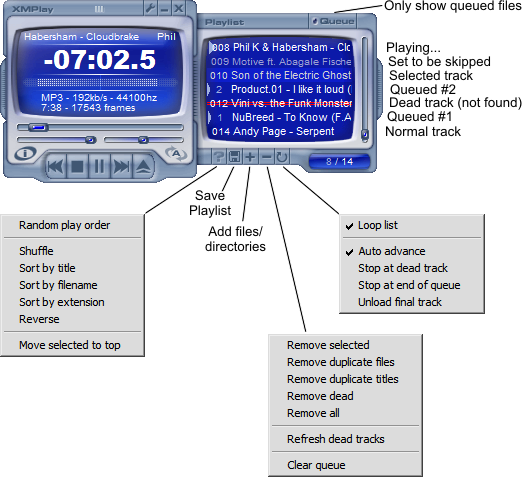
Select a track by clicking on it.
Doubleclicking plays a track.
Hold Ctrl to select multiple files at once.
Hold Shift to select ranges of files, just as in Windows Explorer.
Use Ctrl+Shift to select multiple ranges of files.
You can drag files around the playlist to change their playing order.
Tip: "Dead" tracks will be marked with a double red line. Merely unplayable files will only be marked with a single red line.
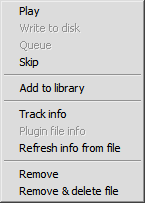
The context menu of any file will give you a list of options:
Dropping files on the main window will make them replace the current playlist and begin playing immediately.
Dropping files inside the playlist will insert the files above the track that you dopped the files upon.
Dropping files on the "Add tracks" button will add the files at the bottom of the playlist.
XMPlay supports the reverse of "Drag and Drop": dragging a file out of the playlist and into other applications that accept Drag and Drop actions.
To do this, select one or more tracks on the playlist, begin dragging with the left mouse button and then press the right mouse button. The cursor will now indicate valid targets for external Drag and Drop operations.
If you drop files in file managers, XMPlay will copy them there. If you drop files on other applications, e.g. for opening files, XMPlay just passes a reference to the actual file to the other application.
This works from both the playlist panel as well as the "big" Playlist.
You can enable/disable random playing here. Right-clicking gives you more options:
Tip: only tracks that are currently selected will be sorted.
Saves the playlist as Unicode .pls file.
Left-clicking the plus button opens a dialog where you can select one or more files to be added to the playlist.
Right-clicking the plus button opens another dialog, where you can add whole directories and subdirectories at once.
Tip: drag'n drop files or directories here to add them to the bottom of the playlist rather than inserting them inbetween.
Left-clicking the minus button removes the selected tracks from the list.
Right-clicking the minus button gives you these options:
Tip: use "Refresh dead tracks" to revive tracks that were not found because they reside on removable media, like a USB harddrive.
Left-clicking toggles list looping. This option does not influence the track looping option. When list looping is active, playback will begin on the first track after the last track has played.
Right-clicking the button gives you these options:
The small display on the bottom right can be switched between two modes:
Time mode - This shows the total playlist duration in hours, minutes and seconds. If you have tracks selected, the display will flash between the total duration and the duration of the selected tracks.
Tip: The alternating flashing between the times can be disabled by adding the line "NoFlashTotal = 1" to the xmplay.ini. See "Secret INI options" for more options.
Track count - shows the currently playing track and the total number of tracks on the playlist.
If you want the playlist to leave out a certain track while playing, you can mark the track to be skipped via the context menu item "skip" or by pressing the default shortcut "Space". Un-skipping works the same.
Queueing tracks allows files to be played in a different order than the playlist dictates. Just click the tracks with the middle mouse button in the order you want them to be played. (Note: The currently playing song can't be queued.)
Alternatively, you can right-click one or more files and select "Queue".
If you press the "Queue" button on the upper right of the playlist panel, the playlist will show queued tracks ONLY.
The Info window provides access to a bigger, resizable playlist, detailed track information, the media library, visualisations and more.
You can resize the window by dragging one of it's edges with the mouse. The Window also offers a mode to auto-resize itself to fit the contents (![]() ).
).
![]() This switch toggles between displaying the Information Section and the Extended Playlist.
The Information Section displays information on the currently loaded track, while the Extended Playlist is a large and more flexible version of the one available in the Playlist Panel.
This switch toggles between displaying the Information Section and the Extended Playlist.
The Information Section displays information on the currently loaded track, while the Extended Playlist is a large and more flexible version of the one available in the Playlist Panel.
Tip: The Information Window can also be open even while XMPlay is minimized to the System Tray.
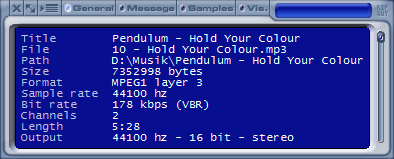
Displays info on the file's name, format, size, length, etc...
Displays any messages or tags contained in the file, including the current track name when streaming from Shoutcast servers. Also displays single tracks from a CUE sheet, if one was found for the current track. See CUE Sheet Usage for more information.
Tip: Right-clicking gives the option to copy the window's text to the clipboard, and also launch any URL's available.
Displays instrument and sample texts (MOD formats only).
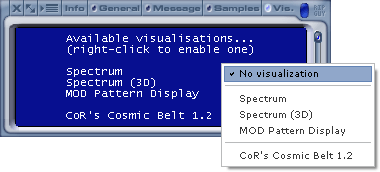
Displays visualisation plugins.
The Visuals Panel displays the currently available visual plugins, including the in-built Pattern and Spectrum Display's.
Once a Sonique visual plugin is installed, it will be listed here and may be selected by clicking the right mouse button within the Panel area or rolling up or down using the mouse scroll wheel.

A spectrum analyser will give you a graphical representation of a certain frequency range.
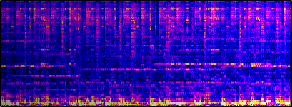
A 3D spectrum analyser will give you a graphical representation of a certain frequency range at a certain time and magnitude. This is shown by providing the time (horizontally), frequency (vertically), and magnitude (colour) of sound.
The "MOD Pattern Display" visualisation applies to MOD formats only, and allows you to get an idea of how the files were "tracked". For simplicity and clarity, not all effects are shown and a universal notation is used for all formats.
When all the channels do not fit in the display, the 4 & 6 (numpad) keys can be used to scroll the display. The selected channel can also be muted using the 5 (numpad) key.
XMPlay can use 2 alternate scrolling methods, which are changed by clicking on the Pattern Display with the middle mouse button, or via the "S" shortcut key.
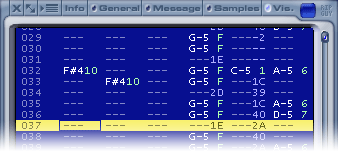
The following entries are shown by XMPlay:
Tip: This section only displays the features that are not contained in The Playlist Panel, for details about the basic playlist functions see the Playlist Panel section.
This button switches the playlist over to display the Library.
Find tracks containing a specified substring in their title or filename. Right-clicking allows you to choose to have only the matched tracks played (the rest will be skipped).
For details of how the this function works, see the Find Tracks section of the Options and stuff window.
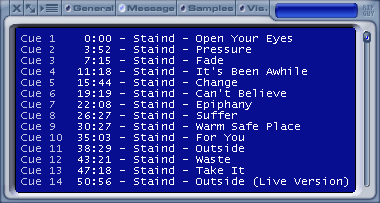
CUE files can be used to quickly jump to specific points (eg. start of a song in an album) in large files. When opening a track, XMPlay will look for a CUE file of the same filename (with ".CUE" extension) in the same directory or archive.
If one is found, it'll be loaded and the CUEs will be listed in the "Message" info window.
Tip: Right-clicking on the next and previous buttons will navigate through the CUE sheet.
For example the following files in an archive or directory would enable XMPlay to use a CUE sheet:
Staind - Break the cycle.flac
Staind - Break the cycle.cue
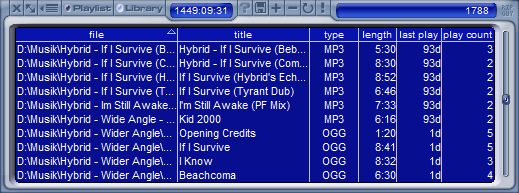
The library is a sort of glorified playlist. Whereas the playlist just contains each track's filename and title, the library contains a lot of additional information.
Files can be added to the library in the same way as they can with the playlist, eg. using the add button or by drag'n'dropping them. They can also be added automatically when played or added to the playlist. See the "Playlist" options.
Right-clicking on a track will give options to play the track, add it to the playlist, view/edit track info, refresh the info, and remove the track. Double-clicking will also play the track, and middle-clicking will queue the track.
Tip: When playing or queuing a track from the library, it'll first be added to the playlist if it's not already in there.
The full list of info contained in the library is: filename, title, artist, album, year, track, genre, comment, file type, file size, length, the time of last playback and the play count.
Each of which can be hidden or shown by right-clicking on a column heading.
You can also change the display order of the columns by dragging them, and you can change the width of each column by dragging the borders.
The tracks in the library can be sorted by any of these values, making it quick and easy to locate the tracks you want to play. Click on the column heading to sort by that value. Clicking again will reverse the order.