Skins (156)
Visuals (115)
Input Plugins (34)
Output Plugins (6)
General Plugins (14)
Archive Readers (15)
Input Plugins (41)
DSP Plugins (10)
External Add-ons (16)
XMPlay Archive (71)
Skins (156)
Visuals (115)
Input Plugins (34)
Output Plugins (6)
General Plugins (14)
Archive Readers (15)
Input Plugins (41)
DSP Plugins (10)
External Add-ons (16)
XMPlay Archive (71)
Someday you'll want to output your music to something other than your speakers.
XMPlay can use external encoders to compress the audio output (see the Output - Encoders page of Options and stuff). The command line syntax required for proper compression depends on the encoder used. On this page the configuration of a number of popular encoders is described more extensively.
Note that XMPlay does not display any messages the encoders might return. This means that debugging is impossible, so you should work out the correct command line syntax before starting to encode your music. Determining the correct syntax is done in Windows' own command prompt (Start > Run > cmd) using a test file. For example, you can try lame - test.mp3 < test.wav to test LAME via stdin.
LAME (LAME Ain't an Mp3 Encoder) is an open source MP3 encoder. It performs very well at medium and high bitrates, especially when using VBR (Variable Bitrate). Get the executable from the Support Site or from RareWares. Put lame.exe in the same folder as xmplay.exe. The rest of the files are not required. The default file extension is mp3 and the resolution is 24-bit.
Basic
The basic syntax for LAME is lame input.wav output.mp3. This will convert input.wav, the input stereo PCM WAV-file, to output.mp3, the output MP3 file, with a constant bitrate of 128 kbit/s (about 1 MB per minute of audio). To use LAME with XMPlay, you should replace the input file with an stdin marker (a -) and the output file with the output field (%o), so lame - %o.
Bitrate
The default setting may not be good enough, but you can easily tune it. One of the first things you can do is change the bitrate with the -b command, like lame -b 256 - %o. Instead of the default 128 kbit/s, this will produce a 256 kbit/s file, with the higher bitrate resulting in a higher quality audio file. Not all bitrates are allowed in MP3 (run lame --longhelp to see which are), and using low bitrates will cause LAME to resample the audio to a lower sample rate.
VBR
One of the strong features of LAME is its implementation of VBR-encoding. You specify a quality parameter, and LAME will determine, for each piece of your file, the bitrate required to achieve this quality. VBR-encoding is activated by using the -V command, so lame -V 4 - %o. The parameter can range from 0 (highest quality and largest file) to 9 (lowest quality and smallest file). 4 is usually good enough for common music, and 2 produces audio that is hardly discernible from the original audio.
Tags
LAME can write an ID3 tag, containing fields like Artist and Title, if you supply it with the information to be put in the tag. Defining tags from the command line is done with --tx "value" pairs (note the double minus), where x defines the type of tag and "value" is the string to be saved. For example, lame -V 4 --tt "title" --ta "artist" --tl "album" --ty "year" --tc "comment" --tn "tracknumber" --tg "genre" - %o. Luckily, XMPlay can provide all these tags directly from the file using the same formatting as with track titles. This results in lame -V 4 --tt %1 --ta %2 --tl %3 --ty %4 --tn %5 --tg %6 --tc %7 - %o.
Note that LAME defaults to a ID3v1 tag, and will only add an ID3v2 tag if one of the fields is longer than v1 would allow.
More
lame --longhelp
The Helix MP3 encoder is created by RealNetworks, based on the code of the Xing encoder, and is currently open source (see the Helix Community). It is aimed at very fast encoding (it's roughly three times as fast as LAME) and prefers VBR (Variable Bitrate). Get the executable from RareWares. Put hmp3.exe in the same folder as xmplay.exe, you won't need the rest of the files. The default file extension is mp3 and the resolution is 16-bit.
Basic
The basic syntax for Helix is hmp3 input.wav output.mp3, to convert input.wav, a stereo PCM WAV-file, to output.mp3, the output MP3 file, with a bitrate of around 128 kbit/s. As with LAME, you should replace the input file with the stdin marker and the output file with the output field, so hmp3 - %o.
VBR
Helix can determine the bitrate required to compress a piece of audio based on a quality setting. VBR-encoding is on by default, but you can specify the quality with the -V command, so hmp3 -V80 - %o. The quality parameter can range from 0 (lowest quality and smallest file) up to 150 (highest quality and largest file). 80 is usually good enough . If you're going for high quality MP3s, you're probably better off with LAME, since that has been tested thoroughly.
High frequencies
Helix by default activates a 16 kHz lowpass filter. If you're annoyed by this, add the high frequency switch -HF2 to allow higher frequencies to be encoded as well, so hmp3 -V80 -HF2 - %o. This requires a VBR quality of at least 80, and will increase the bitrate of the output file.
MP3 TOC
When encoding with VBR, seeking becomes more difficult, because a number of bits does not always correspond to the same number of seconds. XMPlay knows how to handle this, but it's better to tell the encoder to include a sort of map in the output file. This is done by adding the header flag -X2 to the command line, so hmp3 -V80 -HF2 -X2 - %o.
Encoding speed
To reach the maximum encoding speed, you have to tell Helix to use SSE, a processor operation set. This is done by adding the optimization flag -U2 to the command line, so hmp3 -V80 -HF2 -X2 -U2 - %o.
Tags
The Helix MP3 encoder does not write tags. You'll have to apply the tags with an external program, for example Mp3tag.
More
hmp3 -h (though it's not that much...)
OggEnc2 is an open source Ogg Vorbis encoder based upon the official encoder by Xiph. Get the executable from the Support Site, or get a processor-specific version from RareWares. Put oggenc2.exe in the same folder as xmplay.exe. The default file extension is ogg.
Basic
The basic syntax for Oggenc2 is oggenc2 input.wav, to convert input.wav, a PCM WAV-file (multichannel as well), to input.ogg, the output Ogg Vorbis file, with a bitrate of around 128 kbit/s. To use this encoder with XMPlay, use oggenc2 - -o %o, with the stdin marker and the output field. Note that OggEnc2 needs the output file flag -o, otherwise it won't create an output file.
VBR
Ogg Vorbis is a VBR (Variable Bitrate) codec, so the encoder chooses a bitrate based on a quality setting. With the -q command, you can define a quality setting, so oggenc2 -q 4 - -o %o. The quality parameter can range from -1 (lowest quality and smallest file) to 10 (highest quality and largest file), and fractions are allowed. 4 is pretty good for common music, 9 will preserve pretty much anything you can hear. If you're trying to save disk space, be sure to try 0 as well.
Note that it is possible to specify a target bitrate using the -b flag (oggenc2 -b 256 - -o %o), but that just calculates the quality setting based on the sample rate and the number of channels.
Tags
OggEnc2 can write a Vorbis tag to the output file, containing fields like Artist and Title, if you supply it with the information to be put in the tag. With the various flags, this results in oggenc2 -q 4 -t "title" -a "artist" -l "album" -d "date" -N "tracknumber" -G "genre" -c "comment". To have XMPlay supply the encoder with these tags, use the same formatting as with track titles, so oggenc2 -q 4 -t %1 -a %2 -l %3 -d %4 -N %5 -G %6 -c %7 - -o %o.
More
oggenc2 -h
NeroAacEnc is an AAC encoder built by Nero AG, which outputs files in the MP4 format. Get the executable from the Nero website and put neroAacEnc.exe (from the Win32 folder) in the same folder as xmplay.exe. The rest of the files are not required. The default file extension is m4a and the resolution is 32-bit. Note that mp4 and acc work as well for the extension, and XMPlay supports all of them with xmp-aac. (In reality the encoder puts the AAC audio stream in an MPEG4 box, which can appear with the extension mp4 or m4a, with the latter containing only an audio stream.)
Basic
The basic syntax for neroAacEnc is neroAacEnc -if input.wav -of output.m4a, to convert input.wav, a PCM WAV-file, to output.m4a, the output MA4 file with an AAC audio track with a bitrate of around 175 kbit/s. Replace the input file and the output file with the stdin marker and the output field respectively to use this encoder with XMPlay, so neroAacEnc -if - -of %o.
VBR
The AAC audio in the output MP4 file can be VBR (Variable Bitrate), so the encoder can choose a bitrate based on the requested compression quality. You can select a quality with the -q command, so neroAacEnc -q 40 -if - -of %o. The quality setting can range from 0 (lowest quality and smallest output file) up to 150 (highest quality and largest output file). Generally a setting of 40 should be good enough for common music.
Profiles
AAC has various profiles (see MPEG-4 Part 3 on Wikipedia for more info). The Nero encoder can create audio using three different profiles: Low Complexity (LC), High Efficiency (HE, is LC with SBR) and High Efficiency v2 (HEv2, is LC with SBR and PS). The encoder selects the profile best matching your quality setting (e.g. a low quality setting activates the HEv2 profile), but you can also force the profiles using the -lc, -he or -hev2 commands respectively, so neroAacEnc -q 40 -hev2 -if - -of %o. If you're trying to save disk space, give the HEv2 profile a try. XMPlay can decode all three profiles with xmp-aac. Mobile phones usually support all three profiles, but other (hardware or software) decoders might not.
Tags
The Nero AAC encoder does not write tags. You'll have to apply the tags with an external program, for example Mp3tag.
More
neroAacEnc -help
FLAC is the reference Free Lossless Audio Codec encoder. Get the executable from the Support Site or from Rarewares and put flac.exe in the same folder as xmplay.exe. You don't need the rest of the files or sources to encode FLAC files. The default extension is flac, but ogg is possible as well (producing Ogg FLAC files). The resolution is 24-bit.
Basic
The basic syntax for FLAC is flac input.wav -o output.flac, converting the input PCM WAV-file input.wav losslessly to the output FLAC file output.flac. To use the encoder with XMPlay, set it to use stdin and specify the output field, so flac - -o %o.
Compression
The FLAC format is lossless, so it's not possible to select a certain bitrate. What can be selected is the amount of time the encoder spends in trying to compress the data, ranging from -0 (fastest encoding and largest file) to -8 (slowest encoding and smallest file). -5 is the default setting, so flac -5 - -o %o.
Tags
FLAC can write FLAC tags to the output file, but you have to define both the field names and the information they should contain. Using the same formatting as for track titles, this creates the encoder command-line flac -5 --tag=title=%1 --tag=artist=%2 --tag=album=%3 --tag=year=%4 --tag=track=%5 --tag=genre=%6 --tag=comment=%7 - -o %o.
More
flac -h or, with even more detailed information, flac --explain.
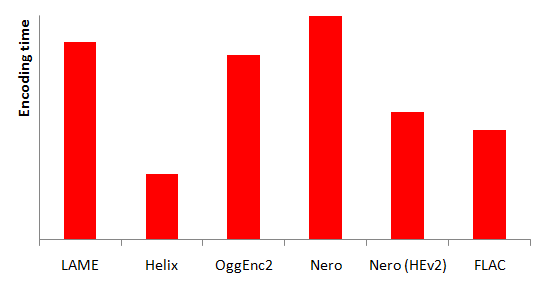
In the graph below is the encoding time for a small set of audio files, just to give you an indication .
XMPlay can tune in to internet radio streams, so you can listen to music mixed on the other side of the world. With some additional software, XMPlay can also stream your music to your own listeners, so you have your own internet radio station. In that case, XMPlay generates a compressed audio stream, sends it to a server, and then the server sends it off to your listeners.
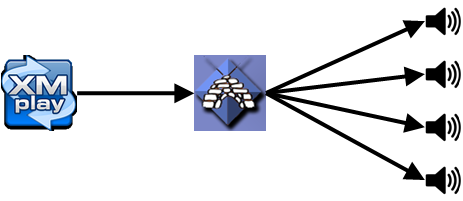
All the audio stuff is handled by XMPlay, and all things considering streaming it to your listeners is handled by the server, Icecast in the case of this article. The server does not need to be running on the same machine (it could also be on another machine you have, or on a machine on the other side of the world), and the server can serve multiple different streams. You should set up the server first, and then have XMPlay connect to it via a plugin.
Note that broadcasting music to the public will require appropriate licenses, since most music is covered by copyright. Respect the artists who make the music you like!
Icecast is an open-source media server platform. Get the Icecast server from Icecast.org, the official site from Xiph. Download and install the Win32 version of the Icecast server. You do not have to install it as a Windows service, but you can choose to. Start the server executable (Icecast2win.exe or Icecast2 Win32 in your Start menu), and you'll be presented with the main server interface.
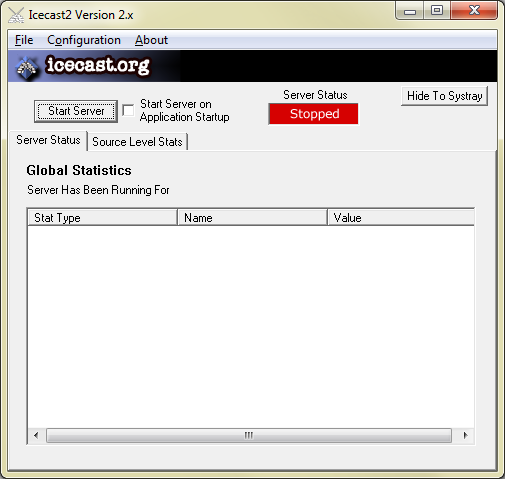
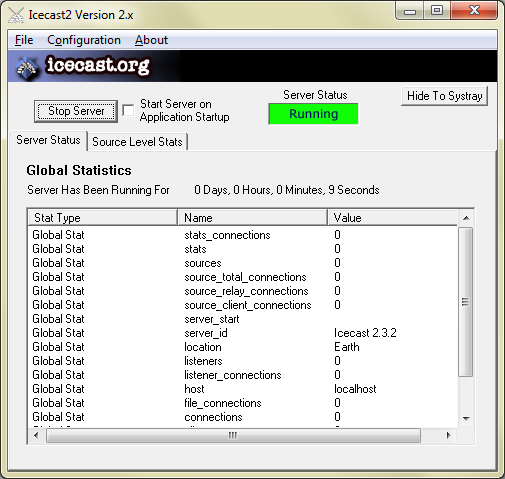
As you can see, the server is currently stopped. Open the Configuration menu and click Edit configuration. This will launch Notepad to edit the Icecast server configuration file, icecast.xml. You can keep most of the settings the same (perhaps increase the maximum number of allowed source streams from 2 to 8 if you plan on running multiple streams), but you really should change the passwords. Note that if you're running on a limited account, Notepad may not have sufficient privileges to save the configuration file directly to the Program Files directory, so you'll have to move the new file manually (save it somewhere else and copy it back to the appropriate folder with Explorer). Hit the Start server button, and the Hide to Systray to move the window out of the way. If you get a server startup error, this probably means the port you've chosen to run the server from is already in use, so you should change that in the server configuration file.
Note that Icecast will have to be able to accept incoming connections, so you should configure your firewall as such. If you're planning to stream to listeners via the Internet, you may also have to forward the port you've chosen from your router to your server.
Icecast can obviously do a whole lot more, like stream relaying, listener authentication and serving HTML from the built-in webserver. Xiph has put the whole documentation for the Icecast server online at Icecast.org.
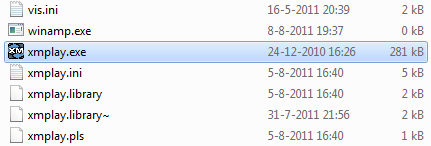
Now point the installer to your XMPlay directory and let it extract its files, including the Ogg Vorbis encoder. It'll place a bunch of encoder files next to XMPlay's executable (bass.dll, libFLAC.dll, libOggFLAC.dll, ogg.dll, pthreadVSE.dll and vorbis.dll) and the plugin into your plugins directory (dsp_edcast.dll). Perfect! You'll probably be wanting to stream in the MP3 format as well, so download LAME (from the Support Site or from Rarewares) and put lame_enc.dll next to xmplay.exe. If you'd like to stream in AAC, get the FAAC encoder (for example from Rarewares) and place libfaac.dll next to the other files.
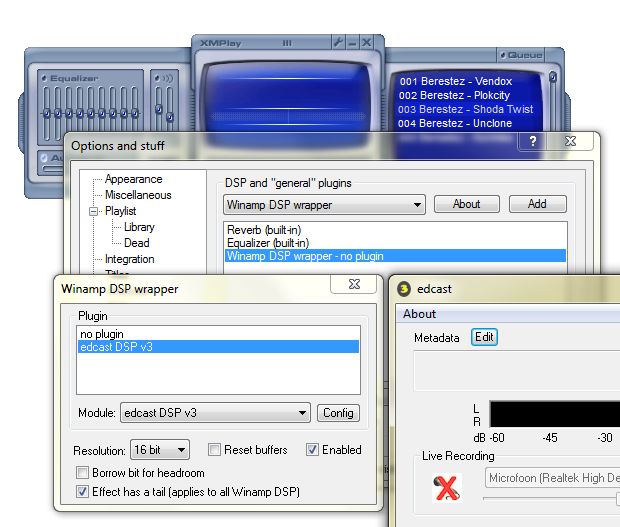
Start XMPlay, open Options and stuff and go to the Plugins page. From the dropdown box, select Winamp DSP wrapper and click the Add button. Select the wrapper in the list and click Config. Tick Enabled and select Edcast DSP v3. This will instantly open the configuration window of Edcast itself.
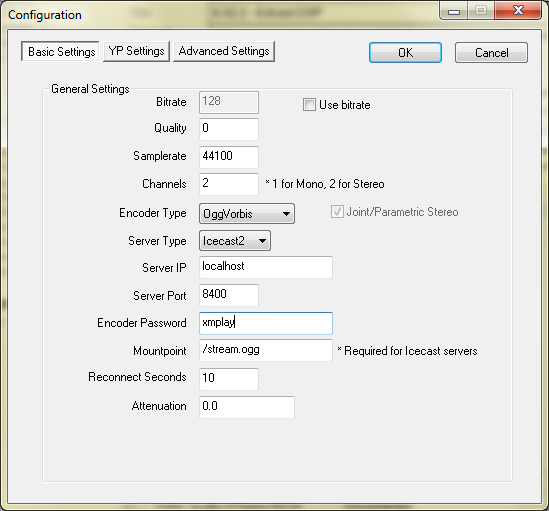
In the Edcast window, click Add Encoder to add a new encoder with default settings. Double-click the encoder in the list to edit its settings. Configure it to connect to the Icecast server you've set up before. In this example, the server runs on the same machine (Server IP is localhost) on Port 8400, and the Encoder password is xmplay. Check your icecast.xml if you've forgotten the values you've used. Be sure to set the Mountpoint to the correct format, stream.ogg in this case.
Click YP settings, untick Public and change the server name (which is what'll be displayed in the playlist of your listeners). Then hit OK to close the encoder configuration window. Now select the encoder in the list and click Connect to have the plugin connect to your Icecast server, it'll display Connected behind the encoder. Start playing a file in XMPlay to have Edcast start the stream.
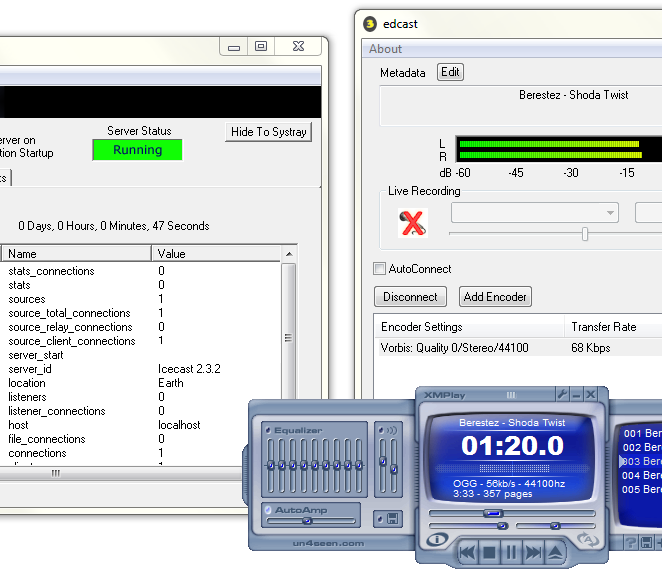
As you can see, Edcast is encoding the audio into a Ogg Vorbis audio stream. The title gets updated with the title provided by XMPlay, and the encoded audio is sent off to the Icecast server. You can now connect another player to your stream to listen to it. Direct your browser to http://serverip:port/status.xsl (http://localhost:8400/status.xsl in this case) and click M3U at the top right, or just point your player directly to http://serverip:port/mountpoint (http://localhost:8400/stream.ogg in this case).
The variant with an MP3 stream is very similar. Just change the Encoder type from Ogg Vorbis to MP3 LAME and set the Mountpoint to stream.mp3. Now even Windows Media Player is able to tune in!