In this chapter, all available options of XMPlay will be explained in-depth.
Track looping
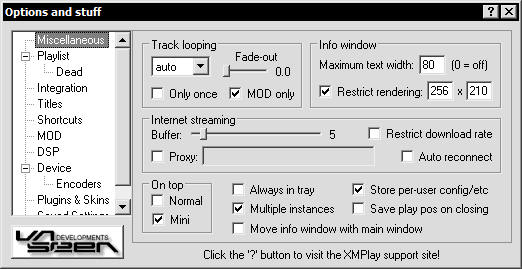
The track looping options are as follows:
- Never - Tracks will not loop.
- Auto - Tracks will only loop if their ending is not silent.
- Always - Tracks will always loop. You have to change tracks manually then.
- Only once - Tracks will loop only once, even if "Always loop" is enabled.
- MOD only - Only apply Auto-looping to modules.
- Fade-out (modules only) - If a module is intended to loop at some point, you can set the fade-out slider to the number of times that a module should loop before XMPlay fades the song out and advances to the next track (0.0 = infinitely).
Tip: Auto-looping may cause unwanted behaviour if you frequently listen to DJ sets or albums in which songs fade into each other. In this case, enable the option "MOD only".
Info Window
The maximum text width sets the number of characters that will be in the Info Window before wrapping to the next line.
Restrict rendering applies to the Vis window - some Visuals behave strangely or even crash XMPlay if they are displayed at resolutions higher than 256 x 210, which was the fixed size of Sonique's Vis window.
- Enabling this will render the Visuals at the given resolution and stretch them to fit into the Vis window.
- Disabling the option will try to render the visuals with the optimal resolution.
Internet Streaming
- Buffer - How many seconds of a stream must be buffered before playback starts.
- Restrict download rate - restricts the download rate for streams to a reasonable rate to ensure further streaming, saving bandwidth.
- Proxy - If you need to define a HTTP proxy, you can set it here.
- Auto reconnect - Reconnects to a stream if disconnected.
On top
Here you can set, at which modes XMPlay will appear in front of all other windows.
Other options
- Always in tray - Set this if yout want XMPlay always to minimize to the tray, not just when right-clicking the Minimize button.
- Multiple instances - Enable this to allow running multiple instances of XMPlay at the same time, disable to keep only one XMPlay open at a time.
- Move info window with main window - Enable this to make the Info window move when you move the main window and disable it to move both windows seperately.
- Store per-user config/etc - Enable this to write all XMPlay settings to Windows' Users directory (e.g. C:\Documents and Settings\Administrator\…). Disable it to write everything into the XMPlay directory.
- Save play pos on closing - Enable this if you want XMPlay always to behave as if you right-clicked the Close button. Upon starting, XMPlay will continue playing where you stopped.
Tip: Even if you have "Move info window with main window" enabled or disabled, you can invoke the opposite behaviour "on the fly": while dragging one of the windows around, click the right mouse button. The other window will now be detached or attached respectively.
List advancing
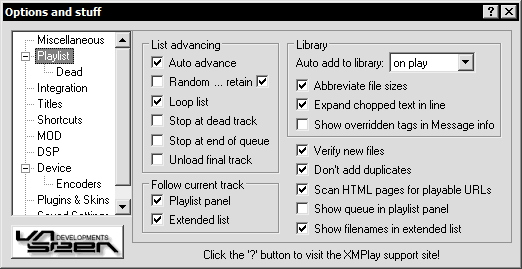
- Auto advance - Set whether the playlist automatically plays the next track after the last one has finished.
- Random - Play all tracks in random order.
- … retain - XMPlay will remember which tracks have already been played when you close it, so if you pick up random playing, it doesn't start from the beginning again.
- Loop list - Start at the top of the playlist if the last track has been played.
- Stop at dead track - Stop playback when a dead track is encountered.
- Stop at end of queue - Stop, once the end of a queue has been reached.
- Unload final track - if the last track has been played (and list looping is not active), unload the file, so it can be edited, renamed, moved etc.
Library
- Auto add to library - Determine, when XMPlay should add tracks to the library.
- Abbreviate file sizes - Display file sizes as "1 MB" rather than "1024 KB".
- Expand chopped text in line - If a song title is to long to display, you can hover it to be fully shown. If this option is enabled, it's text field will expand onto the neighboring columns. If disabled, a bubble tooltip will be shown instead.
- Show overridden tags in Message info - if you have overridden any song tags via the file information window, these will be displayed in the library, too.
Follow current track
This option makes the selected playlists auto-scroll to center the currently playing track.
Other options
- Verify new files - All files will be checked for playability before loading. Contents of directories are always checked, whereas URLs will never be checked.
- Don't add duplicates - When you try to add a track to the playlist that is already there, it will just be selected and not be added a second time.
- Scan HTML pages for playable URLs - This makes XMPlay scan websites for links to playable files, which it then adds to the playlist.
- Show queue in playlist panel - This shows only queued tracks in the playlist panel. This option is the same as clicking the "Queue" button on the playlist panel.
- Show filenames in extended list - If enabled, the extended playlist will display the filenames instead of their formatted titles.
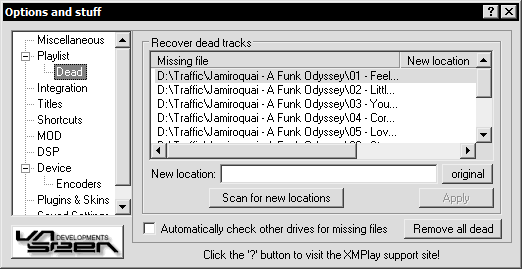
If XMPlay encounters any file that it can't find, it will be displayed here. You can then enter a new location for every file by hand, or let XMPlay scan for new locations.
Pressing the "original" button will enter the filename of the dead files into the editing field next to it, so you can change the directory more easily if you just moved the file.
If you frequently use removable drives which contain your music, XMPlay might mark tracks as dead which are on one of these drives. Ticking the "Automatically check other drives for missing files" option will make XMPlay search on removable drives (CD, DVD, USB/Firewire devices) as well. The "Remove all dead" button removes all dead tracks from the playlist or library.
Recovering dead tracks
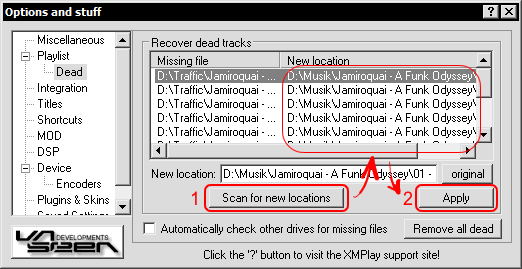
First, press the "Scan for new locations" button. A dialog will pop up where you can select a directory to scan in. Enabling the "Subdirectories" option on that dialog will scan in subdirectories as well, increasing your chance of finding the missing files. After XMPlay finishes it's search (and the files are found), click the Apply button.
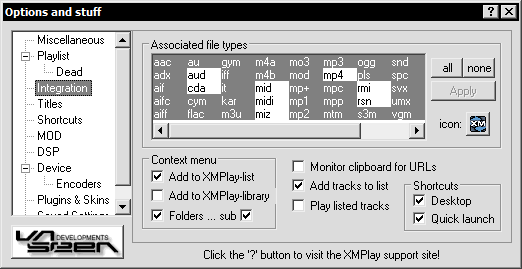
Associated file types
Selecting an extension in this list will set XMPlay as default player for this filetype. The buttons on the side let you select either all or no extensions. After you're done selecting, press Apply.
You can also select an icon that will be used to display all files that are associated with XMPlay.
Context menu
- Add to XMPlay-list - Adds a context menu item to all playable files in Windows Explorer, to add the files to the playlist.
- Add to XMPlay-library - same as above, only files will be added to the library instead of the playlist.
- Folders - Adds the "add" option to folders.
- … sub - Sets whether subdirectories will be searched, too if you add directories to XMPlay. This also applies when adding folders via Drag'n Drop or the command line.
Other options
- Monitor clipboard for URLs - XMPlay can monitor the clipboard for URLs of playable files, which it will automatically play or add to the playlist. When you see a playable file on a webpage, simply right-click and "Copy Shortcut" to have XMPlay stream it.
- Add tracks to list - If enabled, tracks opened from Windows Explorer or the clipboard are only added to the playlist, without clearing the list first. The same thing is done when using the "Add to XMPlay-list" option (right-click on the file in Explorer).
- … and play - Enabling the "and play" option will result in the newly listed tracks also being played.
Shortcuts
Here you can select where you want to have shortcuts to XMPlay. Enable to add a shortcut, disable to remove it.
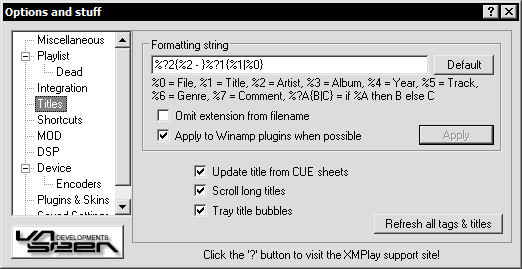
Formatting string
This string works similar to a regular expression (which you will be familiar with if you are a programmer). Some formats don't have tags, eg. MOD formats just have a title "tag". This could make the titles messy when elements are not available, if it wasn't for the fact that the formatting can vary depending on what tags are available.
For example, the default formatting is: %?2{%2 - }%?1{%1|%0}
This means if the artist tag (%2) is present, use that and place " - " after it. Then, if the title tag (%1) is present, add that, otherwise add the filename (%0).
- Omit extensions from filename - Don't display the file extension, if the "filename" tag is being displayed.
- Apply to Winamp plugins when possible - If input plugins that were originally written for Winamp support title information, try to apply the formatting string to them, too.
Other options
- Update title from CUE sheets - If a CUE sheet contains title information about a track, use this instead of the actual file tags.
- Scroll long titles - Track titles that are too long to fit into the main window title display will scroll from right to left if this option is enabled.
- Tray title bubbles - If XMPlay is minimized to the Tray, it shows the song title in a bubble when the track changes. Uncheck this option to disable this.
- Refresh all tags & titles - This option makes XMPlay rescan the tags/titles for all tracks, both in the playlist and the library.
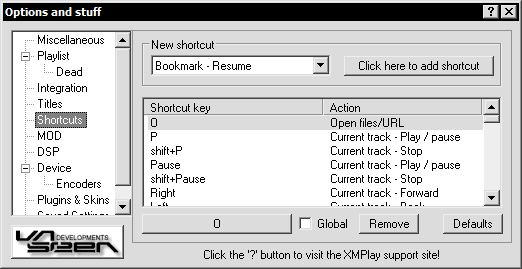
Here you can fully customize how you control XMPlay via the keyboard.
Multiple keys can be assinged to perform the same action, likewise multiple actions can be assigned to a single key. When multiple actions are assigned to a single key, they are performed in the order that they were added.
As an example, you could assign a key to select all search matches, invert the selection, and delete selected tracks. That'd leave you with just the search matches left in the list.
Tip: When changing the volume/amplification/EQ/reverb through shortcuts, a help bubble will appear on the mouse pointer to indicate the new value.
- Global - This allows the shortcut to be used from within other applications (i.e. without XMPlay being in focus).
- Defaults - Resets all shortcuts back to the defaults as when XMPlay is first run.
A list of all default shortcuts can be found here.
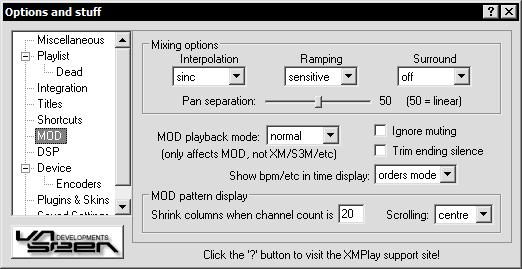
These options only affect MOD file formats (MO3/XM/IT/etc).
Mixing options
- Interpolation - "Linear" interpolation draws a straight line between the samples, "Sinc" interpolation draws a smooth curve between the samples and requires more CPU power.
Linear interpolation gives decent sound quality with minimal cpu usage.
Sinc interpolation has, as a result of its complexity, far higher sound quality, with the price of higher cpu usage.
Interpolation can also be disabled. This is useful for older module's to provide a crisper sound.
- Ramping - Ramping makes volume and panning changes smoother so that sudden large volume/panning changes do not cause any "clicking" in the sound. It also fades-in (very quickly) new samples so that there is no click from them. Sensitive ramping only performs the fade-in when it's neccessary to prevent a click, so percussive sounds stay sharp.
- Surround - "Mode 2" ignores panning, so is particularly good for mono MODs.
- Pan separation - The higher the setting, the more sounds are pushed away from center. Obviously can only affect things when playing in stereo.
Other options
MOD playback - decides how MOD files should be played.
- FT2 MOD = FT2 plays MODs slightly differently from the convention, infact most trackers play MODs differently from eachother! Anyway, if you want to hear MOD files as FT2 plays them, then select this.
- PT1 MOD = This plays MODs as the original ProTracker did, so now you can relive those early Amiga days!
Here's what the other options do:
- Ignore muting - Ignores muting commands in modules.
- Trim ending silence - If there is any silent space at the end of a track, it will not be played. Instead XMPlay will jump to the next track, assuming there is more than one track in the list, and looping is not on.
- Show bpm/etc in time display - This option determines when, if at all, the number of active channels and bpm/speed are shown in the time display.
When enabled, the active channel count is shown to the left, and the bpm/speed is shown to the right. The channel count will be inverted if any virtual channels have been killed within the last few seconds (Due to excess CPU use).
MOD pattern display
- Shrink columns when channel count is XX - When there are a lot of channels, the MOD pattern display can become too wide for the screen.
This option will cause the instrument/volume column to be removed when there are a certain number of channels, so that more channels can be fitted on screen.
- MOD pattern scrolling - The pattern display can have the current position centered, or it can follow as the position goes off the display.
The response speed to all these options is dependant on the buffer size, the delay will be the length of the buffer chosen in the device setup.
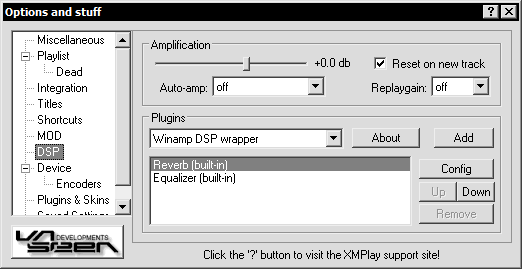
- Amplification slider - This is different to the volume slider. The volume slider controls the level of the sound card output, the amplification slider controls the level of the actual decoding. The higher the amplification, the greater the dynamic range of the decoding output, but if it's too high clipping may occur resulting in distortion of the sound.
- Auto-amp - This causes the amplification level to be automatically reduced whenever clipping occurs. With fade-in enabled, it will fade-in new tracks until they clip, then it'll behave the same as normal. Dynamic mode continues to increase and decrease the amplification level throughout playback.
- Reset on new track - Resets the amp level when a track is loaded.
- Replaygain - When a track has "replaygain" information, XMPlay can use it for the default amp level. XMPlay can read RG information from OGG files and APEv2 and ID3v2 tags. Native plugins may also support it, but Winamp plugins have no way of communicating that information.
When a track doesn't have the preferred value but does have the other (eg. "Album" is chosen but only "Track" is available), it'll be used instead.
The bottom part of the window is dedicated to DSP plugins. The "up" and "down" buttons can be used to change the order in which the DSP are applied. This DSP list also allows for multiple DSPs to be active at once, in whatever order the user chooses. There are 2 built in DSPs - the equalizer and reverb. Most Winamp DSP plugins can be used via the "Winamp DSP wrapper". You can create your own plugins by using the SDK available from the XMPlay website.
How to set up a DSP
Once a DSP plugin has been installed it then has to be setup within XMPlay. In this example we will be setting up the iZotope Ozone DSP.
-
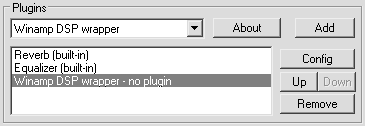
Once installation is complete, start XMPlay and proceed to the Options dialog. Under the DSP option you will find the Winamp DSP wrapper listed, press Add and double click the new "Winamp DSP wrapper - no plugin" entry.
-
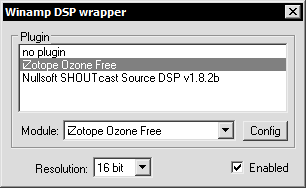
The DSP wrapper's config will appear, once the iZotope Ozone plugin is selected Ozone's Dialog will appear, and may be enabled to process audio via the check box in the same dialog.
Tip: Most DSP plugins need the Resolution left at 16 bit. It is also recommended that you are not playing music during the DSP setup.
- The Ozone DSP will now be functioning with XMPlay. Close the DSP Wrapper's Configuration window to continue.
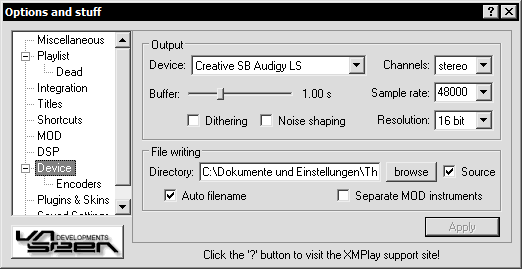
Output
You can change which device (if you have multiple devices) to use, and what frequency, resolution, channels and buffer to use with the device. If the chosen device is not available then a free device will automatically be used instead, if there is one available.
You may also choose the "WAV Writer" device, to write the output to WAV files rather than a soundcard. External encoders ("External - ?") can also be used to write compressed audio files, eg. MP3 or OGG. See the next part: "setting up external decoders" for details.
The amplification slider on the "DSP" section controls the volume level of the WAV. Be careful not to use a too high amplification level as this may result in samples being clipped. You can avoid any amplification problems by using the "WAV Writer - normalized" device.
If the device does not support the settings you chose, XMPlay will use the closest settings that the device does support. When a track's sample rate is not supported by the device, XMPlay will automatically down-sample it to a rate that is supported.
Tip: If looping is enabled while using a writer device, the track will be looped only once in the written file, even if the "Only once" switch is not on. The sample rate option only affects MOD formats. See the "Output" text in the "General" info window for the exact format of the output.
- Dither - Dithering is simply adding a low level white noise to the sound before it's converted (from floating-point) to the output resolution (8/16/24/32-bit). Adding noise may seem silly, but it actually effectively increases the resolution because it allows very low level signals to appear in the output that would not do otherwise (eg. they could have been rounded down to 0) - even though the noise level is higher than the low level signal, the brain can pick out the signal.
- Noise shaping - Noise shaping moves the noise generated by dithering to frequencies that the human ear is less sensitive to, so that it becomes less audible.
File writing
From here you can select the default destination when using a WAV Writer, or External Device. Dithering and noise-shaping are recommended when writing to disk (eg. to burn on CD), but noise shaping is not recommenced if you intend to process the written file (whenever possible, use 32-bit instead).
Tip: When writing to disk (including external encoder), 32-bit is standard IEEE754 floating-point ("type 3" WAV).
- Directory - This is the place where the written files will go.
- Source - Writes files to the same directory as the source files.
- Auto-filename - Enabling "auto filename" removes the need to select a filename when writing WAVs or using an external encoder. The files are written as the same name with the default extension added. Because no user interaction is required, writing is also continous in this mode - it automatically moves onto the next track when the current one ends (if the "auto advance" option is enabled).
- Seperate MOD instruments - With this option enabled XMPlay will individually write each MOD instrument to disk.
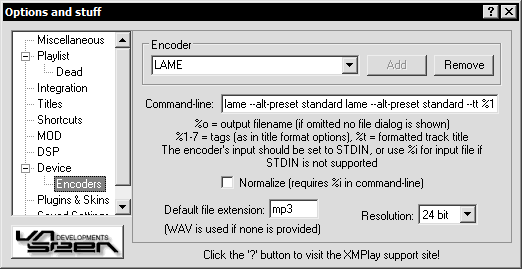
Here you can add/remove/edit the encoders available to the device list.
Any command-line encoder can be used, optionally using STDIN, so that no intermediate file writing is required. The resolution of the sample data sent to the encoder will be as set in the "Device" options above, unless it is overriden here. Settings for the LAME and OGGENC encoders are provided, to use them put the LAME.EXE or OGGENC.EXE file in the same directory as XMPlay.
- %i - A command-line tag used as the wav input source, please note this uses the two pass method of creating the wav then encoding the file and is much slower. Only use this command if the encoder in question does not support the STDIN command.
- %o - A command-line tag used as the output/destination, and should be placed where destination is required in the encoder's command line options.
- %1-7 - These are used for the different tags such as title and artist, the full list is shown below.
- %1 Title
- %2 Artist
- %3 Album
- %4 Year
- %5 Track
- %6 Genre
- %7 Comment
- %t - A command-line tag used as the track title, and should be placed where title/filename is required in the encoder's command line options.
- Normalize - This check box enables/disables volume normalization of the written file.
Tip: Normalization requires the %i source tag in the encoder command-line.
Adding an encoder
Once an encoder has been installed it must be configured. This is done by adding a command to XMPlay so it knows were and how to send the information, as well as settings on how to encode the file.
-
First enter the name for the encoder you are installing, this name is up to you. For example in this screenshot I have chosen LAME as the name, we then click the add button.

-
This command line is all that needs to be added, and is different for every encoder. To make this easier, examples of the command line and what each part means has been listed in the Encoders Settings section. Information about an individual encoder's commandline can usually be found in contained with the encoder as a txt file or in the encoder itself. Simple double clicking on the encoder in windows explorer will give a description with most encoders.

-
Don't forget to enter the extension of the encoded file. In this case "mp3" is the correct extension for this filetype. The "wav" extension will be used by default if this field is left empty.

This section also allows you to specify the resolution of the audio for each encoder instead of just accepting the current resolution selected.
- The encoder is now set up and ready for use.
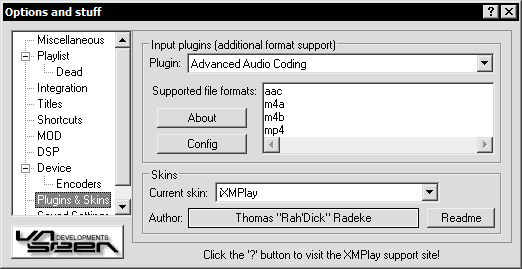
Input plugins (additional format support)
Here you can see which input plugins you have installed and which formats they support.
Clicking the "About" button brings up a dialog box with information over the current plugin.
Pressing the "Config" button brings up the plugin-specific configuration dialog, if it has one.
Skins
Here you have a list of currently installed skins. Selecting a skin loads it.
Clicking the "Author" button takes you to the skin author's website, if specified.
The "Readme" button brings up additional information about the skin, if the author has provided some.
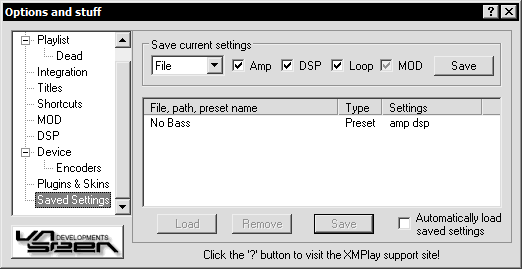
Amp/DSP/looping/MOD options can be saved, to be automatically applied when specific tracks are loaded, or saved as presets to be quickly set whenever wanted.
When saving settings, the settings that are actually saved is determined by the check boxes. The "MOD" box can have a greyed tick, which means that the MOD settings are only saved if the current track is a MOD format.
Tip: To save a default setting for all tracks, save your settings as a path and edit the path to "".
- Amp - This will set the amplification level and the auto-amp mode.
- DSP - This will configure of all DSP plugins that are currently available (In the DSP Plugins list).
- Loop - This will set all the track looping options (Miscellaneous options page).
- MOD - This will set all the MOD options page settings.
Before clicking "Save", you need to select what the settings will apply to. There are 3 types of saved settings - "File", "Path", "Preset".
The preset name or file/path of a saved settings can be edited by clicking on the entry in the list.
- File - This will save the settings for one file only.
-
Path - This will save the settings to be used by all songs in the path of the current track.
There is also no specific "default" setting, but a "" path setting can be used instead, as that will match all files.
-
Preset - This allows you to save a preset which can be loaded for any track at any time.
The saved settings can be accessed by right clicking the settings button (disk icon) in the Output Options panel.
When XMPlay tries to load settings for a track, it will first look for a "File" match. If there is none, it will look for a "Path" match. In the case of there being multiple path matches, the longest match will be used.
For example, both "c:\" and "c:\blah\" match "c:\blah\blob.mod", but the "c:\blah\" settings will be used.