Skins (156)
Visuals (115)
Input Plugins (34)
Output Plugins (6)
General Plugins (14)
Archive Readers (15)
Input Plugins (41)
DSP Plugins (10)
External Add-ons (16)
XMPlay Archive (71)
Skins (156)
Visuals (115)
Input Plugins (34)
Output Plugins (6)
General Plugins (14)
Archive Readers (15)
Input Plugins (41)
DSP Plugins (10)
External Add-ons (16)
XMPlay Archive (71)
This simple tutorial shows how to skin the main panel of XMPlay, but gives you the information necessary for a complete skin. For this you will need a paint program that allows you to assign the palette, such as Paint Shop Pro (any edition probably - I used an old 16-bit 3.11 version even).
Other suggestions of graphics applications that can do this would be nice, as well as any steps which you think should be emphazised.
Firstly we open up panel_main.bmp, this is the graphic that shows what we see.
You can make this look however you like, there are however some things that arn't possible.
The horizontal bars used for volume control, position indicator etc must be a flat horizontal line as shown in the default skin. (E.g. They cannot be vertical.)
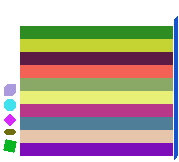
With the main panel I like to draw the entire layout of the skin, including the playlist and how the preferences panel fits into it. The below image shows how the playlist is locked into place with a small tab with an arrow indicating where the preferences are.
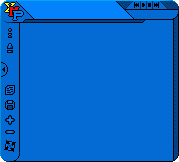
Once I decide thats the look I want I save the image for later (so for use when making the playlist and preference panels for example). And I delete all the bits thats arn't directly in the main panel image, while leaving gaps for the playlist and buttons.
We now save this back as panel_main.bmp and are now ready to make the mask to mark the position of buttons etc.
Now we mark out the areas of the bitmap where the buttons, sliders and displays are. You may find this easier to cut out the areas on the panel_main.bmp and delete the rest, so the buttons are lined up correctly.
This can be just done in paint and saved as mask_main.bmp.
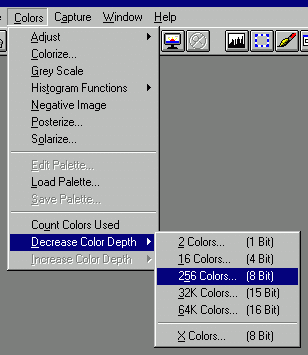
After opening it in Paint Shop Pro, we first reduce the number of colours in the image to 256, via the menu as shown below and press Ok to continue.
Now double click on the area indicated below to go into the color index, the index for each colour relates to the index in the text file accompanying the skinning kit.

So for example the title display of the main panel has an index of 2, so the area where the title is to be displayed will be colour with this indexed colour as shown in the picture. Do this for each area of the mask to indicate all the positions of the buttons, displays and sliders. Save the image back as mask_main.bmp.
Before this skin would be complete there must also be changes to the slider_horiz.bmp and button_pause.bmp to fit in with the new interface. Like so...
![]()
![]()
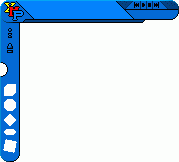
With that the main panel of XMPlay is now skinned, you can start XMPlay to see your handywork in action, change colours, sizes, types of fonts for the displays and lighting in the skinconfig.txt and ofcourse do the same for all the other panels. The following images are just an example of the playlist which would fit into this design.

![]()
Tip: If you are working on the mini-mode skin and use the "button_pause.bmp" instead of "button_pause_mini.bmp", the pause button mask *must* be the same size on both the main, and mini-mode's otherwise it will look incorrect.
Almost all Sonique Visual Plugins use a small file called "vis.ini" which is located in the XMPlay directory. These settings allow you to change the way a visuals works and is displayed.
The vis.ini file is only written to by a visual when XMPlay has been used at least once after the visuals installation. It should also be noted that visual settings are saved on exit of XMPlay which means any changes to the vis.ini while XMPlay is running will not be saved.
In this example we will show you how to edit these settings for the visual EdgeCrusher.
Navigate to the XMPlay directory (C:\Program Files\XMPlay for example.)
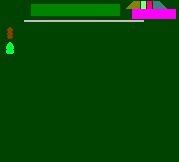
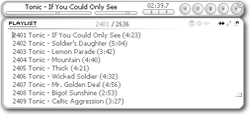
Double-click on the Vis file that is located there (as shown below), and it will open in notepad to show the settings currently available.

It is possible for many different settings to be in here, as it is used by almost all sonique visuals.
Here we can now see the settings for the various visual effect Edgecrusher is capable of.
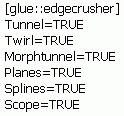
In this case they are simple true/false settings, while other visuals may allow integer values and colors. Be sure to read any available documentation that accompanies the visual before making any changes.
To make changes to the visual configuration first ensure XMPlay is not running and then alter any values to another valid value.
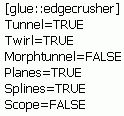
For example Number values, usually have a maximum/minimum shown in the visuals documentation, and True/False is easily changed as shown.
Save your changes and start XMPlay as normal to see the new settings take effect.
If you have any problems or require help on changing a specific visuals configuration please ask on the XMPlay forum.
The goal of this tutorial is to get XMPlay up and running using WINE under Linux. I'm using Ubuntu 6.10 "Edgy Eft" and WINE 0.9.30 for now and had some success getting XMPlay to play music.
If you know any tweaks that make XMPlay run more stable under WINE, let me know!
Open a terminal and type
fdisk -l
to find your Windows partition. It will probably be something like /dev/hda1.sudo mkdir /mnt/c
Then mount your NTFS partition in read-only mode to the directory you just created, like so:sudo mount /dev/hda1 /mnt/c/ -t ntfs -o nls=utf8,umask=0222
Now, you can access your files on your NTFS Windows partition via your Linux file manager (e.g. Nautilus, Konqueror, etc.) by navigating to /mnt/c.sudo nano /etc/fstab
This will open your file system table ("fstab") and allow you to edit drive associations. Add the following line:/dev/hda1 /mnt/c ntfs nls=utf8,umask=0222 0 0
Then press Ctrl+O to save (press Enter on the filename), Ctrl+X to quit, then reboot.More instructions on mounting/unmounting different file systems, see the Ubuntu Guide: How to mount...
winecfg
to get into the WINE configuration dialog. At the "drives" tab you can assign your mounted NTFS partition to a drive letter - this way you will be able to access your music from within XMPlay easier.Be sure to go to the "Audio" tab and check at least one device/driver, or you will have no sound!
After you're done configuring, close winecfg.
If you have configured everything, you can run XMPlay by typing
wine "/mnt/c/Program Files/XMPlay/xmplay.exe"
If the main window shows up, check the output devices in the Options & Stuff dialog. If you see a device like "dmix:0", select it. If you don't see any normal output device, try configuring WINE to use another audio driver.
If you're running XMPlay directly from a NTFS drive and don't have NTFS-3G (write support!) installed, be sure to check the "Store per-user config/etc" option on the Miscellaneous tab, or XMPlay won't save any configuration changes.
If XMPlay crashes during startup, try using a "virgin" copy of XMPlay with no additional plugins.
If you want to run XMPlay from your desktop without having to type the "sudo wine..." command every time, right-click on your desktop and chose "Create new launcher...". Chose "Terminal Application", enter "XMPlay" as name and use the whole "sudo wine ..." line from above as command. As icon, you can use this image, which I once created for dock-like applications.
This page provides some insight into some common tricks that you will see used in many XMPlay skins, either making them more useful or just look neat.
If you have a nice idea that you think would be great for this page send it to XMPlay Support.
Tip: If its nicely written out it will get on here a whole lot faster.
In this example we'll lock the playlist panel in place so as to make it a permanent feature of the main panel.
Firstly we open up panel_main.bmp, and note down the width of it.
Your playlist panel should be the same width as the main panel.
Although it doesn't have to be, it makes this much easier.
Now open your skinconfig.txt and edit the pos_right setting.
This setting has two numbers, the first must be the same as the width of your main panel and the second number should be 0.
E.g. pos_right = 100 0
Tip: Locking the left panel, or "options panel", is done the same way.
Save your changes to the skinconfig.txt and thats it.
Tip: When locking panels like this its a good idea to use the 255 mask on the playlist panel.
This makes it an extension of the main panel for moving XMPlay via the mouse.
In this example we'll make it so the left panel, or "options panel", slides out of the right side of XMPlay instead of the left.
Firstly we open up panel_main.bmp, and note down the width of it.
Your options panel should be at least double the width of the main panel if not more.
Now open your skinconfig.txt and edit the pos_right setting.
This setting has two numbers, the first must be the same as the width of your main panel. The second number shows how many pixels the panel will slide out, so change this as required (May take some trial and error).
E.g. pos_right = 100 50
Tip: Reversing the playlist panel is done the same way.
Save your changes to the skinconfig.txt and that's it.
This is a particularly hard trick to use, but looks great if you can pull it off.
Best way to show what it is, if for you to download the MMD3 skin and try it out. You'll notice when you enable or disable/enable any of the main panels options, although only the button itself is highlighted many areas are effected by the change.
Here we'll try to explain how that works.
Before you do anything there is one catch to using this. The button and the area it changes cannot overlap any other object mask area.
Here we'll show excerpts from 4 Bitmaps that come together to create this effect.
This is the button_loop.bmp

As you can see it is alot bigger than a normal button bmp as you also need to have the graphics for all the other areas you will change.
This is the mask_main.bmp

Here you can see the area we will click on, also there are two pixels off to the right marking out a rectangle to match the button_loop.bmp size. This will cause this whole area to change with the states of the button.
This is the panel_main.bmp

This is pretty normal, the only difference is the two transparent pixels to match those in the mask. This is to stop them from highlighting with the normal button area.
But does'nt that mean there is two transparant pixels in the middle of the skin?!
Yes, thats why the playlist panel is fixed in place underneath to fill in the blanks.
Like so: panel_list.bmp

And so you can see the playlist panel carries duplicate graphics to cover this up.
Tip: It's a good idea to have a 5 pixel buffer around the blank spot in the playlist panel, this stops the hole showing when the player is being moved.
And thats all there is to it, unfortunately there is no sample bitmaps for this at the moment.