Skins (156)
Visuals (115)
Input Plug-ins (34)
Output Plug-ins (6)
General Plug-ins (14)
Archive Reader (15)
Input Plug-ins (41)
DSP Plug-ins (10)
External Add-ons (16)
XMPlay Archive (71)
Skins (156)
Visuals (115)
Input Plug-ins (34)
Output Plug-ins (6)
General Plug-ins (14)
Archive Reader (15)
Input Plug-ins (41)
DSP Plug-ins (10)
External Add-ons (16)
XMPlay Archive (71)
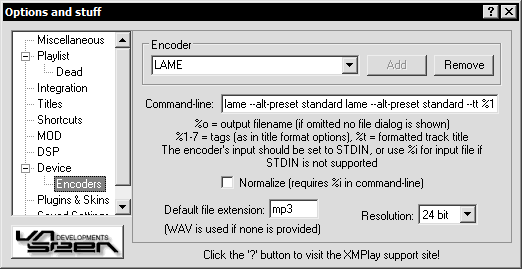
Here you can add/remove/edit the encoders available to the device list.
Any command-line encoder can be used, optionally using STDIN, so that no intermediate file writing is required. The resolution of the sample data sent to the encoder will be as set in the "Device" options above, unless it is overriden here. Settings for the LAME and OGGENC encoders are provided, to use them put the LAME.EXE or OGGENC.EXE file in the same directory as XMPlay.
Tip: Normalization requires the %i source tag in the encoder command-line.
Once an encoder has been installed it must be configured. This is done by adding a command to XMPlay so it knows were and how to send the information, as well as settings on how to encode the file.
First enter the name for the encoder you are installing, this name is up to you. For example in this screenshot I have chosen LAME as the name, we then click the add button.

This command line is all that needs to be added, and is different for every encoder. To make this easier, examples of the command line and what each part means has been listed in the Encoders Settings section. Information about an individual encoder's commandline can usually be found in contained with the encoder as a txt file or in the encoder itself. Simple double clicking on the encoder in windows explorer will give a description with most encoders.
![]()
Don't forget to enter the extension of the encoded file. In this case "mp3" is the correct extension for this filetype. The "wav" extension will be used by default if this field is left empty.
![]()
This section also allows you to specify the resolution of the audio for each encoder instead of just accepting the current resolution selected.