Skins (156)
Visuals (115)
Input Plugins (34)
Output Plugins (6)
General Plugins (14)
Archive Readers (15)
Input Plugins (41)
DSP Plugins (10)
External Add-ons (16)
XMPlay Archive (71)
Skins (156)
Visuals (115)
Input Plugins (34)
Output Plugins (6)
General Plugins (14)
Archive Readers (15)
Input Plugins (41)
DSP Plugins (10)
External Add-ons (16)
XMPlay Archive (71)
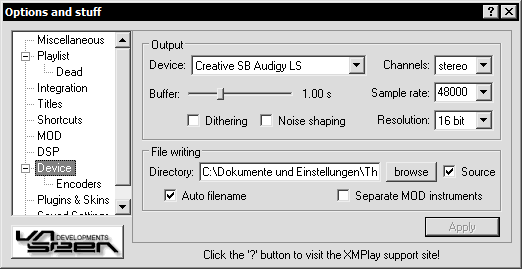
You can change which device (if you have multiple devices) to use, and what frequency, resolution, channels and buffer to use with the device. If the chosen device is not available then a free device will automatically be used instead, if there is one available.
You may also choose the "WAV Writer" device, to write the output to WAV files rather than a soundcard. External encoders ("External - ?") can also be used to write compressed audio files, eg. MP3 or OGG. See the next part: "setting up external decoders" for details.
The amplification slider on the "DSP" section controls the volume level of the WAV. Be careful not to use a too high amplification level as this may result in samples being clipped. You can avoid any amplification problems by using the "WAV Writer - normalized" device.
If the device does not support the settings you chose, XMPlay will use the closest settings that the device does support. When a track's sample rate is not supported by the device, XMPlay will automatically down-sample it to a rate that is supported.
Tip: If looping is enabled while using a writer device, the track will be looped only once in the written file, even if the "Only once" switch is not on. The sample rate option only affects MOD formats. See the "Output" text in the "General" info window for the exact format of the output.
From here you can select the default destination when using a WAV Writer, or External Device. Dithering and noise-shaping are recommended when writing to disk (eg. to burn on CD), but noise shaping is not recommenced if you intend to process the written file (whenever possible, use 32-bit instead).
Tip: When writing to disk (including external encoder), 32-bit is standard IEEE754 floating-point ("type 3" WAV).